Showing posts with label Repstrap. Show all posts

Monday, 9 May 2011

Bowden extruder configuration and final mechanical assembly

I have now reached the point of axis testing and calibration, all the mechanics are now working and hopefully apart from a bit of oil and adjustments I should have ScrewBallStrap running in the next few days.

This is the machine with the Full size build-bed, about 330mm x 480mm
I'm going to only use half of it for initial testing, this is easy as I just slide out one end and change the 20mm x 20mm supports to be smaller.

This will be the smaller build bed for testing the machine (slightly over A4 sized)

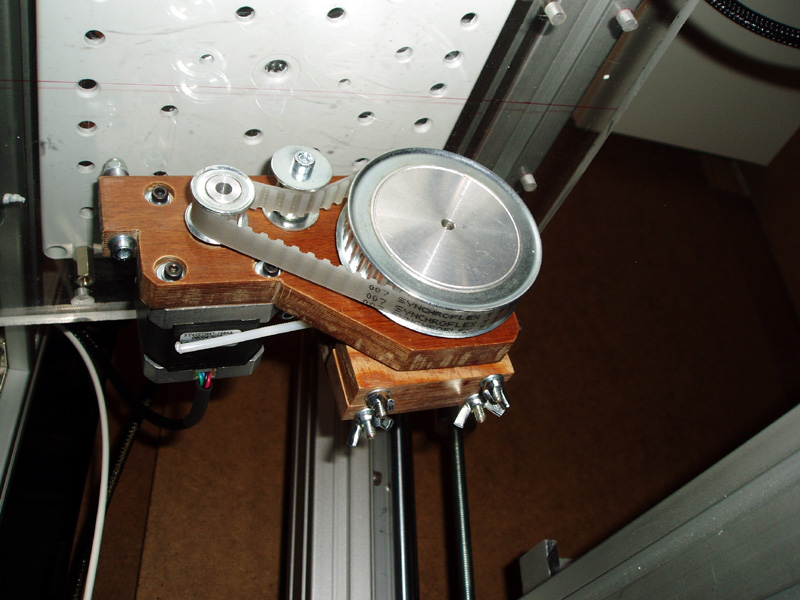
I have mounted the Bowden extruder on the underside of the electronics at an angle so I can keep the PTFE delivery tube as short as possible to the hot-end.

Side view makes it a little easier to understand - 
E = Electronics Box.
A = The Rubber isolation points, these provide vibration isolation and also allow the platform (B) to be angled.
B = 12mm Polycarb base.
C = Is the point where the filament enters the Extruder from the back of the machine.
D = The filament exits the extruder inside the PTFE deliver tube.

A back view of the same assembly.

More testing later and some updates to follow, it's getting close to printing now.

Rich.

Thursday, 17 March 2011

Hot-end for 1.75mm Filament (Push-fit Bowden)

My new push-fit 1.75mm Hot end is finished, it's based on similar designs like Adrian's new micro hot-end -

Here is how I made it -

I am a big fan of using off-the-shelf parts where possible in Reprapping, so using Pneumatic Push-fit connectors was an obvious choice for attaching the PTFE (bowden) tube to my extruder assembly.
The other standard part I always try to use is the metal rail mounts shown above. They work well as a clamp and  are low cost (£2 / $3) and easy to modify.
This 8mm mount above is manually tapped so I can screw in the Push-fit (1/8")

I'm using a simple Aluminium R/A piece to mount to my Repstrap, you could use something different to mount to Mendel, Prusa or Rapman machines.
10mm PEEK rod and block, 1.75mm Hot-end with 0.35mm Nozzle.

Turn down both ends of the PEEK rod (one 7.2mm and the other 8mm).
Then with a 4mm drill bore the barrel - the PEEK will expand and shrink so the hole will be undersized, but that's good.

Cut a length of 4mm (outer) PTFE tube.

Then you need to push the PTFE tube into the PEEK barrel, this is hard so taper the tube end with a pencil sharpener and force it in, you may need some PTFE spray to help this process.

Cut down the tube but make sure to allow both ends of the tube to compress slightly, one in the push-fit end and the other in the hot-end, you can tighten down the push-fit after it's all at temperature as the PTFE tube will elongate with temperature, you don't want any leaks.

Drill your PEEK block so it has the same spacing as the rail mount.

Drill your chosen mounting bracket.

Assemble with 55mm M4 bolts, washers and nuts, you can use a Nyloc nut at the top, it should not get hot enough to melt them.

You will need to tighten everything after it gets up to temperature for the first time, the PEEK will bend.

The other end of the PTFE tube is connected via a push-fit on the Extruder, so the 1.75mm filament can be driven down the tube to the hot-end.

I hope to have some examples of it running soon, I now have the last remaining Pololu stepper drivers, so I can start to wire-up the ScrewBall strap and get back to 3D printing (another 3D printer) !

Rich.

Tuesday, 11 January 2011

Homemade Delrin Nuts for Z Axis - first go at using my Lathe

So the Plan with the Z stage is now to use M8 Rod and make some Delrin Nuts for it to move up and down.
I will change over to M10 Trapezoidal leadscrews if this arrangement actually works.

Delrin Bar stock and M8 rods.

Not bad for a first stab at it? - Delrin seems easy to machine on the Lathe, much easier than Aluminium.
I don't need it to look pretty as it's going inside the Z framework.

Drill out a 6mm hole so I can hand-tap the M8 Thread.

Needs to be parted and cleaned up.

Hand Tapped and ready for ramming into the 30mm x 60mm Framework.

They line up with 10mm Holes drilled through the frame so the M8 rod can run up and down.
The Rectangular nature of the centre hole digs into the Delrin and stops it turning around.

M8 Rods cut to size and an 8mm Clamp and washer is used to translate the load onto the bearing.

This mount allows the bearing to rotate and fixes movement.

Seems to work well.


I has a small problem with my Flexible motor couplings. They were 6.35mm and the shafts of a NEMA17 motor are 5mm, so I used a section of 6mm Nylon tube and heated it in a kettle for 2 mins then forced it onto the motor shafts, giving a very snug fit on the coupling.

NEMA 17 Motor (one at each end)
Then Flexible Coupling.
M8 Rod
and Delrin nut inside the Frame Mount for the X Axis.

So the updated RepStrap V2.0 Machine now looks like this.

I need to make the Ballscrew mounts tomorrow, so more updates shortly. 

Rich.


Friday, 7 January 2011

Goals for RepStrap V2.0 Machine

My Design Aims for the RichRap RepStrap Version 2.0 Machine are - 
  • Faster print speed - (This is my main driving factor after having a slow Repstrap for 6 months).
  • Change to Ballscrews on X and Y Axis (not sure about Z at the moment).
  • Revised Electronics (Mega based - interim version for 2011, until I get my other set finished).
  • Integral Electronics Tray and wiring with reliable connectors.
  • Change from a fixed to Moving Y bed and print platform.
  • Remove the Gantry head arrangement for the Z axis - Need to think of a simple way to do this...
  • Simplify the Z axis by using dual Nema 17 motors (I may regret that decision...).
  • Increase build-area to 300mm x 450mm x 300mm (Y being easily changed from 100mm upwards).
  • Have easy-fit/remove build platform at different sizes and thickness.
  • Vertical mount Extruders.
  • Dual Extruder ends with remote mounts for Bowden mounted extruders
  • Switch to Herringbone Extruder Gears.
  • Filament coil store and supply feed for 2 reels built into the machine.
  • Heated bed.
  • Resistor block Hot-ends.
  • Multiple Thermistors / readings.
  • Use as many off-the-shelf components as possible.
  • Use the off-the-shelf parts to maintain quality and accuracy in the design.
  • Do the minimum amount of machining as possible. - But I may do some just for fun as I have a shabby Lathe and Band saw now.
  • Where I need to do machining then it needs to be non-critical or easily adjusted to retain quality.

I Intend to be inventive to keep costs down.

* I don't intend to use Belts in this model, but I have a long-term plan for a miniature design using belts instead of Ballscrews maybe directly after this one.

So why don't I just make a Mendel?
 - Well I like the thought of a machine I can build and design myself and I have learnt alot from the first attempt last summer.
And finally it should cost the same to update my RepStrap as it would to make a Mendel, so here we go!


First Z Motor Mount plate (50mm Alu Angle)

First parts of the new X stage, supported with 16mm Linear Bearings and a 30mm x 60mm Aluminum frame that will incorporate the Z vertical movement by using Delrin and leadscrews.


The above plan may sounds like this will be far away from the reprap project goals as it's still using Aluminum and machined components, but I intend that this machine will make it easier for me to develop real self replicating machines in the future. Also Aluminium is 100% recyclable so on that front it's not anti-reprap.

Rich.

Wednesday, 5 January 2011

New Tools for Christmas and a start on my RepStrap Overhaul.

Happy New Year Everyone.

I had some new Tools for Christmas and have finished restoring my old Lathe to working order so I'm going to start my planned upgrade of my RepStrap - This time around I'm going to make more notes (Eventually for the Reprap Wiki, I hope) make some design drawings and take lots of Photo's.

BandSaw for Christmas. – Now unpacked and Running.


More Aluminum MCS sections for a new design.

30 x 30mm Alu MCS Frame

30 x 30 and 30 x 60 Brackets.

30 x 60mm Alu MCS Frame

Received a set of Ballscrews and rails for a complete overhaul of my Repstrap, more pictures to follow.

I'm going to strip my current Repstrap later and start the rebuild tomorrow.

Rich.