Saturday 24 February 2018

Avoiding 3D Printing filament tangles & MasterSpool V4 update

Let's discuss the fear of 3D Printing filament tangles.
And how best to avoid them.

Before I bore you all to death with more MasterSpool related content, this is probable going to be my last post about the subject for quite a while. The project is in a good place, with users and manufacturers deciding to get involved. I want to see how it evolves, but more importantly I want to get back onto all my other projects, that got put on hold for the last few months.


This post is also an overview of the MasterSpool Version 4 update - see below and in the video.

Future projects - 
I'll have some new developments, machines, materials, projects and ideas to share with you in the coming months, I hope you continue to read, view and generally enjoy what I'm doing here with 3D Printing.

I'm trying hard to branch out and get involved with even more aspects of 3D printing this year.

Above is a sneak peek at one of the projects we did as a family for Valentines day 2018

Next time I'll have a number of Valentines projects I did with the whole family. It was really great fun exploring with 'mixed media' and getting everyone involved. 3D printing plays a big part, but it's just one of many processes we used for making valentine related useful objects. - more on that soon.

MasterSpool V4 - 

The one thing that the MasterSpool project has taught me it that quite a lot of people (that post comments on YouTube) have a lot of fears of things not working, failures and generally expect new things to probably be bad (and no use to them unless it saves them money!).

In the video I want to talk about MasterSpool V4 and also one of the last remaining fears people seem to have about using 3D printing filament from a refill system. - The almost irrational FEAR of tangles.

I seem to have spent just as much time talking about why it's okay to try out new things, and that it's going to be fine, as I have actually designing, using and talking about MasterSpool.

But in many ways, I guess that's to be expected - this is starting to disrupt things a little...


You can watch the video above - or over on YouTube in Full HD 
Please also subscribe to my channel if you would like more 3D printing content in the future, thanks.


V4 was driven from and for the community - thanks to everyone that has supported the open standard and provided feedback, advice and tested out the system.

First V4 test print using the BCN3D Sigma (0.4mm nozzle) and the LulzBot TAZ 6 (0.5mm nozzle)

One of the first modifications was to make V4 easier to print with bigger nozzles and chunky layer heights - the text on the spool has been modified to allow nozzles from 0.4mm to 1.2mm to be used.


First the three positions for the tie-wraps were opened up and cut into the side of the spool - this makes it much easier to fit and remove the refill coils.

Double sided 'velcro' straps can also be used.


You can use normal tie-wraps (zip-ties) or reusable tie-wraps as shown in the images above.

More 1.75mm filament end storage was added - now three locations around the spool. And the 2.85mm / 3mm clip was also modified to provide a spring hold of the end - allowing stacking without interference.


The sides of the spool were also flattened to allow bearing mount spool holders to work well.
Generally other rounded edges were also removes to speed up print time.


The label position is still in Version 4 - this seems to be quite a useful aspect to the refill spool system.

Many other smaller changes have also made the spool stronger and faster to print.

Print settings I use - 

18% infill using PLA or PETG
Two perimeters (with a 0.4mm or 0.5mm nozzle)
Hex infill patters (Slic3r)
0.2mm or 0.25mm layer height.
Small brim of 1.5mm
Magigoo on a PEI sheet

The second most asked question - 

Where Can I buy refill coils for MasterSpool - 

You can buy Refill filament coils from Das Filament in Germany (they do worldwide shipping) -
https://www.dasfilament.de/filament-refill/

I have no affiliation with Das Filament, the link is provided as people are constantly asking me where to buy MasterSpool coil refills from ! And be quick - they seem to sell out really fast after a new batch is added.

The third most asked question I get is about the filament refill coil dimensions, I have now added an overview and dimension PDF document to the V4 downloads - 


And Version 4 on Thingiverse - https://www.thingiverse.com/thing:2769823


Not bored of MasterSpool content? 
Then check out these other opinions from more makers here -

Tom has a great vlog on the Masterspool (V3, but it's still good fun to watch) -

3DMakerNoob has also been printing out MasterSpools with all his loos-ends - watch it here -

C.R.T also posted his video on the V3 MasterSpool - the same day I updated to V4 -

If you have any feedback at all, do leave a message, comment or discuss it with me over on Twitter. Feel free to use the hashtag #MasterSpool - I'll try to catch them for an update post in the future.


Thanks for reading, see you next time.

Rich.

Please join me on Twitter @RichRap3D

My profile and posts over on Google+

Files and designs shared on YouMagine

Files and designs shared on Thingiverse

Files and designs shared on GitHub

Files and designs shared on Repables 

My Youtube channel is here, all 3D Printing and Hi-Def video content.


Thursday 1 February 2018

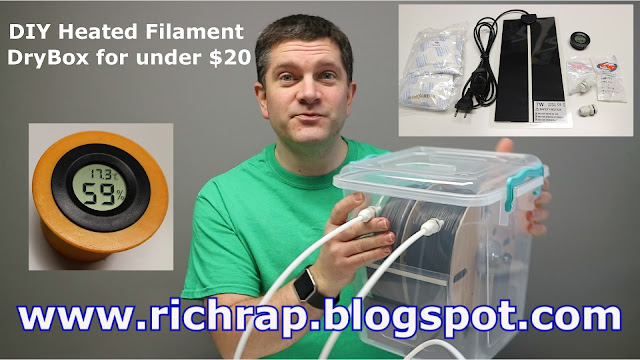
DIY Heated DryBox for 3D Printing filament - under $20

DIY Heated DryBox

In this blog post and Video I'm showing you how to make a simple heated drybox for your 3D printing filament that you can use whilst 3D Printing.


With just a few basic items from eBay (or similar) and some 3D design files to print (links at the bottom of this post) - you can make a drybox for both storage and in use while 3D printing.


An overview video of the heated drybox (including a #MasterSpool update) can be seen below and over on my Youtube channel here.


For an overview and background to this project, do take a look at the video, I'll dive straight into the main components in this blog post below - 

Polymaker Polybox - spotted at the recent TCT show.

During the TCT show in October last year, I had a chance to take a quick look at the Polymaker polybox. It's a neat enclosure, but I quickly realised that it is just an enclosure, that's all.

I pack all my filament in sealed zip-lock bags with desiccant. That's usually good enough for storage, but some materials do require drying or heating before use.

For some time I have been planning to build a dry heated storage box. 

Now that I know the Polybox just monitors temperature and humidity I decided to build my own, but with a heating capacity installed too.

It's surprising how simple it is to make a heated dry box with off-the-shelf components and a little 3D printing.

The polybox has a number of bearings that polymaker filament spools run on, I didn't want to do that because I use a lot more different types of materials, some use cardboard spools, and having the spool edges run on bearings, just creates cardboard fluff.

Other spools are very small (Taulman Nylon), they simply would not reach across the bearing points.

I decided to keep it simple and allow spools to be mounted on a standard sized spool mount. Different diameter mounts could then be printed as required.

As a minimum I wanted a box that would fit 2 x 1kg spools of filament and allow both to feed independently if required.

This one is a straightforward build - you should find it quite simple to print out the required 3D printed parts - assemble and make up the rest of the heated dry-box. Any questions - just ask.

The main component I used for heating is a simple flexible reptile heater - you can find these on eBay for just a few USD - Search for '15*28CM Adjustable Temperature Reptile Heating Heater Mat' 

The other main electronic component is the temperature and humidity monitor device, I opted for a round module, but you can get square and also ones with separate temperature sensing probes etc.


For the above temperature/Humidity sensor just search eBay for 'Mini LCD Celsius Digital Thermometer Hygrometer Temperature Humidity Meter Gauge'

Three 12mm cable glands make up the power in and dual filament out ports - just a simple 12mm hole will allow these to fit perfectly.

I bought a pack of 100 of  these way back in 2010 - so I have been finding uses for them ever since :)

Print out the 3D printed parts - I used FormFutura ReForm rPET filament for the above.

The printed spool holder uses a section of M8 threaded rod and two M8 nuts.

Lastly bags fg 50g desiccant can be fitted under the heater - they can easily be removed or changed at any time.


The reptile heater just slides in the grooves in the 3D printed parts.


Cable goes out of the back  of the box - allow yourself some slack cable so you can lift up the 3D printed parts to insert desiccant.

Optionally you can print out a seal for the lid - I made the above using ColorFabb nGen Flex - it has just the right level of flex, but not too floppy to easily seat onto the top of the box.


Fit the remaining two cable glands and use oversized tube to allow filament to feed out of your dry-box.

That's it. It uses 7w while being on, and does not take long to get to a stable ~30 Degrees C temperature - humidity will quite quickly drop to under 14%.

It's really useful for any type of dedicated support material - being able to be used while still inside the heated dry-box. It will also be great for Nylon, wood filaments, CF, PolySmooth and many other materials that are sensitive to moisture.

Bonus device - 

I also have a little bonus invention for monitoring your filament coils while they are in Zip-Lock-Bags - here is the SpoolCheck sensor.


It uses exactly the same thermistor and humidity sensor, and a small packet of desiccant as the heated dry box project.


Just pop it in the centre of any 'standard' filament spool (or a loaded MasterSpool ) - and pop it all in a zip-lock bag.


You basically end up with a way to monitor filament in storage, and see if any is not in tip-top-condition :)


Even overnight you should see a drop in humidity inside your 'drybag'

The files for both the heated drybox and the SpoolCheck sensor are up on -


Please do let me know if you make a heated drybox or find the SpoolCheck sensor useful - best to catch me on Twitter usually.


* Edit - ( for clarity and to answer a common question) -

I get a lot of questions about the dry-box project - the most common are -

Will this dry out my (damp) filament? - It's designed to keep good filament in good condition and stable for printing. It's not an oven, so I still recomend drying out materials like Nylon and PETG in an oven if they have been in the open for days. - Then use the heated dry box when you use the material on a print to stop the material getting saturated with moisture.

What would be a good % of moisture to look for on the hygrometer? (Or what's the best percentage figure) -

The % shown on the hygrometer is relative to temperature, so it's not the most ideal indication as we are also using a heater inside the enclosure. You will actually see the percentage rise up after switching on the heater, this is quite normal and to be expected.

What you are looking for is stability of the system - so for me that's around a display of 30 degrees C and a percentage of also around 30%

If you use the same sensor in a sealed bag with silica gel, and the temperature drops, and the silica gel takes moisture out of the internal atmosphere, you will see readings of room temperature and percentages of around 10% to 25% if you just leave the same sensor out on the shelf, you will see much higher readings depending on where you live and the ambient conditions.

Short answer is that the heated drybox is to keep things warm, dry and stable. so a reading of 30 degrees and 30% is really good, and it's all working well. An even lower percentage is even better, but it's more important to keep things consistent, this way every time you use the material you should get the same quality print results.


And some general info on the heated dry-box system and why I use it for consistent printing - 

It's all about consistency and stability - so I can tune a material for use, and then know it's going to use the same settings next time - without the material being in a different state / damp / temperature etc. - 

The silica gel is still doing some of the work for the heated dry-box. I’m just using the heater to help maintain stability and provide some consistency, warming the air inside to around 30 degrees C and regardless of room temperature changes, keep humidity shown below 30% @ 30 Degrees C.

For storage I don’t care so much about temperature – as long as the humidity is also showing a low measurement – at this time of the year (winter in the UK) I expect around ~18 degrees C and 10-20% humidity inside a sealed dry bag with a silica gel packet. Everything is around 14% right now for me.

Good -  
  • Stable temperature (not too high) and stable humidity (under 30%).
  • Temperature rising and the percentage of humidity being shown going down.
  • Temperature dropping and the percentage of humidity being shown going down or staying stable.
  • If temperature goes up, I don’t want to see the humidity also go up, stable is good, lowering is even better.
Bad –
  • Temperature rising and the percentage of humidity being shown also going up.
  • An ambient temperature of ~25 Degrees C and a humidity measurement of around 50%. In these conditions Nylon will absorb enough moisture (in 6-8 hours) to make the material almost useless for 3D printing – you will see steam coming from the nozzle, bubbles on the extruded material, frosting of the Nylon being extruded, weak printed parts and poor layer bonding.
Really bad –
  • Temperature lowering and the percentage of humidity being shown also going up.

* Edit


Thanks for reading, see you next time.

Rich.


Please join me on Twitter @RichRap3D

My profile and posts over on Google+

Files and designs shared on YouMagine

Files and designs shared on Thingiverse

Files and designs shared on GitHub

Files and designs shared on Repables 

My Youtube channel is here, all 3D Printing in Hi-Def video content.