Firstly if you are not exactly sure why Polycarbonate is worth investigating for 3D printing, take a look at the Wikipedia page, basically it's strong and impact resistant (It's used in the making of bullet proof glass) temperature resistant and luckily it is a thermoplastic so can be extruded (at the right temperature). It can be bent and formed while cold without cracking or deform and it is also very 'crystal' clear, but that's actually not so important for us as will become apparent below.
Don't confuse Polycarbonate with Acrylic or Plexi-glass, they shatter and crack, Polycarbonate tends to just bend and deform and after much effort will eventually stretch like very hard rubber until it eventually breaks.
It's a really amazing material, the 'diamond' of plastic, I was excited to test it out.
I have used sheet Polycarbonate for all sorts of things so I already had an idea of what to expect when thinking about extrusion.
- It has a high melting temperature (glass transition is about 150 Degrees C)
- It flows at around the 280 - 300 Degrees C point
- It is stiff so 3mm filament would have been a problem to coil and feed into the extruder
- It's hard so should work well in a Hobbed bolt filament transport system (geared extruder drive)
- I already had a new hot-end design that I was confident would work at 300 Degrees C


After changing my extruder Esteps and calibrating infill for 0.3mm layer height I started testing.


My first test was with the good old Pyramid model. Looking back I should have started with cubes or something requiring less extruder reversals, but it was a good test.
I was getting a small amount filament buckle in the cool-end, not a big issue, but extruder reversal needed tweaking a little.
Firstly I started at a reasonable speed of 30mm/sec print and 180mm/sec Travel.
Hot end at 280 Degrees C and the Heated bed set at 95 Degrees C
I was expecting warp and the extruder to jam, it didn't and printed ok.
I then printed again and lowered the temperature until it jammed up.
This was a really interesting failure mode !
It didn't do what I was expecting. Normally when you lower the temperature to work a lower limit eventually the hobbed bolt grinds through the filament and carves a chunk out of a single point and the teeth get all jammed up.
With the Polycarbonate it kept on driving the filament into a tightly packed block under the Hobbed bolt all around the spare space under the drive just before the opening, as the filament was still being driven I didn't even realise it until I started to see it bulge from under the hobbed bolt.

I didn't take a photo of it jammed up in the extruder, but here is it after extraction from the extruder, it's been stretched a little by me pulling it out, but you can see the failure mode really well.
And remember this filament is completely cold (room temperature) when it's doing this, amazing stuff!
That just told me that Polycarbonate is one of the best materials to use with Hobbed bolt transport and actually it can be extruded at a much lower temperature than I expected as long as you are not printing too fast- more on speed and temperature below -
I was reasonably surprised by printed Pyramid looking so 'snow-white' I had initially expected it to look clear, so I experimented with Speed and temperature for the next six Pyramids.
What I discovered was that the slower you print and the lower the temperature the 'whiter' the printed object.
Also lots of reversal moves gives the object a snow-white appearance.
Strength does not seem to be affected by the appearance or speed of printing or indeed temperature.
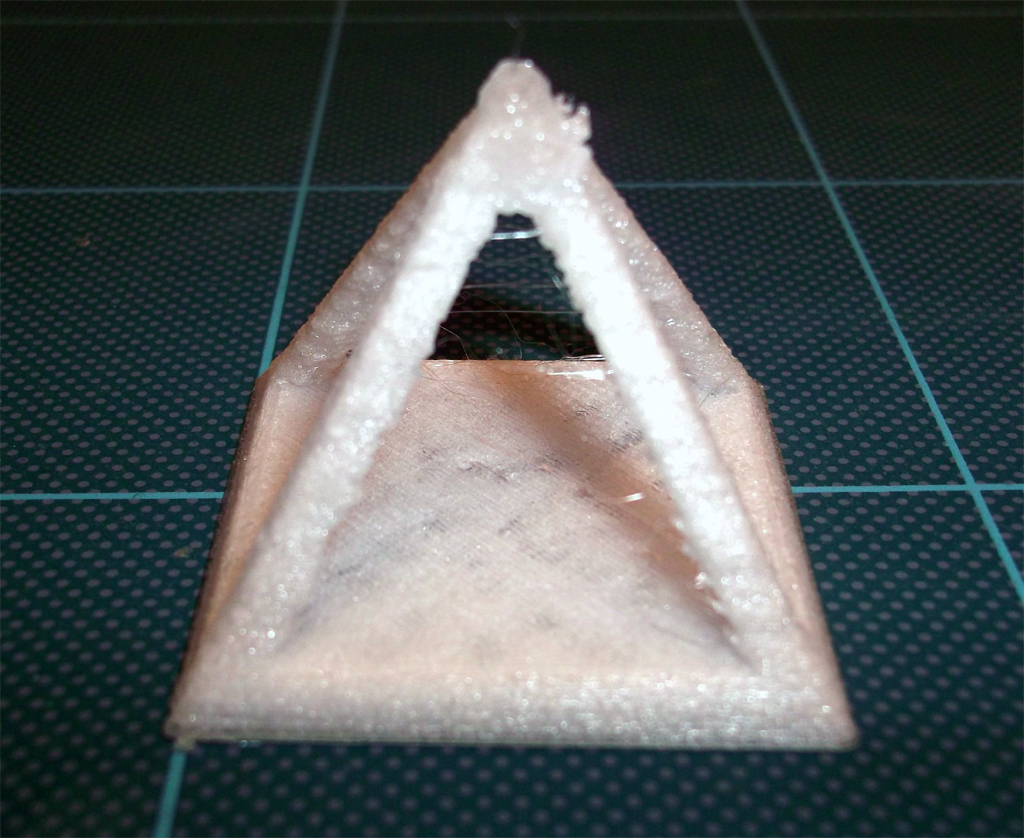
If you print hotter and faster the more clear the object becomes.
This Pyramid above was printed at 120mm/Sec and 305 degrees C, I don't think it's going to get much more transparent than this due to the many extruder reversals? That's my theory as the free-air extruded filament is clear so something is causing it to change, or maybe other factors like moisture are playing a part?

I pulled the hot filament out of the extruder to see what it looked like, you can see the filament is slightly buckled in the drive channel, this is due to the fact it's 1.6mm and my extruder is designed for 1.75mm filament, but not a big problem with this strong material.
What's really interesting is that the melted part is the same snow-white colour I can see in the printed object.
This needs more investigation, maybe I should to try to dry the filament to see if moisture is some of the cause to this? Anyone have any ideas?
Here is a short video showing Polycarbonate printing on Prusa Mendel, you can watch it below or in High Def on Youtube Here
Polycarbonate Printing

This should give you an idea of how strong Polycarbonate is, you can bend it when cold and even put a knot in it.
The video below shows Polycarbonate filament being bent, manipulated and tied to show strength and flexibility, you can also view this in High Def on Youtube Here
PC and PC-ABS Filament test
As a way to compare PC printing material take a look at the below videos showing PLA and ABS in the same manner. This is part of a wider material testing program I'm doing at the moment.
Further 3D Printing material test comparisons -

To give you an idea of how difference material handle, take a look at the videos below or on Youtube Here, where I bend twist and break some different filament types and supplies to see how they behave.
A range of PLA 3D printing plastic filament being bent and manipulated
A range of PLA 3D printing plastic filament being bent and manipulated
Future tests will be on a much wider range of suppliers and materials along with printed parts, for an example of how different materials perform after being printed look at the below video where I destroy some printed Pyramids.
Part Destruction! - lets pull apart some Pyramids

In the video below I pull and snap apart some printed Pyramids of different material types, they are all made with 20% infill and printed at 80mm/sec with 3 solid layers.
Printed object destruction
Other 3D printing materials - I'm really interested in what other experiences people have had with different material types in 3D printing, please contact me if you want to be involved in materials testing and /or you have any experience of different plastic's.
If you also want to test Polycarbonate materials then please do contact me.
I'm not a plastic's expert or have training on materials analysis but I'm really interested in how different types perform in 3D printing and how blends or mixes of plastic may help enhance our machines and objects.

Future test - PC-ABS
I have some other spools of mixed Polycarbonate materials, the intention was to lower the extrusion temperature and make it even easier and lower cost to use PC on RepRap.
I will get around to testing these types when I make another dedicated extruder.
I would really like to add this info to the Reprap.org wiki pages, but I could do with some help on creating pages and sections. At this time references to PC do not exist on the wiki.
Ideally A page like this for PLA needs to be made for Polycarbonate.
If anyone can help me please get in contact or PM me on the RepRap forum, thanks.
Thanks for reading and please leave a comment.
Rich.
Ideally A page like this for PLA needs to be made for Polycarbonate.
If anyone can help me please get in contact or PM me on the RepRap forum, thanks.
Thanks for reading and please leave a comment.
Rich.