Showing posts with label 3mm. Show all posts

Wednesday, 19 October 2011

Made in (insert country here) – British Prusa Mendel

Hello everyone,

here is a progress update on my British Prusa Mendel build - (It's almost finished)
And just to get the chronology correct - This is the 1st son (Daughter?) of 'Mendel Bling' (Bling also has 12 other children in the big wide world) - Bling was the first offspring of 'Bath Mendel' - confused? - good, carry on -

Inspired and encouraged by comments and feedback on my Mendel Bling build and the wonderful colourful Faberdashery plastic that is also manufactured right here in the UK, I have designed and printed a British themed LM8UU Prusa Mendel.

The aim and purpose of this exercise is to promote local design and manufacture of everything and anything.
Wherever you are in the world !

I hope you like how it turned out...

One thing to note is the X carriage size of 450mm wide instead of the normal 406mm, this allows more movement for the Extruder - Allowing a dual extruder set-up to print over the entire build surface.

The X Carriage is of the 4 Linear bearing design - also allowing for future upgrades.

It's printed with Fire Truck RED, Lapis BLUE and White PLA from Faberdashery, the Extruder body and X carriage are printed with Natural ABS.


I wanted to try a few new different techniques in this design for getting interesting looking prints, the first was a double sided colour print on both the top and bottom, after some thought, it made sense to print the top as normal, and print out a second section that could be bonded onto the underside.

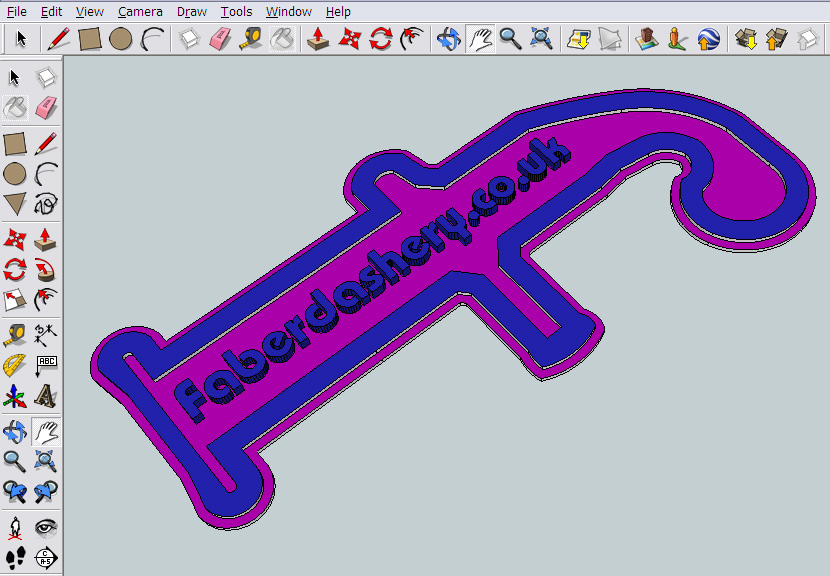
I used Sketchup to get the design and colour sequence correct for the layer selective colour printing.
So this is my plate of frame Vertex parts with the British flag as a layer selective colour section, in the real print I also added some colour stripes to the vertex body (See below).


And they came out quite well I think.


Here is a video of the printing progress If you view it on Youtube Here it's in Hi-Def resolution or you can watch it below.

(It's quite long, so skip bits if you wish, but please take a look at the end results)

Then I needed the other side set of flags to bond onto the vertex, again done in Sketchup and plated up as a single print job.

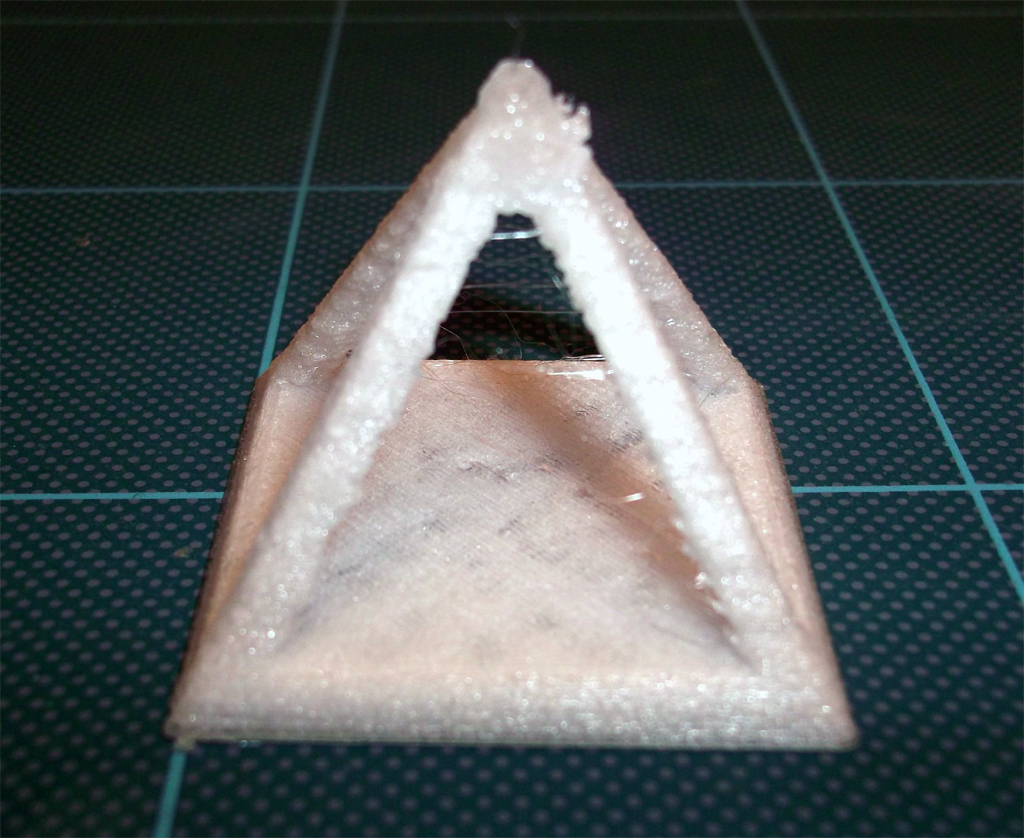
The Square flags are for another experimental technique, intended to be hot-wrapped around the Z mounts to give horizontal colouring, I need to experiment more with this process.

And spot the obvious mistake, I had a different layer sequences in the Square flags and the Vertex flags when I designed them, so the white and blue colours are accidently reversed on the Square flags, Doh! 

The flag is only 2.4mm thick so it was bonded with heat onto the six Vertex pieces.


X carriage motor end with LM8UU linear bearings on the Z Axis. 

All other parts are printed in a Blue, White, Red, White, Blue sequence.


Again a short video on the other printed parts - Check it out in Hi-def on Youtube Here of view below -


I also wanted an identification plate and some status indicators for the machine.
Designed in Sketchup, it's going to cover almost all my build area.

This was the largest single object I have printed so far, shortly after this photo I did start to wonder if it would actually come off of the build platform at the end of the print?

The print is only 17 layers high, 4 White layers all solid, 4 Blue, 6 Red and 3 Green.

Printed at 80mm/sec the total print time was just over 90minutes.

It popped off the bed when cold, not a single bit of warp.


The Indicators plate was done in a similar way.

Plate building on Youtube here - and below - 


All of my machine now have a T-slot frame around them, this allows me to fix all the electronics, power supply and cables onto and into the frame, it also doubles as an essential filament holder.


I printed out a set of 8MM Rod/Bar clamps from Antona and also the very neat 8mm rod holder from Kludgineer here - Well recommended if you are doing a similar thing.


The Electronics are housed in the same style enclosure I have used before, with cooling fan. 
An ATX Power supply is fitted to the T-slot frame to supply power for the electronics and heated bed. 


Last video of the completed build, just some wiring to do and it will be running !

I had many other suggestions on how to make it look 'British' including a great one from Bob "hang a teabag on it!"
Short of printing a bowler hat and walking cane I still think it needs a little more eccentricity and quirkiness, but I'm sure it will evolve over time to have some of those quintessential British qualities.

It's not fully built and completed yet, but I hope to get it fully running for the next local Reprap meet-up.

I started with 75M of 3mm Plastic filament 25M of each Red, White and Blue and only printed one complete set of parts. At the end of this print run I had less than 40cm of each, which was just enough for a Starfish.

Thanks again for reading and I hope you decide to source something from a local supplier today, happy building.

Rich.

Friday, 30 September 2011

Indestructamendel - Polycarbonate 3D Printing with Prusa Mendel

A little while back I posted on the Reprap Forum about printing with Polycarbonate, no one seemed to have done this yet so I had some pure Polycarbonate filament made up and some other mixes to enable some further experimentation and testing, here are my initial results and findings with Pure Polycarbonate.


Firstly if you are not exactly sure why Polycarbonate is worth investigating for 3D printing, take a look at the Wikipedia page, basically it's strong and impact resistant (It's used in the making of bullet proof glass) temperature resistant and luckily it is a thermoplastic so can be extruded (at the right temperature). It can be bent and formed while cold without cracking or deform and it is also very 'crystal' clear, but that's actually not so important for us as will become apparent below.

Don't confuse Polycarbonate with Acrylic or Plexi-glass, they shatter and crack, Polycarbonate tends to just bend and deform and after much effort will eventually stretch like very hard rubber until it eventually breaks.

It's a really amazing material, the 'diamond' of plastic, I was excited to test it out.

I have used sheet Polycarbonate for all sorts of things so I already had an idea of what to expect when thinking about extrusion.
  • It has a high melting temperature (glass transition is about 150 Degrees C)
  • It flows at around the 280 - 300 Degrees C point
  • It is stiff so 3mm filament would have been a problem to coil and feed into the extruder
  • It's hard so should work well in a Hobbed bolt filament transport system (geared extruder drive)
  • I already had a new hot-end design that I was confident would work at 300 Degrees C 
My test Polycarbonate Coil was manufactured at 1.6mm which will work in a 1.75mm extruder.

I did a few temperature tests and free air extrusion tests to see what the extruded filament looked like, it's one of the cleanest extrusions I have seen in free-air (290 Degrees C)


After changing my extruder Esteps and calibrating infill for 0.3mm layer height I started testing.

My first test was with the good old Pyramid model. Looking back I should have started with cubes or something requiring less extruder reversals, but it was a good test.
I was getting a small amount filament buckle in the cool-end, not a big issue, but extruder reversal needed tweaking a little.
Firstly I started at a reasonable speed of 30mm/sec print and 180mm/sec Travel.
Hot end at 280 Degrees C and the Heated bed set at 95 Degrees C
I was expecting warp and the extruder to jam, it didn't and printed ok.

I then printed again and lowered the temperature until it jammed up.
This was a really interesting failure mode !

It didn't do what I was expecting. Normally when you lower the temperature to work a lower limit eventually the hobbed bolt grinds through the filament and carves a chunk out of a single point and the teeth get all jammed up.

With the Polycarbonate it kept on driving the filament into a tightly packed block under the Hobbed bolt all around the spare space under the drive just before the opening, as the filament was still being driven I didn't even realise it until I started to see it bulge from under the hobbed bolt.
I didn't take a photo of it jammed up in the extruder, but here is it after extraction from the extruder, it's been stretched a little by me pulling it out, but you can see the failure mode really well.

And remember this filament is completely cold (room temperature) when it's doing this, amazing stuff!

That just told me that Polycarbonate is one of the best materials to use with Hobbed bolt transport and actually it can be extruded at a much lower temperature than I expected as long as you are not printing too fast- more on speed and temperature below - 

I was reasonably surprised by printed Pyramid looking so 'snow-white' I had initially expected it to look clear, so I experimented with Speed and temperature for the next six Pyramids.

What I discovered was that the slower you print and the lower the temperature the 'whiter' the printed object.
Also lots of reversal moves gives the object a snow-white appearance.
Strength does not seem to be affected by the appearance or speed of printing or indeed temperature.

If you print hotter and faster the more clear the object becomes.

This Pyramid above was printed at 120mm/Sec and 305 degrees C, I don't think it's going to get much more transparent than this due to the many extruder reversals? That's my theory as the free-air extruded filament is clear so something is causing it to change, or maybe other factors like moisture are playing a part?

I pulled the hot filament out of the extruder to see what it looked like, you can see the filament is slightly buckled in the drive channel, this is due to the fact it's 1.6mm and my extruder is designed for 1.75mm filament, but not a big problem with this strong material.
What's really interesting is that the melted part is the same snow-white colour I can see in the printed object.
This needs more investigation, maybe I should to try to dry the filament to see if moisture is some of the cause to this? Anyone have any ideas?

Here is a short video showing Polycarbonate printing on Prusa Mendel, you can watch it below or in High Def on Youtube Here

Polycarbonate Printing


This should give you an idea of how strong Polycarbonate is, you can bend it when cold and even put a knot in it. 

The video below shows Polycarbonate filament being bent, manipulated and tied to show strength and flexibility, you can also view this in High Def on Youtube Here


PC and PC-ABS Filament test

As a way to compare PC printing material take a look at the below videos showing PLA and ABS in the same manner. This is part of a wider material testing program I'm doing at the moment.

Further 3D Printing material test comparisons - 
To give you an idea of how difference material handle, take a look at the videos below or on Youtube Here, where I bend twist and break some different filament types and supplies to see how they behave.

A range of PLA 3D printing plastic filament being bent and manipulated

A range of PLA 3D printing plastic filament being bent and manipulated


Future tests will be on a much wider range of suppliers and materials along with printed parts, for an example of how different materials perform after being printed look at the below video where I destroy some printed Pyramids.

Part Destruction! - lets pull apart some Pyramids

In the video below I pull and snap apart some printed Pyramids of different material types, they are all made with 20% infill and printed at 80mm/sec with 3 solid layers.

Printed object destruction

Other 3D printing materials - I'm really interested in what other experiences people have had with different material types in 3D printing, please contact me if you want to be involved in materials testing and /or you have any experience of different plastic's.
If you also want to test Polycarbonate materials then please do contact me.
I'm not a plastic's expert or have training on materials analysis but I'm really interested in how different types perform in 3D printing and how blends or mixes of plastic may help enhance our machines and objects.

Future test - PC-ABS

I have some other spools of mixed Polycarbonate materials, the intention was to lower the extrusion temperature and make it even easier and lower cost to use PC on RepRap.
I will get around to testing these types when I make another dedicated extruder.

I would really like to add this info to the Reprap.org wiki pages, but I could do with some help on creating pages and sections. At this time references to PC do not exist on the wiki.
Ideally A page like this for PLA needs to be made for Polycarbonate.

If anyone can help me please get in contact or PM me on the RepRap forum, thanks.

Thanks for reading and please leave a comment.

Rich.

Tuesday, 16 August 2011

A splash of British colour - Faberdashery PLA experiments

I have been using Faberdashery PLA for the last week and I’m really impressed with it, here are a few things it inspired me to design and print along with some testing results and observations using the filament with my Prusa Mendel printers.

Faberdashery are UK based and their wide range of coloured PLA is manufactured in the UK. They sell by the meter instead of by weight so you can choose as much or as little as you need.


A great way to experience the range is with a Rainbow fun pack
In the Rainbow pack you get 10 beautiful colours, they also have Gold, Silver, and Black, White and others by the meter or 100 m coils. 
No natural/clear PLA is available yet, but maybe they will stock it in the future.

The first great thing about the filament is the great range of Opaque colours, usually PLA is transparent with just a suggestion of colour. I do like the nice solid colours from Faberdashery, they look more like ABS but without the nasty smell or the warp.

The way it’s delivered and packed is great and it feels like you are getting some care and individual attention for your order. The only thing I would like to see in the future is the filament bags heat-sealed maybe with some desiccant for moisture absorbsion, but I expect most of us will use is straight away as soon as we get it.

I finished almost the whole box in 4 evenings flat!

Dimensions of the filament are very good, round and the minimum I measured was 2.74mm and the maximum 2.89mm. All my models were sliced for 2.85mm Filament and I did not need to re-slice for change in colour so having this tolerance is very good when you are doing multicolour filament joining.

The Filament Polymer type is 4043D, recommended temperature of 160Deg C to 220 Deg C, I found the higher end was required for faster printing.

With all these great colours I decided on a Rainbow and after not finding one on Thingiverse I made my own in Sketchup.

It was not just designed to look pretty as I added lots of sections for filament bridging and thin layers for colour change. Skeinforge finds bridging on curves hard as it decided on an angle for the direction of bridge and does the whole section the same angle, so at points along the curve filament is going straight into the gap, this makes it a hard test especially when done at high speed, that’s why you can see a few gaps and dips in the model surface. I could make it look much better with a different Rainbow design but this was testing how the filament would perform on my Prusa Mendel ‘Bling’ machine.

These are the sections of coloured filament you need for the rainbow, it's about 3.5M it total - and Note the correct length of cream filament above, more on that below as I made a mistake in the joining process...
The red length is longer than it needs to be for 'overrun'

I did mess up with the filament joining, as you can see from the printed Rainbow picture above the Red covers 3 bows and mixes Orange, this was simply an incorrect length of Cream filament right after the First White colour, I had cut the correct length of cream as you can see in the photo above, but I joined a off-cut of 12cm rather than the correct length of 37cm :(

The cream should have been where the Pink is and so on, this would have also made light blue in the correct place etc. when I get more filament I’ll try again with the correct lengths and I’ll have a better Rainbow.

Underside of the rainbow, - Note the filament bridging test.
On the back you can see the Cream, it’s in the infill section of the Pink Bridging colour, if it would have been the correct length it would also have been on top.

The rainbow and all the objects here were printed at 120mm/sec Feed/Flow and 200mm/sec Travel speed, 0.5mm Nozzle and 0.3mm layer with 1.5 WOT, no slowing down even on the bridging, just full speed apart from the first layer down and perimeter were done at 60mm/sec.

Take a look at the below videos of the Rainbow print, you can see how the filament is extruding for yourself.

Rainbow files on Thingiveres Here - 

With the multicoloured Heart box I tried a different method to combine colours, along with the joined coloured  filaments I also designed cut-out sections and objects to fit into the voids, after printing these separately these were heated with a hot-air gun and pushed into the spaces, this was not as easy as I had expected due to the fact I made them sized to fit, really they need to be slightly smaller as they would be so much easier to join when warm and soft. 
I’ll try this method again, but similar results could be achieved just with filament joining.


 This round of colour printing also convinced me that you need at least 2 layers to make a good colour change as you can see in the above Purple top-colour and the 'A' below.


Next time I'll make the colour change 2 layers, this would make it nice and solid.

Youtube Video of the printing.
Heart Box files on thingiverse Here - 

I have wanted to print a old fashioned working fan, again I didn’t find one of thingiverse, so I designed a simple one that you can print out in whatever colours you like and fit the sections together.

Simple Sketchup design, each blade is the same. 


The hinge pin is a section of 3mm filament, just melted at each end to hold it in place. The sliding tabs are also fitted in place with melted tops to hold it all together.

Fan design files on Thingiverse here - 

Temperature testing -

This is a good video to show the speed and how smooth the filament is going down - first layer is at 60mm/sec


Using the different colours I discovered that a good temperature for extrusion and a Glossy print is 205 Degrees C and if you want a Matt effect (especially on the Dark Blue and Purple) raising the temperature above 215 Degrees C (See the close-up of the Faberdashery F logo below for an example).

Matt effects can be achieved running the filament at 215 - 220 Degrees C.

Simple two colour print test

My next machine - A very British Mendel - 

3 Colour Red, White and Blue printing.


It's always nice to see community suppliers manufacture in their home country so I could not think of a better way to say 'MADE IN THE UK' than a very British Red, White and Blue Mendel. 

I'll order some more filament and my 3rd Prusa Machine will be made in this Fabtastic 3 colour scheme.

Thanks Faberdashery, keep up the good work and give us all even more great colours to play with.


I will be doing a 'Big PLA Review' shortly, with print comparison and destruction testing from as many suppliers as I can order product from. It should be a good reference point for anyone looking to buy PLA for 3D printing. Stay tuned for updates on this, I hope to include, UK, Europe, US/Canada and Chinese suppliers.

Thanks for looking and please leave a comment.

Rich.