Showing posts with label fan. Show all posts

Friday, 22 June 2012

Ball joints, Fans, RPi, Hearts and fairy dust - #30DoC Days 19 to 22

Hello, and I hope you are having a good day? Here is an update of my RepRap adventures over the last few evenings -

For #30DoC - Day 19 I printed the Impossible Sphere for the weekly RepRap competition (see last post)-

Here is another one at 0.2mm layers - using the SCAD script richgain posted a few days ago -

I have not yet tried Greg's high resolution version, but it's on my list.

Day 20 was a Raspberry Super Pi Case - On thingiverse Here - It's a jazzed up version of the great case by HansH with added mounting ears and SD card support, light guides, etc.

Here it is in 'Special Edition' Gold and Glow in the Dark!


I also have my Printer running from my Raspberry Pi, with The Arduino, as it still does an ideal job due to the limited I/O on the RPi, I will do a separate post on setting up the RPi with Pronterface for RepRap printing. The Raspberry Pi is my excuse to finally learn more about Linux, so maybe you can give me some pointers along the way. There is also an active post in the RepRap forums on RPi, Pronterface and RepRap If you want to join in the development ideas with Raspberry Pi and RepRap.

Day 21 was an attempt to make a direct-able fan mount for MendelMax (and any other printer) - I have been using fans on and off for about the past year when printing in PLA, I'm really keen to understand how fans help with the build process, so in an attempt to learn more I wanted a mount I could direct airflow across, along, and even cyclone around my printed objects.

I used the ball joints from the great Fully printable PCB Vice by Sneakypoo as a starting point.

I love the Screw and threaded ball joint, it works perfectly.

The idea was to have it mount on the MendelMax 20mm Aluminium frame - but you attach it to any surface or bars with ty-wraps.

Above is the Vertical mounted fan.

As the ball joint can't quite do all angles, I have also done a Horizontal mount with M3 nut-trap (above), but not had time to test it yet, looks like it fits the 80mm fan just fine.

I have not yet had a chance to fit them to the MendelMax quite yet, but I'll keep you updated how well they work.

And for speed control I'm using a standard PC fan controller as they are just a few pounds, and give me individual control of four PC fans, it was easier to buy one than make up my own.
It also has one input power feed so you could still control it from the RAMPS Fan output but with the bonus of having individual power levels for all four fans.

The Universal 80mm Fan mount files are up on Thingiverse Here - 

For Day 22 we needed some urgent printed gifts for my daughters birthday party gift bags - after a bit of discussion and searching Thingiverse we decided on a secret box to store precious things or fairy-dust in, magic!

I first thought of the stratasys demo pot but that didn't quite hit mark -

Then we discovered the many twisted Boxed by Wizard23 and decided a Heart box would be great, check them out, they are all fantastic and they fitted together perfectly.


I needed to print 15 of them - here is a work in progress action shot -

Getting the size just right, they are very quick to print.

Printed in perfectly ideal colours from Faberdashery Buttercream and Cherry blossom pink - that reminds me, if you want a filament that sticks really well to your heated bed, I have yet to find a type or colour that sticks as well as Buttercream, from my experience with it, it's close to warp-proof.

*
I have also just got my new extruder prototype assembled, and it works! with a simple first test - I just need to change the design a little as it's almost impossible to assemble at the moment. - More on that next week.
*

Thanks for reading, more soon.

Cheers,

Rich.

Tuesday, 16 August 2011

A splash of British colour - Faberdashery PLA experiments

I have been using Faberdashery PLA for the last week and I’m really impressed with it, here are a few things it inspired me to design and print along with some testing results and observations using the filament with my Prusa Mendel printers.

Faberdashery are UK based and their wide range of coloured PLA is manufactured in the UK. They sell by the meter instead of by weight so you can choose as much or as little as you need.


A great way to experience the range is with a Rainbow fun pack
In the Rainbow pack you get 10 beautiful colours, they also have Gold, Silver, and Black, White and others by the meter or 100 m coils. 
No natural/clear PLA is available yet, but maybe they will stock it in the future.

The first great thing about the filament is the great range of Opaque colours, usually PLA is transparent with just a suggestion of colour. I do like the nice solid colours from Faberdashery, they look more like ABS but without the nasty smell or the warp.

The way it’s delivered and packed is great and it feels like you are getting some care and individual attention for your order. The only thing I would like to see in the future is the filament bags heat-sealed maybe with some desiccant for moisture absorbsion, but I expect most of us will use is straight away as soon as we get it.

I finished almost the whole box in 4 evenings flat!

Dimensions of the filament are very good, round and the minimum I measured was 2.74mm and the maximum 2.89mm. All my models were sliced for 2.85mm Filament and I did not need to re-slice for change in colour so having this tolerance is very good when you are doing multicolour filament joining.

The Filament Polymer type is 4043D, recommended temperature of 160Deg C to 220 Deg C, I found the higher end was required for faster printing.

With all these great colours I decided on a Rainbow and after not finding one on Thingiverse I made my own in Sketchup.

It was not just designed to look pretty as I added lots of sections for filament bridging and thin layers for colour change. Skeinforge finds bridging on curves hard as it decided on an angle for the direction of bridge and does the whole section the same angle, so at points along the curve filament is going straight into the gap, this makes it a hard test especially when done at high speed, that’s why you can see a few gaps and dips in the model surface. I could make it look much better with a different Rainbow design but this was testing how the filament would perform on my Prusa Mendel ‘Bling’ machine.

These are the sections of coloured filament you need for the rainbow, it's about 3.5M it total - and Note the correct length of cream filament above, more on that below as I made a mistake in the joining process...
The red length is longer than it needs to be for 'overrun'

I did mess up with the filament joining, as you can see from the printed Rainbow picture above the Red covers 3 bows and mixes Orange, this was simply an incorrect length of Cream filament right after the First White colour, I had cut the correct length of cream as you can see in the photo above, but I joined a off-cut of 12cm rather than the correct length of 37cm :(

The cream should have been where the Pink is and so on, this would have also made light blue in the correct place etc. when I get more filament I’ll try again with the correct lengths and I’ll have a better Rainbow.

Underside of the rainbow, - Note the filament bridging test.
On the back you can see the Cream, it’s in the infill section of the Pink Bridging colour, if it would have been the correct length it would also have been on top.

The rainbow and all the objects here were printed at 120mm/sec Feed/Flow and 200mm/sec Travel speed, 0.5mm Nozzle and 0.3mm layer with 1.5 WOT, no slowing down even on the bridging, just full speed apart from the first layer down and perimeter were done at 60mm/sec.

Take a look at the below videos of the Rainbow print, you can see how the filament is extruding for yourself.

Rainbow files on Thingiveres Here - 

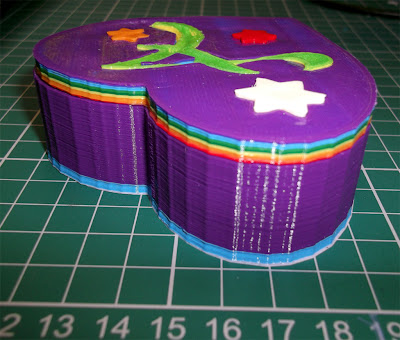
With the multicoloured Heart box I tried a different method to combine colours, along with the joined coloured  filaments I also designed cut-out sections and objects to fit into the voids, after printing these separately these were heated with a hot-air gun and pushed into the spaces, this was not as easy as I had expected due to the fact I made them sized to fit, really they need to be slightly smaller as they would be so much easier to join when warm and soft. 
I’ll try this method again, but similar results could be achieved just with filament joining.


 This round of colour printing also convinced me that you need at least 2 layers to make a good colour change as you can see in the above Purple top-colour and the 'A' below.


Next time I'll make the colour change 2 layers, this would make it nice and solid.

Youtube Video of the printing.
Heart Box files on thingiverse Here - 

I have wanted to print a old fashioned working fan, again I didn’t find one of thingiverse, so I designed a simple one that you can print out in whatever colours you like and fit the sections together.

Simple Sketchup design, each blade is the same. 


The hinge pin is a section of 3mm filament, just melted at each end to hold it in place. The sliding tabs are also fitted in place with melted tops to hold it all together.

Fan design files on Thingiverse here - 

Temperature testing -

This is a good video to show the speed and how smooth the filament is going down - first layer is at 60mm/sec


Using the different colours I discovered that a good temperature for extrusion and a Glossy print is 205 Degrees C and if you want a Matt effect (especially on the Dark Blue and Purple) raising the temperature above 215 Degrees C (See the close-up of the Faberdashery F logo below for an example).

Matt effects can be achieved running the filament at 215 - 220 Degrees C.

Simple two colour print test

My next machine - A very British Mendel - 

3 Colour Red, White and Blue printing.


It's always nice to see community suppliers manufacture in their home country so I could not think of a better way to say 'MADE IN THE UK' than a very British Red, White and Blue Mendel. 

I'll order some more filament and my 3rd Prusa Machine will be made in this Fabtastic 3 colour scheme.

Thanks Faberdashery, keep up the good work and give us all even more great colours to play with.


I will be doing a 'Big PLA Review' shortly, with print comparison and destruction testing from as many suppliers as I can order product from. It should be a good reference point for anyone looking to buy PLA for 3D printing. Stay tuned for updates on this, I hope to include, UK, Europe, US/Canada and Chinese suppliers.

Thanks for looking and please leave a comment.

Rich.