Mixed Materials 3D Printing experiments
For Valentines 2018 I wanted to try making things with the family. Not just 3D printing, but a combination of 'mixed materials'. In this blog post and video I'll show you what we did for together for Valentines day gifts using a number of different materials and techniques.
It's true that you can get some really interesting 3D printing materials, including wood, rubber, metal and even cork. But the objective of this project was to help get you thinking about using more than just different 3D printing filaments, colours or thermoplastic materials in your projects.
ColorFabb Bronze filament - can look very nice when buffed, but what about using 'real' materials...
The video below goes over some of the experiments our family did over Valentines 2018 -
Or you can watch it in HD over on YouTube here
I have wanted to combine fabric materials that my wife often uses into a 3D model for some time. I'm also really interested in doing more work with real wood. Lets see how we got on and what my kids also wanted to experiment with.
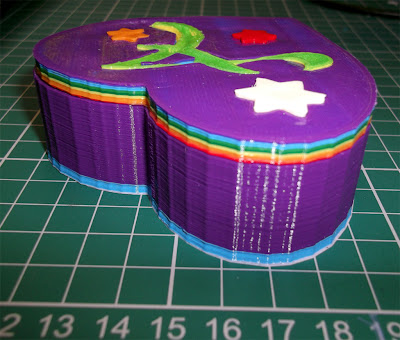
The first task was to select a 3D model we could experiment with, after a brief look I decided to design my own heart shaped gift box, with a lid that could be complemented in different types of materials.
A simple heart box for experimenting - the lid can be decorated in various ways - see below
After printing the prototype in 3D4M C8 and a few more in Polymaker Polysmooth (PVB) materials, I smoothed one in the Polysher to check the fit and finish.
Printing in C8 Material for the prototype -
Many more printed in Polymaker PolySmooth PVB
Before and after smoothing in the Polysher
The first was smoothed for my oldest daughter, a simple box that she wanted to decorate.
The second was glitter covered. This uses the Polysmooth trick of adding glitter straight after being smoothed in the Polysher. The glitter sticks and produces a smooth sparkling finish that will not rub off when dry.
Next was an experimentation with paper.
I have used paper before, I custom covered an entire E3D BigBox with paper a few years back, it was a really fun project to do over Christmas whilst assembling the and wooden version of this rather big 3D printer.
For this I made a 3D printed guide for drawing around different types of materials.
This proved to be really useful in getting patterns to be inline across the three separate sections of the heart box.
Using any sort of paper (or other materials), you can draw around and then cut out each part to fit into the 3D printed inlay areas.
The template was made fractionally smaller to allow for drawing and then cutting, so it should fit perfectly.
The next idea from my wife was to try out an embossing machine she uses on fabric.
I designed up a test 'die' with the letters A and S.
They needed to be mirrored before 3D printing, so the end pattern appeared correctly after being embossed onto a material.
We then tested out leather, vinyl, suede, and some faux materials to see what sort of pressure was needed to get a good level of embossing.
The 3D4M C8 material was a little too soft for very fine features, it got a little squished and sharp edges were slightly crushed after a few operations in the 'BigShot' press.
We later discovered that almost any normal PLA (with some impact modifiers) was one of the best materials to use for printing embossing patterns. It's a hard plastic that's stiff enough to work many times, even on very dense materials and fabric's.
This is an area we are still experimenting with, now moving on to 3D printing both positive and negative embossing sides to get even better results - an update on that in a future post.
I'm really pleased how even a simple embossing pattern turned out, this really has a lot of maker potential for interesting projects.
We experimented with many other types of materials, not all shown in their completed forms.
One was with sand and sea shells - bonded into the lid using clear resin.
A Polysmooth 'sticky' lid being covered in real bronze powder - allow to dry and tumble finish.
Another had real bronze powder poured over when 'sticky from the polysher'. Another mixed different colour PolySmooth materials - self bonding when smoothed.
To finish off some of the boxes I also did end up using some ColorFabb Bronzefill filament for inlay sections - tumbled and buffed to a shine.
Finally I really wanted to experiment with a real wood veneer. I was lucky enough to have some leaves of walnut burr to try out.
Using the 3D printed pattern it was easy to trace out onto the thin wood.
I used some 3M blue tape to help keep the delicate burr grain from splitting - a tip here is to use sharp scissors rather than a knife blade.
If you do decide to cut it out with a blade, consider rounding off the tip. A sharp blade-end can actually rip wood like this, you are better off going very gently around the line a number of times rather than try to cut out the wood in one pass.
You can leave on the masking tape after cutting, or remove if you feel the wood will stay together.
Then it's a matter of bonding the wood inlay into the 3D printed part.
I used white 3M waterproof PVA, just a thin film of glue over both sides.
I also printed out matching blocks to help compress the wooden inlay into the heart box lid.
These were really useful as it made the job of clamping up the part easy. Just let it dry for 24 hours and remove from clamps.
I'm really quite happy with the first result.
I finished the lid with two coats of polyurethane varnish spray, to seal the wood and the bronzefill.
As a proof of concept, this turned out well enough to make me want to experiment more. I'm no expert in using wood vineere, so if you have any other tips, do leave them in the comments. I'm really keen to do much more with real wood and 3D printing, I think I will be designing more objects like this for future projects.
The modular jewelry tree -
I also designed a secret side-project for my wife as a gift. Along with the heart gift boxes, the modular jewelry tree project files are now up on Thingiverse and Youmagine if you wish to use the model for yourself.
My secret project was inspired by something that my wife had mentioned at Christmas. The comment was that her small jewelry stand for necklaces was not big enough and didn't have enough hangers.
Designing this, printing and then polishing and finishing was quite tricky to keep secret, but I managed to get it all done before Valentines day.
This colour of PolySmooth filament produces a really nice 'glazed ceramic' look when smoothed.
It's also a modular design, so you can select different sections in whatever order you require to get the height and length of arms for your jewelry.
The little holes in the stacking pin are for added strength, the force extra material using perimeters so you get a strong connection even with a low level of model infill (15%) - that said for the best end results you should still glue/bond the sections together.
You don't need to glue the arms, they should slide and clip in, holding in the main pillar.
The sections have a slight twist, the purpose is to allow earrings or bangles to hang down, and not overlap any hanging below.
The files are up on Thingiverse and Youmagine -
Modular Jewelry Tree -
Will be uploaded shortly
Proto-Pasta Surprise -
I had a very nice surprise filament giftbox from the masters of materials at Proto-Pasta.
If you watch the video, I'm genuinely stunned with the multi-colour transition roll of filament. I had hoped to be able to get hold of a roll at some point.
I now know this was the experimental reel made just before Joel (the 3D Printing nerd) visited the Proto-Pasta team for some custom experimentation of transition filaments.
You can see Joel's recent visit video to Proto-Pasta, on his channel here
Thanks for reading, see you next time.
Rich.
Please join me on Twitter @RichRap3D
Files and designs shared on GitHub
Files and designs shared on Repables
My Youtube channel is here, all 3D Printing and Hi-Def video content.


