Wednesday, 14 September 2016

Training - Mastering Desktop 3D Printing with Simplify3D - O'Reilly Media

Hello everyone, and many thanks for reading.

I had a short break from blogging and YouTube over the summer months, but I was still very busy with all things 3D Printing - Lots to update you with over the coming weeks, but first -  

I had a rather busy summer planning and recording a training series about 3D Printing for O'Reilly Media - Safari Books Online & Infinite Skills.


The first series of screen-cast training about using Simplify3D has now been released here.


Screen-cast training is essentially using and performing a step by step tutorial of the software package or activity. With this I had to cover both the software and physical aspect of making objects with a 3D printer.


You can also watch this in HD over on Youtube - YouTube Channel RichRap

If you have ever wanted to support me and my ongoing adventures with 3D Printing, then using this training course is a really great way, you may learn something new and any feedback you can give me will help with future content for this and my Blogs & YouTube. 

I don't enable any advertising in any of my 3D Printing blog, YouTube content or file sharing sites, so if you ever feel the desire to support my efforts, using media like this O'Reilly series will allow me to invest more time and effort into all my 3D Printing content and ongoing developments. Thank you.

This was the first time I had adventured into screen-cast training, and it's really quite a challenging but powerful way to demonstrate learning and provide real-world advice about a subject or application.

Okay, I know this is a self-promotional sales pitch, thanks for following my ongoing 3D Printing adventures and I hope this training is useful to you. 

O'Reilly asked me to write and record a 3D Printing training program for their Infinite Skills website. They had very little content on the many processes of 3D Printing. Plenty are already available on 3D modelling, but as we know a 3D model is not always suitable to be 3D Printed.

I decided to first focus on one of the most significant and challenging aspects of successful 3D Printing, and that's the Slicer and it's many settings. After much thought and a a realization that covering all the different open and closed source slicers would be almost impossible, I decided to focus on using Simplify3D. This has been my slicing program of choice for the last year+ and I have been really delighted with the control you get and support the Simplify3D team provide, to both their users and the wider 3D Printing and maker community.

If anyone has seen a screen-cast either live or recorded on YouTube you will often get frustrated watching someone mumble, make mistakes and generally jump around the program interface. That's not what the O'Reilly Infinite skills team expects - they have a very high standard of professional presenting. It was a lot of work, really good fun learning how to plan, script and produce an on-screen training series.

Okay, one last sales pitch + a chance to win a Simplify3D license

You can get my complete 3+ hour Simplify3D training package here - I can tell you this was a lot of work to put together so I hope it is useful and provides some good advice for both using the slicer and with improving your 3D Printing results.

If you want to check out my training style first, then do look at the introduction and setup sections where you can see if this course may help you.

This video should give you a taste of the training style, to see if if may benefit you. I go from a basic understanding to quite a high level of tricks and tips in later lessons

The entire table of contents is shown below, feel free to ask me any questions about it.

  1. Introduction
    1. Welcome To The Course 01m  26s 
    2. About The Author 01m  40s 
    3. How To Access Your Working Files01m  15s 
  2. Setup And Configuration
    1. Setup And Orientation For Simplify3D 08m  05s 
    2. Using The Configuration Assistant 05m  17s 
    3. Setting Machine Size And 3D Printer Profile04m  49s 
    4. Setting The Machine Firmware Type05m  49s 
    5. Machine Control Panel Interface05m  08s 
  3. Importing And Preparing 3D Models For Printing
    1. Importing 3D Models, Positioning, Scaling, And Rotation05m  48s 
    2. 3D Model Errors And Types Of Model Repair05m  00s 
    3. Rotating Parts For Strength, Mirroring, And Infill Levels06m  29s 
    4. Models Imports For Dual Extrusion 3D Printing06m  10s 
  4. Configuration Of Essential Print Process Settings
    1. Manufacturing Process Settings06m  13s 
    2. Setup Of The Extruder And 3D Printing Tool Head12m  20s 
    3. Layer Heights, Perimeters, And First Layer08m  25s 
    4. Additions And Settings05m  23s 
    5. Infill And Settings06m  03s 
    6. Support - Using Support Material06m  39s 
  5. Configuration Of Further Print Process Settings
    1. Temperature And Settings05m  29s 
    2. Cooling And Settings07m  17s 
    3. G-code And Machine Configuration Settings04m  06s 
    4. Script Settings And Examples04m  54s 
    5. Other Settings09m  22s 
    6. Advanced Settings07m  02s 
  6. Dual Extruder Machine Settings
    1. Setting Up Dual Extruders - Multiple Material 3D Printing04m  47s 
    2. Additions And Infill08m  09s 
    3. Support Material Settings04m  33s 
    4. Temperature And Tool Change04m  13s 
    5. Advanced Settings05m  08s 
  7. Generating 3D Print Files, Verification, And 3D Printing
    1. Generating G-code For Single Extruder04m  02s 
    2. Generating G-code For Dual Extruder02m  03s 
    3. Support Structures For Single And Dual Extruder Printing05m  05s 
    4. Viewing The Tool Path And Various Print Features02m  59s 
    5. Using The Machine Control Panel Interface For 3D Printing09m  43s 
  8. Thank You
    1. Wrap Up01m  30s


While this training does focus on using Simplify3D as an application, it covers many aspects of setting up your 3D Printer, what to watch out for before, during and after printing. Improving settings and using different materials for both single and dual 3D Printing. Even if you don't currently use Simplify3D you can still get a lot of useful advice and information to improve your 3D printing skills, whatever slicing package you currently use.

If you are not interested in the training, you can also donate directly to me via my paypal.me, if you would like. I really appreciate any support you can give, even if that's just reading the blog and being happy enough to come back for more next time.

Win a Simplify3D License - 

The wonderful people at Simplify3D are also providing some software license giveaways - This is in conjunction with E3D. All you need to do is Follow E3D and Also Simplify3D on Twitter and then send out a tweet to both of them saying what you want to do with 3D Printing, or what project you are working on that involves 3D printing. That's it and you may win a Simplify3D License.

While I remember - Daniel Noree - is having a competition - if you miss out, then check back with me for more chances to win a Simplify3D license.

Until next time (and that won't be long) Thank you all.

Richard.


3D Printing and support material processing of the Steampunk Octopus

More about the Steampunk Octopus 3D Print.


Many people asked for more details and information about printing and processing the Steampunk Octopus, so here it is.

This was originally an experiment designed to test out settings for Simplify3D on the BCN3D Sigma 3D Printer, but that quickly also transformed into a project I could do with my daughter.

Since this had a large and complex both to print, the support material settings could be tested, and because this model also has many, many separate segments we decided to test out printing the leg parts of various different 3D printers, with different hot-ends, extruders and cooling requirements for the different materials being used.


I have to say a big thank you to the designer of the Ball-joint articulated octopus
model - Ellindsey. It has some different head options and they are a lot of fun to print and build up.


You can also watch this and many more of my video's in HD over on YouTube here.


As you will see from the video, support material removal can be quite a challenge. For some models you just can't use the same material as the main model.


We had fun making this up, and as you can see in the video it's also a good learning experience - thermoplastic softens with a heat-gun or hairdryer and that makes it easier to fit leg segments together.


After a few different test prints, all the leg segments were printed without using any support material.


We spotted that many of the leg segments did not require any support material at all. When using a slightly bigger nozzle size of 0.6mm, you can get a really good overhang greater than 70 degrees.

Water soluble PVA material - make sure you keep it really dry and do not run at temperatures over 200 Degrees - Stick to 195 Degrees C and do not leave it in the hot-end for extended time at temperature without extruding.

I'm currently doing some further testing on a soluble support material from E3D called Scaffold, more info about support material removal in this post here.

Scaffold - Soluble and PVA based but modified to work with more materials and changes to viscosity. Available from E3D.

I have also used PVA based support materials and various other solutions - one being PolySupport from Polymaker (Many thanks for the sample filament roll Ben @ Hawk3DProto).

Polymaker Polysupport - an easy to remove support material - works well with many types of material - not soluble.

Ideally we would all like to use an easy to remove or even better, a water soluble support material that is compatible with many different 3D Printing materials.

The next time I get a tricky to print 3D model, I will compare and challenge these support materials and let you know how I get on.

Thanks for reading, please pop back again soon and catch up with me on the following -

Twitter - @Richrap3d
Google+ - RichardHorne_RichRap3D
YouTube Channel RichRap

Until next time, happy printing.

Rich.


Tuesday, 13 September 2016

E3D Scaffold - soluble support material testing and 3D Printing model challenge

Testing out Scaffold - Soluble Support Material from E3D.

The team at E3D recently sent me some production reels of Scaffold, the soluble support material for desktop 3D Printing. It's now almost released and should be available soon on the E3D website

I'm testing it out and also seeing what's been changed from the Beta release earlier in the year.

Sanjay at E3D said it has had a few modifications to the viscosity and also compatibility with materials. It's tuned to work well with Edge (PET based) and Nylon materials, but will also work with PLA and ABS.

I proposed a scaffold challenge in the video below, and E3D responded. They have kindly offered some £40 discount vouchers for their webshop as a prize for the most interesting or challenging ideas.


If you have a 3D model that you believe would challenge Scaffold (it's mostly aimed as a dissoluble support material) but can also work well as peal-away support, then let me know in the comments below, over on YouTube or on Twitter @Richrap3d

Also feel free to tell me of your experience with using support material - either using the same material or as a dual extruder setup with a secondary material as support.

Give me some time and I will report back with success or failure and hopefully some print advice or tips for using Scaffold in different 3D Printers.

I'm going to also test it out with some models I have struggled to 3D Print over the years, I'll try to do that on a selection of printers, nozzles and extruders too.

A really good support material is still a major goal for desktop 3D Printers, so it's exciting when a new product becomes available, I'll be sure to let you know how I get on. Maybe this is the one?

I'm already seeing some really great suggestions, thank you for posting - One that really jumped out was a collection of Knots gathered up by Richard Caunt - Very Knotty can be found here.

And if you want to see what a pain removal of support material can be - then take a look at this recent update post and video on printing the Steampunk Octopus.

Thanks for reading, I'll be back soon with more 3D printing.

Rich.

Twitter - @Richrap3d
Google+ - RichardHorne_RichRap3D
YouTube Channel RichRap

Saturday, 11 June 2016

Project Snowflake - A 3D printed LED Light sculpture

* Project Snowflake *


This project started Christmas 2015. Whilst searching with my daughter's for some nice models to print out during the Christmas break, we found the great Electra modular origami by Auntdaisy. That seemed like a good challenge.

Below is a video about Project Snowflake, you can also watch on YouTube in HD and subscribe to my channel if you like.


For some background this project started because of a great modular Origami system called Electra. Designed by AuntDaisy - Link >  Electra Modular Origami by AuntDaisy


Below is an extract from the Thingiverse page for Electra - For further information about Electra or more models by AuntDaisy, follow the link above -

MakerHome blog showing how this model was created - see - http://makerhome.blogspot.co.uk/2014/07/day-327-saturday-guest-auntdaisy-and.html

For more information on David Mitchell's origami design, seehttp://freespace.virgin.net/dave.mitchell/galleriesmodulardesigns.htm or his latest "Paper Crystals" book, http://www.amazon.co.uk/dp/0953477495 (with lots of other exciting models.)
_______________________________________________________________________________

For this project we used a string of waterproof WS2811 LED's from China for under $20US


You can cut the chain or add more. Each led has a Red, Green and Blue led, along with a driver and shift register - that also does clock reshaping, so in theory the number and length can be rather a lot of LED's. In reality I would stick to under 200 per chain as the current needed to drive them an the length starts causing issues.

If you need more, just use two strings and control the sequence on the Arduino.

And it's very simple to drive these LED strings with just one Digital output from any microcontroller (5v I/O recommended) - see the adafruit library or use my daughter's example code as a starting point (it's based on the adafruit examples).


The adafruit Uberguide to Neopixels is really all you need to get going with these great little LED's


Many different displays are based on these great LED's - Just search eBay for WS2811 or WS2812 for lots and lots of options.


Wiring is straightforward - 

You need an Arduino compatible board - The adafruit flora or gemma is great for experimenting with Neopixel's and if even has one already fitted to the board.

Neopixels like a 5V digital I/O signal, so a good option is the Arduino Nano.


The Arduino micro can also be used but you will need to also add a 5V regulator - 


If your voltage regulator has a tuned output, then make sure you set it to 5V before connecting it up to the Arduino mini (or any other Arduino without an on-board regulator) - or you will fry it.


The LED string we used runs on +12V so with the Nano we can connect the +12v directly into the power input.


 The Nano can be bought in 3.3v and 5v versions, do check you buy the 5v model.


The Nano is a great little board, even with an onboard USB connector for programming.


Also make sure your power supply is +12V at around 2Amps or more.


Also it's a very good idea to add a 100uF capacitor (rated at +16V or higher) to the Power supply Output, then you can connect that to the power input on the Arduino Nano.


The only other component we need is a 220Ohm to 560Ohm resistor (the one above is a 510Ohm)


You can accidentally damage some Neopixel style WS8211/12 LED's if you don't fit a resistor in series with the first LED. It needs to be connected to the output pin (here we are using Digital 8) and then into the Input of the WS8211 LED string.


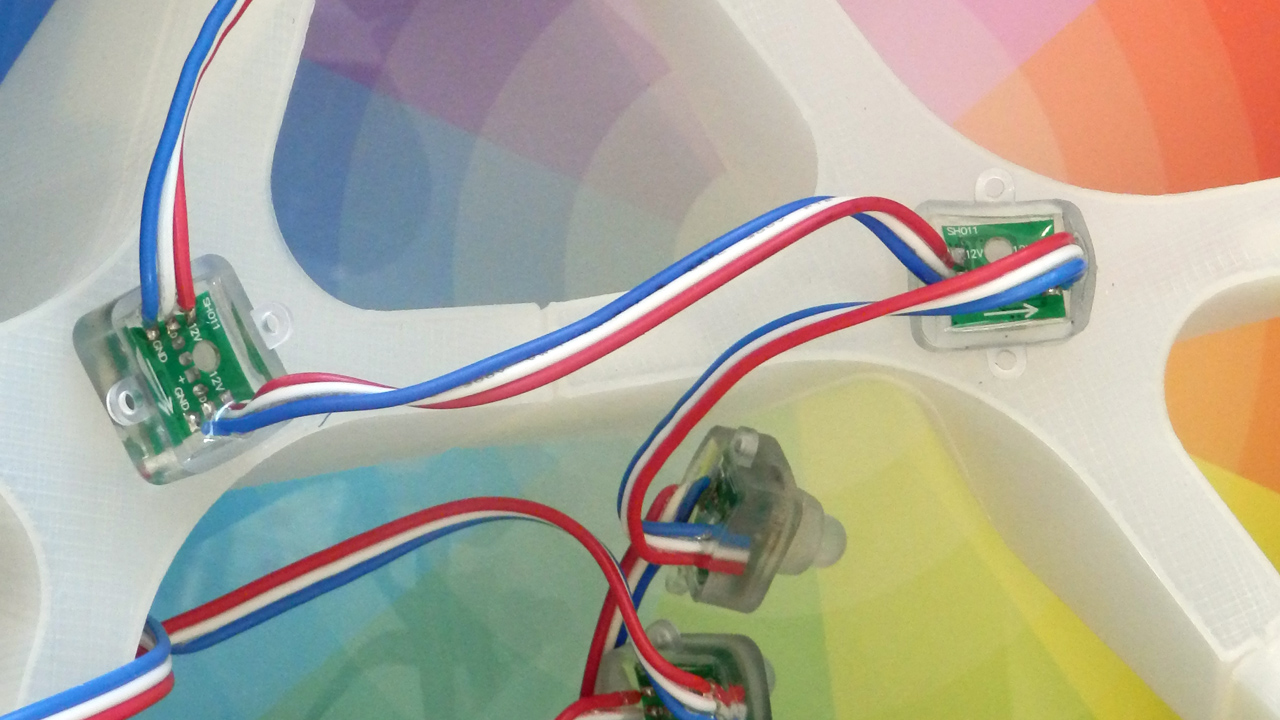
The string of LED's run one after the other, Blue is ground, Red is +12V and the input and output is White. Make sure you connect the output of your Arduino Digital 5V I/O pin (D8) into the Input (shown on the left in the image above).


Then you can fit each LED into the 3D printed modules, if they are a little tight, heat the plastic slightly with a hairdryer - they should click in and stay firmly fitted.


It's best to route them in a spiral, you can only really do it one way making sure all 30 holes are fitted.


Leave as many other LED's as you like in the chain, they would look cool hanging down or up if you are going to hang the sculpture from a rope for example.

We had a chain of 35.

This was a great learning project for and with my Daughter (10 years old).

Last year she assembled a RepRap Fisher Delta 3D printer, so this was an natural progression, Doing the 3D model design in Freecad.


Then building up the electronics and wiring the modules.

And finally programming with the Arduino IDE.

She really enjoyed it, and is already doing more projects, and investigating more uses for 'Neopixel' style LED's.


That's it!

All the files are over on Youmagine here, along with the model file to 3D print and example code for the Arduino nano to drive the LED's and some other files to experiment with the adafruit Flora.

I almost forgot to mention, I found a really great plastic filament from Excelvan for using LED's - Light piping and diffusion - it's really nice to use and perfect for any sort of LED based projects.


Please watch the video if you want to see it in action, and if you have any questions just leave a comment, or ask me on Twitter / G+ or YouTube.

Twitter - @Richrap3d
Google+ - RichardHorne_RichRap3D
YouTube Channel RichRap

Until next time, happy printing.

And if you decide to print out Project Snowflake, please let me know.

Rich.


Wednesday, 25 May 2016

Upgrades and printing with the BCN3D Sigma dual extruder 3D Printer

My update on using the BCN3D Sigma 3D Printer for the last 6 or so months.


Do check out the video for a more visual feast into the madness of my modifications :)


You can also watch it in HD over on my YouTube channel here (and please subscribe, thank you)

A few months back  Last year (2015), I posted about my first few weeks using the BCN3D Sigma 3D Printer, here is an update on some of the changes and how I have been getting along with the machine.

As I said in my previous video and blog post, the BCN3D Sigma is a really great 3D Printer. It has many of the key features people are looking for in a machine they need to produce 3D Models.

Because the Sigma is a fully built and tooled up machine, it's not really aimed at the low-end or to compete with the kit build market. That said, it's excellent value for money with the bonus of having dual independent print heads, it's a great 'production quality' desktop machine.

I have just now, in early 2016 spent my own hard earned cash on buying a Sigma, not something I do lightly. And I could not afford a brand new one, so it's actually second hand. I was very lucky someone in the UK wanted to sell it. (thank you so much for driving it to me, you know who you are, I am highly grateful and now use this machine every single day).


That's probably the best and most genuine endorsement I can give a machine. Spending my own money on a printer, now, when I already have a few is significant.


The Sigma is still the best built production machine I have used (so far) - finally on-par with my own custom 3D Printers I have built and still use over the many years of doing this.

I have done all the usual things with Sigma, printing fast and 'draft quality' to slow and fine layer models to examine the details that can be produced. I'm not so concerned with ultimate quality when 3D printing. I would much rather a fast and accurate, strong print using a fat nozzle.

All these dual colour pots were using 0.6mm nozzles and a fast print profile with 0.2mm layers.
The print time was under 5 hours for each one. The quality is not 'perfect' but more than good enough for kids to use and for 'practical' applications.


In fact I have a 5 hour rule, if I can't print it in under 5 hours, then I use a bigger nozzle, or lower quality or wait until the weekend (and then it may not happen). So for me, 3D printing is more about getting something that's accurate and strong, not ultimate quality.

Sigma can do quality, but with a change of nozzle size and pushing the speed, it also does fast too.

Dual printing is where this machine really stands out from the other 'dual extruder / dual nozzle' systems available. This is an area where I am most excited for FDM, Having useful models, and an ability to 'actually print almost anything' is a fundamental goal for desktop 3D Printing.

 Two ways to dual 3D print - Above bigger tool-change retractions and no purge tower.

 Or use a tower and avoid jamming up the hot-ends because of long retraction <<< Do this method!


Above is the Nervous System dual treefrog - a tricky one to dual 3D print. It was the second thing I printed on the new machine, right after the test calibration pattern (above). Both at 0.4mm nozzles, and a 0.2mm layer height, set to print fast (65mm/sec) - not ultra-fine quality, but a solid and fast 3D print in under 4 hours.


Like everything that's designed or configured for you, it's possible you will want to change or tweak things to make it easier for you to use every day. That's exactly what this update is about - my changes to the machine and what I have been printing for a few months.


Firstly I need total flexibility for spool sizes and all different types of coiled plastic. We don't quite yet have a universal spool size standard, or any sort of agreement on the ideal diameter of filament coils.


I found I could not fit 1Kg reels of filament inside the Sigma, they almost fit, and I even printed new spool adapters. But everything was just a little too tight fitting, and not easy to change out.


After some considerations, as this is a fully built machine that can't be taken apart. I opted for an external filament rack and to re-mount the bowden extruders outside of the machine. Sounds quite drastic, but it's a simple re-routing of the motors.

The upgrades were obviously 3D printed on the Sigma - and to keep everything as light as possible a painted wooden frame was built to take two spools at the back.

The other change was to provide more options for materials and nozzle sizes. The Sigma comes with 0.4mm brass nozzles fitted. If you want to print in filled materials or abrasive carbon fiber or glow-in-the-dark then you really need a hardened nozzle.


Sigma on the left and E3D V6 on the right


I was also finding that the second print head was starting to be used more for support materials, rather than a different colour. Dual colour prints are nice, but the second head is great for using as a different support material. And I found that a 0.6mm nozzle allowed me to print support materials faster and with more success.

I can now swap out nozzles for almost any size or type. I leave a 0.6mm on the left and a 0.4mm on the right. This way I can print fast or fine or with dual materials - very complex models.


On the prototype machine I added a simple strip of Kapton to catch stray 'noodles' still a good thing to do to any Sigma.


On the new Sigma, you can fit these 3D Printed stiffening supports, this helps the silicone strip wipe off any excess plastic, and reduces the chances of noodles being pulled out and onto your build platform.


I'm really happy with the Sigma, and I can't wait to hack it some more.

BCN3D Technologies tell me that they are about to fully release the entire machine and even all it's manufacturing secret's as a complete open-source package. (I'll link here when that's announced).

* EDIT - 26/05/2016 - BCN3D have released everything, check out the press release here

They seem very serious about the Open-Source route, and don't sound like they are holding anything back at all.

Thanks for reading - and watching (I do go into more detail about the changes in the video).

Until next time.

Rich.