Showing posts with label model. Show all posts

Sunday, 30 April 2017

TAZ6 Octo-Tool holder and a reminder that thermoplastic can be reformed after 3D Printing

TAZ 6 Octo-Tool holder. Design, 3D print and post thermoforming


Last month we saw a lot of people 3D printing the hairy lion. That inspired me to design a complex looking tool holder, but with an easy way to 3D print out the model and some easy re-shaping of the tentacles after printing (using hot air for thermoforming).

Inspiration for this idea came from the Hairy Lion model by Primoz Cepin

The hairy lion is a good example of re-forming thermoplastic into a different shape after first printing in a much easier model, that's more optimised for the 3D printing process.

I made a video about the design, and how to shape 3D printed parts after 3D printing below -


You can also find this and more on my YouTube channel in HD over here

The model is printed out flat. It's easy to both model and 3D print this way.


After printing, shape the legs into interesting positions by using a heat-gun. This is Colorfabb nGen material, great for thermoforming. PLA is also very easy to form using hot-air or hot water.

The metal plate shown above is simply being used as a heat shield so the tentacles bend exactly where I want them and the body is not deformed.


You may need to do a little more bending once fitted to make sure tentacles are not in the way of the 3D printer moving parts.
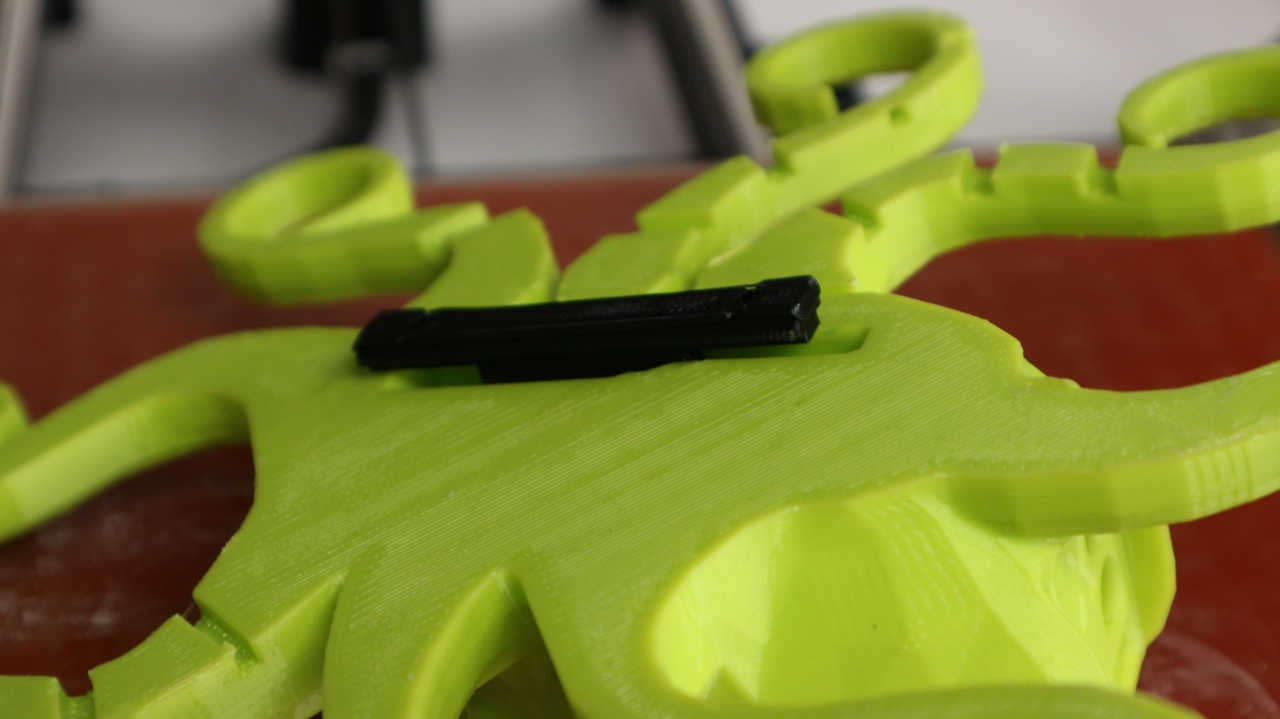

A 3D printed clip allows you to slide the Octo-Tool holder onto the machine.


You just need to slot the clip into the TAZ 6 20mm aluminium t-slot section on the left hand side.
You could add many other tools and upgrades to your machine this way.


You will need to remove one part of the TAZ 6, just to allow the clip to slot in. Be careful not to loose the t-slot nuts, they do enjoy slipping down the aluminium channel sections. Use blue-tack to hold them in place.


The top tool holder can also be printed and fitted, if you would like to have a different top tool holder, then feel free to alter the Freecad model included with the Youmagine link below.


It can be fitted using the existing bolts, just loosen then a little and slot in the top tool holder.


Add tools and SD cards, and you are all set with even more awesome TAZ 6 3D Printer.

I have posted the design files for these models and the STL's for 3D printing along with advice for assembly onto your TAZ6 are over on Youmagine here

The original original Bucket O' Octopodes (thicker legs) - by moleofproduction can be found here - http://www.thingiverse.com/thing:8896

2D Scanning for accurate 3D models
One tip I didn't talk about in the video above is an easy way to make shapes for tools like the Pliers.

I have used this method many times and it's a great way to ensure existing objects fir into 3D printed parts.


Take a 2D scan or a good photo, or the object. Then just load (import) this image into your CAD program and scale to a known dimension of the object. For this set of pliers, I measured the distance of the middle round section and scaled the image so that dimension was correct. then you know you are at the correct scale for the model.

It's then just a case of tracing around the image and producing a plane you can extrude, to form an indent for the object. You can round corners and add grip points as I did in the top tool holder.

I have replaced all manner of objects using this method, from shower mounts to kitchen utensils, just from simple 2D scans using a flat-bed scanner.

I hope that was useful, do comment and please subscribe to my YouTube channel for more 3D printing adventures soon.

Rich.

Please join me on Twitter @RichRap3D   -  https://twitter.com/RichRap3D

Files and designs shared on YouMagine - https://www.youmagine.com/users/richrap

Files and designs shared on GitHub – https://github.com/RichRap

Files and designs shared on Repables - http://repables.com/u/richrap/

My Youtube channel is here, all 3D Printing and Hi-Def video content.


Wednesday, 14 September 2016

3D Printing and support material processing of the Steampunk Octopus

More about the Steampunk Octopus 3D Print.


Many people asked for more details and information about printing and processing the Steampunk Octopus, so here it is.

This was originally an experiment designed to test out settings for Simplify3D on the BCN3D Sigma 3D Printer, but that quickly also transformed into a project I could do with my daughter.

Since this had a large and complex both to print, the support material settings could be tested, and because this model also has many, many separate segments we decided to test out printing the leg parts of various different 3D printers, with different hot-ends, extruders and cooling requirements for the different materials being used.


I have to say a big thank you to the designer of the Ball-joint articulated octopus
model - Ellindsey. It has some different head options and they are a lot of fun to print and build up.


You can also watch this and many more of my video's in HD over on YouTube here.


As you will see from the video, support material removal can be quite a challenge. For some models you just can't use the same material as the main model.


We had fun making this up, and as you can see in the video it's also a good learning experience - thermoplastic softens with a heat-gun or hairdryer and that makes it easier to fit leg segments together.


After a few different test prints, all the leg segments were printed without using any support material.


We spotted that many of the leg segments did not require any support material at all. When using a slightly bigger nozzle size of 0.6mm, you can get a really good overhang greater than 70 degrees.

Water soluble PVA material - make sure you keep it really dry and do not run at temperatures over 200 Degrees - Stick to 195 Degrees C and do not leave it in the hot-end for extended time at temperature without extruding.

I'm currently doing some further testing on a soluble support material from E3D called Scaffold, more info about support material removal in this post here.

Scaffold - Soluble and PVA based but modified to work with more materials and changes to viscosity. Available from E3D.

I have also used PVA based support materials and various other solutions - one being PolySupport from Polymaker (Many thanks for the sample filament roll Ben @ Hawk3DProto).

Polymaker Polysupport - an easy to remove support material - works well with many types of material - not soluble.

Ideally we would all like to use an easy to remove or even better, a water soluble support material that is compatible with many different 3D Printing materials.

The next time I get a tricky to print 3D model, I will compare and challenge these support materials and let you know how I get on.

Thanks for reading, please pop back again soon and catch up with me on the following -

Twitter - @Richrap3d
Google+ - RichardHorne_RichRap3D
YouTube Channel RichRap

Until next time, happy printing.

Rich.


Tuesday, 8 March 2016

3D Printing and finishing the Nefertiti sculpture

Back in late 2015, two artists allegedly 3D scanned the famous 3300 year old bust of Nefertiti. Secretly and without approval inside the Neues Museum in Berlin - or so the story goes.

The artists liberating this model and also delivering a wonderful replica back to Egypt are Nora Al-Badri and Jan Nikolai Nelles. 


Depending on what you read, who you ask and detailed examination of the 3D Model, you can probably make your own mind up about how this was 'created'.

Fabbaloo have a good version of the story here

You can see the very questionable PR stunt video over on Vimeo, shows the team hiding a low resolution scanner. Probably just to go with the story in the hope that news feeds pick it up. In reality someone probably spent a lot of time painstakingly reconstructing this model, or maybe it's the original high-resolution scan somehow obtained from the museum? One thing that's very nice is the fact the team have released the model into the world for people to enjoy and 3D Print if they so desire.

Lots of good details about the model, history and the story here too - by Suleyman Sonmez

This story is likely to be shrouded in a little mystery and speculation for some time, and maybe that's the entire point. The 'fear' that objects and artworks can be quickly 3D scanned like this will generate discussion and reactions. Regardless of the reality in actually doing this sort of thing, capturing a high resolution and accurate 3D model is not at all easy.

This post is not going deeper into the debate about museums, historical artifacts and tensions between countries that hold precious and cultural objects of desire.

I'm also not going to further speculate on how the model was actually made/scanned or obtained. Maybe another day on all those issues...

The great Fredini continues the discussion and speculation on his post here, if you do want to dig deeper into this.

Even more here (Nefertiti scan heist is a Hoax) from @CosmoWenman

This post is simply about printing a great and beautiful 3D Model with standard desktop 3D printing technology, and some simple finishing tips you can use or adapt to your own requirements.


For this 3D Print I used the following -
  • Standard E3D BigBox Pro 3D Printer. (build size 200 x 300 x 280mm)
  • Fitted with an E3D V6 Volcano nozzle (1.0mm nozzle size) - yes, that's quite big.
  • Colorfabb XT Co-polyester material and also Colorfabb nGen Co-Polyester (to compare both).
  • BigBox Pro heated build surface with my 'glass screen-protector surface' fitted.
  • Netfabb free version to cut up the model into sections to print (full sized).
  • Simplify3D to slice and process the model.
  • Standard grey builders plaster (low cost 10kg bag from DIY store) - You could use plaster of Paris or sand and resin - do not use cement / concrete or fast acting fillers - they generate lots of heat and can also contaminate the model and leach-out salts and minerals onto the surface of the model.
  • Superglue + activator to fill minor holes and joint the sections together - co-polyester and PET/G/T materials like cyanoacrylate (super-glue) - just be careful using it.
  • Sandpaper 240 grade and 600 grade.
  • Zinc based undercoat spray paint - (68% zinc content) low cost car grade 800ml can.
  • The zinc paint can be anything really, I like the finish you get with zinc, it can be polished and is good for highlighting features.
  • Optionally use a polyurethane spray top coat to seal everything after polishing.
    • I like to use Plasti-Kote 591 clear polyurethane gloss varnish. You can also get the 592 satin type - both in a 400ml spray can.

I explain the process and more about the print and finishing in the video below -


You can also watch it in HD on YouTube here -

I briefly contemplated just printing the model smaller, but after looking at the mesh and all the fantastic features, I had to print out a full size version.


 I used Netfabb to cut the model up into sections that could be printed easily, without the use of any support materials and with low levels of infill or hollow if desired.


Simplify3D was used to slice the model ready for printing.


Both sections of the headdress were printed at 0% infill and in spiral-vase mode using Colorfabb XT clear co-polyester filament.


The stunning face section is orientated so all the features can be printed without support. It does however require some level in infill, I used just a 6% rectilinear density to provide enough internal support, this worked perfectly and used minimum material.


The shoulder and neck section was also printed with 6% internal rectilinear infill, in light grey Colorfabb nGen filament.


The two top headdress sections glued and filled with plaster.


The only sections I have lightly sanded and polished are the face and neck, these are intended to be smooth on the original model and have very few areas of actual damage on the scan. The headdress has just been glued and spray painted, not a single thing was done to it to allow all the fine levels of detail to show. Looking closely you can make out the individual paintwork brush marks and texture of the original.

Glued and then a first coat of Zinc spray paint - all before any sanding was done to the face and neck.

Cutting up models into sections can really help on a desktop 3D printer, not only does it allow bigger final parts to be made, but also re-orientation so you may not need to use support material. I hope you try it out, and make some nice big things to display and enjoy.


Lightly sanded, than a second coat of primer paint - and a final polish.


It's now quite the talking point, after all it's not every day you discover a replica of a 3300 year old Egyptian artifact in someone's kitchen.

And if you are hunting more artifacts, the British Museum do share some of their 3D Models, unfortunately they are of a very low detail - maybe we can convince them to release some higher resolution models... but I doubt it.

The original complete model was shared here under a Public Domain license 

My cut up sections can be found on my Youmagine page here, also under a Public Domain license.

10-3-2016 - Update - And if you really want more on this story, take a look at this post here   -by Christian Lölkes 

Thanks for reading. Please leave a comment, subscribe to me on Youtube and if you want to get in contact -

Twitter - @Richrap3d
Google+ - RichardHorne_RichRap3D

Until next time, happy printing.

Rich.