Monday, 7 November 2011

Twelve days of thingiverse - Thing-A-Day - Part 1

As a break from printing machine parts and structural objects I decided to print something off my thingiverse list every day for 12 days.
They got harder to print/slice and more complex each day - On the last day I designed my own thing, see part 2 for that.
And of course, I learned a few new techniques and tricks along the way, I'll share with you here - 


Sing along with me - On the first print of Thing-A-Day my RepRap gave to me...


Mr Alligator and a Fractal Tree :)


Alligator by mraiser

Fractal Tree 2 by tc_fea


On the second print of Thing-A-Day my RepRap gave to me...


A Turtle and a 'Dove' tail joint.

Triangular Dovetail Joint by VeryWetPaint


OK, that's enough of that song... It's not Christmas just yet. Below are on my 'all-time want to print at some-point' list, which is growing every day...


My general goal was to try a few things that have been on my list for a while and also some things that no one else seemed to have tried to print, or at least prints with little evidence of success.


So an easy start - 
A nice Pink Gekko by guru was first up -
This showed up a few minor fill issues so I tweaked settings in Skeinforge and firmware and moved on to -


solid gold Honey pot - basic receptacles by MakeALot. the Idea here was to test my calibration and speed of a hollow object as I had plans to test more hollow things shortly.
this was 100% infill just using multiple shells, it produces a nice heavy pot.


The next object was slightly obscure, but I wanted to print it simply because of the first comment made by Raster on the thingiverse page here 
It's the Awesome Cow by JonMonaghan


From the cow I wanted to try something that looked difficult and as per the cow I wondered if it could be sliced in half to print more easily - 
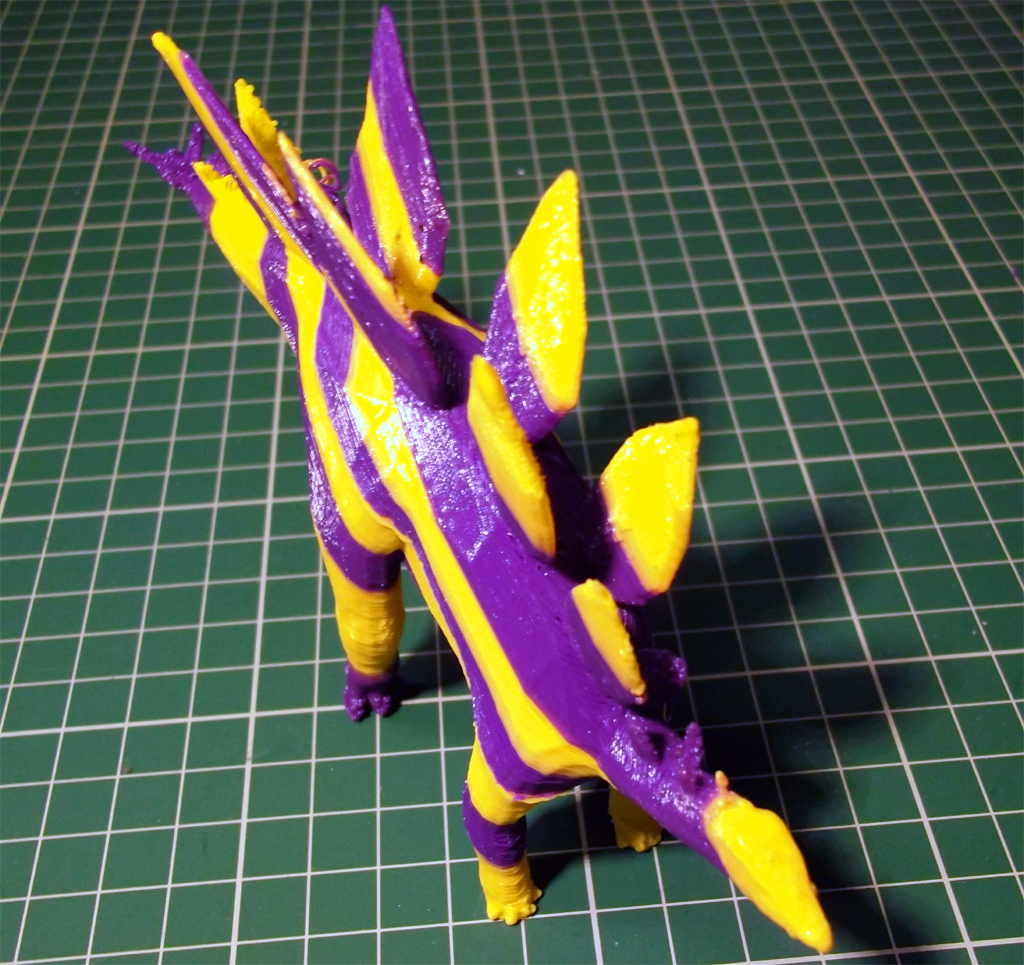
And it could - Behold the mighty Stegosaurus!  by Hurtzmyhead
My sliced Version can be found here


This shows how the low polygon count in the STL model translates to the printed object.

From printing the Stegosaurus he led me to chop off the head of a very fine Venetian Lion Here  as another test in printing something that people only printed with support.
He is hollow and was also 70% filled with Hama beads. 
This is a derivative work of the full Venetian Lion by tbuser.

At some point around here I started filling my other hollow objects with things, 
He has a shiny gold underside.


The Banana Slug (High Res) by scanlime is a fine example of a nice model and a perfect thing to print hollow.


My version is 2 x the size and is filled with Hama beads to give him a nice rattle.


And a version of the great Yoda lite model by faberdasher
This has less robe and more of the detailed face.


I also filled them with various objects and experimented with temperature for a number of reasons.


One test was for my Failed print Blog and the other was to actually see if I could create different effects with PLA and temperature, the answer is Yes as you can see in the photo. With more opaque PLA you can also get some nice matt effects with higher temperature.


Brain Slug by 7777773 was next
Top Tip Here - 
My version is hollow again and was a test of colour filament mixing but I also realised at this point that active gentle cooling of the extruded PLA was essential for a good looking organic (or hollow) prints, so I setup a small cooling fan to blow across the build area after the first layer had been put down, this gives much better results as you can see with some of the other items below, I now always use this fan to blow across PLA whenever I'm printing with it. I have yet to find a situation where it has not improved print quality.

I wanted to print something that could be hollow and also needed to be sliced, so my nest subject was the most excellent model of Roal The Bratty Dragon Prototype by SplotchyInk


My version is bigger and has three sections you can print in different colours to make him look more vibrant.

As an experiment one side was printed with 0% infill and this side shown above was just 5% infill - I had some minor holes using 0%, you can't avoid this on some objects when done hollow, so a low % of infill usually rectifies the issue.
The tummy also needed some infill to stop sagging and collapse of the outer perimeter while building, still a few issues with this print, but a slightly higher infill will resolve this (Extra shells don't always help).


This shows what usually happens to objects like this when you try to print them hollow or with low % of infill
A smaller layer slice height can help, but some infill is almost essential for parts like this. Remember a severe  'overhang' is the same problem if it's going into an object or out of an object.

And a short video of some of the objects, view it Here in Hi-Def directly on Youtube, or below


That's part 1, look out for Part 2 shortly, it'll have some interesting prints, objects and effects.

Thanks for looking, and do try an external fan, you'll be impressed how much better it can make objects print. 

Rich.

Saturday, 5 November 2011

Good enough to eat?

I'm not going to explain this one, just that it had to be done -


Ingredients and recipe - 
  • Scale to your required size, depending on 'taste', my Crumpet print is 80mm. 
  • 'Slice' with your choice of Gcode 'mixer' using a light and airy infill of about 5% - for about 10mins...
  • While that's working, prepare your choice of printing material, I have used Faberdashery PLA in Bling-Bling Gold and Buttercream, Mmmmmm. 
  • Carefully transfer over the file and plastic to your 3D printer making sure the file ingredients are complete and look sensible to print.
  • Preheat bed to around 65 Degrees.
  • Prepare nozzle and preheat to around 200 Degrees.
  • Print for about 35mins ensuring you have a good golden colour on the bottom and top, use a light filling.
  • Allow to cool a little.
  • Enjoy (looking at it) with a nice cup of tea.
And remember it's not just a crumpet... it's a MakeALot crumpet.

(DON'T EAT, Repeat with me, Don't eat.)

Gold base

Buttercream filling, Mmmmm.

The last 2 filled layer (of three) are gold, to give that toasted finish.


And a video to commemorate the event - 


For more of a clue as to the background why I'm printing Crumpets take a look on this thingiverse page

Thanks for Salivating :)

Rich

Wednesday, 19 October 2011

Made in (insert country here) – British Prusa Mendel

Hello everyone,

here is a progress update on my British Prusa Mendel build - (It's almost finished)
And just to get the chronology correct - This is the 1st son (Daughter?) of 'Mendel Bling' (Bling also has 12 other children in the big wide world) - Bling was the first offspring of 'Bath Mendel' - confused? - good, carry on -

Inspired and encouraged by comments and feedback on my Mendel Bling build and the wonderful colourful Faberdashery plastic that is also manufactured right here in the UK, I have designed and printed a British themed LM8UU Prusa Mendel.

The aim and purpose of this exercise is to promote local design and manufacture of everything and anything.
Wherever you are in the world !

I hope you like how it turned out...

One thing to note is the X carriage size of 450mm wide instead of the normal 406mm, this allows more movement for the Extruder - Allowing a dual extruder set-up to print over the entire build surface.

The X Carriage is of the 4 Linear bearing design - also allowing for future upgrades.

It's printed with Fire Truck RED, Lapis BLUE and White PLA from Faberdashery, the Extruder body and X carriage are printed with Natural ABS.


I wanted to try a few new different techniques in this design for getting interesting looking prints, the first was a double sided colour print on both the top and bottom, after some thought, it made sense to print the top as normal, and print out a second section that could be bonded onto the underside.

I used Sketchup to get the design and colour sequence correct for the layer selective colour printing.
So this is my plate of frame Vertex parts with the British flag as a layer selective colour section, in the real print I also added some colour stripes to the vertex body (See below).


And they came out quite well I think.


Here is a video of the printing progress If you view it on Youtube Here it's in Hi-Def resolution or you can watch it below.

(It's quite long, so skip bits if you wish, but please take a look at the end results)

Then I needed the other side set of flags to bond onto the vertex, again done in Sketchup and plated up as a single print job.

The Square flags are for another experimental technique, intended to be hot-wrapped around the Z mounts to give horizontal colouring, I need to experiment more with this process.

And spot the obvious mistake, I had a different layer sequences in the Square flags and the Vertex flags when I designed them, so the white and blue colours are accidently reversed on the Square flags, Doh! 

The flag is only 2.4mm thick so it was bonded with heat onto the six Vertex pieces.


X carriage motor end with LM8UU linear bearings on the Z Axis. 

All other parts are printed in a Blue, White, Red, White, Blue sequence.


Again a short video on the other printed parts - Check it out in Hi-def on Youtube Here of view below -


I also wanted an identification plate and some status indicators for the machine.
Designed in Sketchup, it's going to cover almost all my build area.

This was the largest single object I have printed so far, shortly after this photo I did start to wonder if it would actually come off of the build platform at the end of the print?

The print is only 17 layers high, 4 White layers all solid, 4 Blue, 6 Red and 3 Green.

Printed at 80mm/sec the total print time was just over 90minutes.

It popped off the bed when cold, not a single bit of warp.


The Indicators plate was done in a similar way.

Plate building on Youtube here - and below - 


All of my machine now have a T-slot frame around them, this allows me to fix all the electronics, power supply and cables onto and into the frame, it also doubles as an essential filament holder.


I printed out a set of 8MM Rod/Bar clamps from Antona and also the very neat 8mm rod holder from Kludgineer here - Well recommended if you are doing a similar thing.


The Electronics are housed in the same style enclosure I have used before, with cooling fan. 
An ATX Power supply is fitted to the T-slot frame to supply power for the electronics and heated bed. 


Last video of the completed build, just some wiring to do and it will be running !

I had many other suggestions on how to make it look 'British' including a great one from Bob "hang a teabag on it!"
Short of printing a bowler hat and walking cane I still think it needs a little more eccentricity and quirkiness, but I'm sure it will evolve over time to have some of those quintessential British qualities.

It's not fully built and completed yet, but I hope to get it fully running for the next local Reprap meet-up.

I started with 75M of 3mm Plastic filament 25M of each Red, White and Blue and only printed one complete set of parts. At the end of this print run I had less than 40cm of each, which was just enough for a Starfish.

Thanks again for reading and I hope you decide to source something from a local supplier today, happy building.

Rich.