Here are some of my failures and tips on how to avoid them and lessons learnt. (And if you can help me explain what happened last weekend to one of my PLA filament rolls I would be most interested - see at the end).
You also can't just be told what settings to use and how fast to run etc. you need to feel how your particular machine works and what it's capable of. So experiment, and when you think you have the perfect settings, turn down the extruder temperature until your filament drive fails, that's then a good reference point.
Also increase print speed until your hot-end can't keep up even with a few tens of degrees C hotter than you think you should be running, that's another good reference point.
Below are a few of my print failures during the summer, and some reasons for the failure where I know what happened.

My most common form of failure with ABS is the hobbed bolt filament transport getting jammed up.
Usually there are two reasons for this -
If you print too fast for your hot-end to keep up melting the plastic then usually after the first slower layer layer it will start to jam and grind the filament in the hobbed bolt teeth, then you need to clean it all out.
I have also observed hobbed bolt jamming from using too much extruder reversal when printing lots of small complex parts (a set of many gears for example), the extra too-and-fro on the filament can cause grinding and jamming, but not with all ABS.
I have discovered that some of my ABS needs to be printed at a slower rate to stop this from happening, other ABS I can print faster and I don't get any problems. ABS for me is generally more of a pain to print with.

Pink ABS - This failure was inadequate heating in the hot-end for the speed of solid fill - Solution for me was to use a different hot-end design so I could print faster and get better heat transfer into the filament at speed.

ABS from China Orange - Printing too fast, this part is quite hard to print, it has a very small base to secure it to the heated bed and it's quite small so it prints too-quickly.
On the left it's printed as a shell, (80mm/sec) total disaster, the warp is significant as the layers have no time to cool and they just make a mess, eventually the extruder nozzle will kick the part off the heated bed.
On the right the same part but printed with infill, and 50% slower (40mm/sec), similar problem really, the part was kicked off the bed at this point.
When you print a small object too fast it's odd watching prints that are still mostly molten they bend and move around while more plastic is added, eventually it all ends in failure.
Solution - Print more than one part at a time, or slow down the print quite a lot, my quick solution was to print the part in PLA, it printed fine at 80mm/sec.

A few things are wrong with this print, but other than the temperature being wrong the main issue was the Y motor had not enough drive current, Solution - Increase motor current on your stepper drive.


This one is the opposite problem, the X motor current is too high also causing part sheer but this is due to the stepper driver overheating and shutting down. If you can identify this is happening, you may need to use a fan on your stepper drives depending on your mechanical make-up and motor type or you may be able to reduce your motor drive current a little.

Parts that are not anchored down really well can pop-off of the print bed, causing havoc and destruction everywhere they get pushed around by your hot-end.
This extruder gear came loose and slid itself into a bigger gear and the print continued for quite a few more layers before I spotted it.
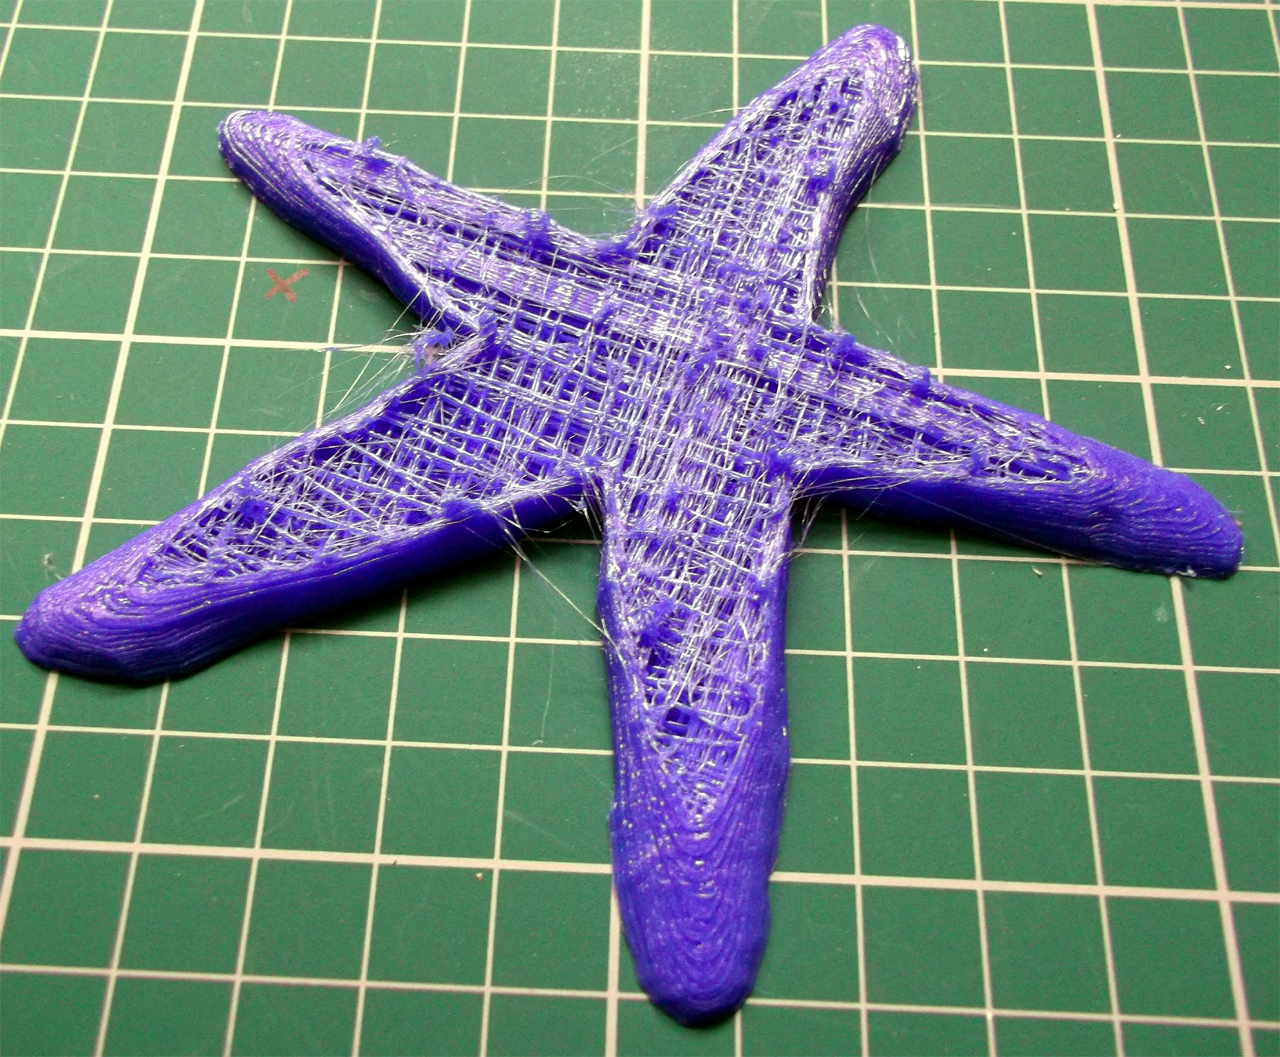
PLA Starfish, This was my fault, It just ran out of filament during the build! poor starfish.


The other thing you get in 3D printing is lots of bits and outlines, this was less than one month of evening printing.

If only we could recycle it.... one day.
Temperature -
Temperature of your hot-end is very linked to extrusion speed and also print quality.
If you print at about 30mm/sec then a lower temperature of anything between 165 to 190 Degrees C is usually fine but as you increase temperature or speed (or both) things start to get interesting.

In this picture you can see the effect of temperature on translucent PLA at a fixed print speed.
The heated bed was 65 degrees C and the print speed is 60mm/Sec.
I started off at 205 Degrees C then increased to 215, at these temperatures the PLA starts to produce loads of tiny bubbles and gives the print a matt and frosted effect. Back to 195 and the PLA looks as you would expect.
Bonus points if you can guess what model this is (check out the reflection).
It's possible to produce nice effects on your models by altering print temperature.
Opaque PLA tends to go slightly matt at higher temperatures and low-to-normal speeds, I don't see evidence of bubbles, but it's hard to tell exactly what's happening.
When I print at over 120mm/sec I need to have Opaque PLA at +225 Degrees C, and translucent at +215 Deg C, at this speed and temperature you do not see the matt/frosted effect in the finished object, I guess that's just down to the limited time the Plastic spends in the heated chamber unless anyone can give a better explanation?
And talking of PLA and temperature - Last weekend I had a roll of PLA shatter on me!

This was one of the last rolls of China sourced 3mm PLA and it's about 4 months old, I keep them in plastic boxes and I have Makerbot Black PLA and Ultimachine White PLA rolls that are much more tightly wound than this PLA from China and they are also in the same sort of boxes, I also had Red and Yellow Chinese PLA from the same manufacturer stored in a similar way and that's still just fine.
All my other Plastic is stored in plastic bags and cardboard boxes all the time.

Now, here in the UK we have experienced quite hot/cold weather changes for October, so I'm putting it down to that, but I still don't really understand why it happened just to this roll. Over a period of many hours I could hear the PLA 'ping' and shatter into lots of smaller pieces, very odd. It seems to have settled down and some parts of the coil are fine, even the centre section that was more tightly wound?
Hot-end Jamming -
My only other odd failure was the jamming of hardened filament at the hot-end, this seems happen after many months of printing due to build-up of solid materials, probably because I tend to run PLA hotter and faster than 'normal' which leads me to my top-tip I'm still investigating -
Top Tip - I would be interested if anyone else has spotted this - If you start to see very, very fine 'hairs' of plastic on your printed parts for no real reason you can think of, this may be a sign that your hot-end is about fail, from build-up of hard material. I have spotted this on the last two times my hot-end needed cleaning, it will need disassembling and maybe drilling and cleaning out, after that it will be back to normal and work for many more months. as long as the PTFE sleeve or barrier has not degraded, then it will fail again quite quickly - keep an eye out for the 'hairs'Some questions for you -
What's your best failure or most spectacular!
Any tips for testing the boundaries of your machine and 3D printing, please comment below -
Anyone done any 'Art' with failed prints?
Thanks for reading and go make something fail, you will learn loads!Rich.
Thanks for another awesome post! These are exactly the kind that help people get to grips with their machines - being able to see the failures (and successes) of others.
ReplyDeleteCould this be expanded to a wiki page, or similar, where people could collect their experiences - with lot of photos and such? Kind of a "visual guide to print failures" perhaps? I've found a few examples around the interwebs - would it be useful to pull them together I wonder?
Best life lesson I ever learnt, made relevant for reprappers.
ReplyDeleteIt's also frustrating when you don't have any idea what has failed!
My worst failure, scratch that, my best failure so far was the incorrect assembly of my 3d printer. I installed the X axis in reverse by mistake. The result was prints that appeared as the mirror image of their .stl counterparts. It has had some interesting knock on effects, like the 'need' to rewire stepper motors for use with mirrored extruders.
This comment has been removed by the author.
ReplyDeleteReally informative post as usual.
ReplyDeleteWould you recommend people print things deliberately to fail? So print a test box or small gear and adjust motor current or adjust extrusion temperature or feed rates during a print to really understand the effects?
Quiz answer: Yoda.
P.S. I was the poster above, but made some profile changes as I've not used blogger in a long while...
A webpage that allows people to upload photos of prints, along with a skeinforge settings profile and other details about their 3d printer and filament would be a great resource for everyone at different stages towards well calibrated printers.
ReplyDeleteThe more photos and settings presented, the more info for diagnosing print errors and artifacts. There could be options for calling up photo comparisons, photos tagged with keyword descriptions of the problem for easy search. And even 'successful diagnoses' of individual photos.
Been idly toying with that idea for a while now. The problem is I have more ideas for the function and layout of such a site than actual skills for realising it! Anyone else interested?
Thanks everyone ! it's great to get so many comments so quickly.
ReplyDeleteGary - I totally agree, a Wiki page would be great, or maybe a dedicated section of the reprap forum would also be a good place, people can't always be bothered to update a Wiki (I'm a bit guilty of that).
Woodsmoke - I like the idea, and it could be done on Thingiverse, you could just use different tags 'Failed' people could make derivatives of the 'fix' or solution and anyone could comment on them?
ReplyDeleteIt's funny you mention the mirror image issue, I had exactly the same problem on my very first RepStrap, I didn't spot it for ages as everything I was printing was symmetrical then I printed a wade extruder and it was mirrored! I still have it somewhere.
Hi Rich (Cadical)
ReplyDeleteGood guess, it is Yoda (Lite)
I like messing with my machine and settings while it prints, so yes make some fail it's always good to know where your limits are so you can stay inside them. When you start printing massive build plates of parts, you want to be sure they are going to print correctly and also print at the best quality for the speed you decide.
When I was using the 5D firmware I was also changing lines of Gcode (live) that were about to be loaded by the Reprap host software, (line by line after each move) that was an interesting experience! and explained a lot about Z axis limits and why you should always have end-stops!
Speed V Quality is another fun and complex area for testing, failure and refinement, maybe that's a good blog post for the future?
Do you have your Huxley yet?
Cheers,
Rich.
I encountered quite a visually appealing problem during my Prusa's maiden voyage: http://techpaladin.com/2011/09/30/what-an-amazing-machine/
ReplyDeleteLuckily, it was a very simple fix.
Very cool post! It has motivated me to really mess with the settings I believe to be ok once things are up and running correctly.
ReplyDeleteGreat pictures too!
I really appreciate the analysis that goes into figuring out why it did something. I figure if you know why it did it, then you can better know how to get it to not do it again, or repeat it at will. I also like the compare and contrast - as in I did the same thing with different materials and got these results. I dye fabric and it is interesting the difference that happens when a slight change is made.
ReplyDeleteHave the parts for a reprap on order and need to figure out how to troubleshoot once we get it assembled and start working with it.
RichRap & Woodsmoke - At first I thought a website or similar would be the way to go, but the forum post for this article mentions Flickr - and thinking about it I think this would be the way to go. No worries about storage costs, no time needed to code the site, comments and access already sorted, rss feeds and such. Plus it's photo oriented which is what these kinds of analysis are really needing (show and tell as it were).
ReplyDeleteI'd say that using Thingiverse would not be the way to go - deluging the site with pictures of failed prints is not really good advertising for 3D printing I guess :) Although as this post obviously shows there is a real desire for a place to analyse and critique failed prints!
Anyhow, i'm keen to help out in whatever way I can.
Sladuuch - Very interesting starfish! I also had a similar issue with filament drag when using spiral-wrap along the top Prusa support beams, and getting snagged. I now use a filament holder and nylon braid on the M8 bars to help reduce friction.
ReplyDeleteNJC - Thanks, let us know how you get on.
Kim - I too like the compare and contrast especially with different materials and print speeds, I have a stack of Yoda's with writing all over them.
Photos of prints should certainly link their Thingiverse origins, but I agree, Thingiverse has other priorities besides photo scrutiny. Uploaded photos all get resized for example.
ReplyDeleteI think Flickr is pretty limited when it comes to this idea too. There's no way of calling up comparisons? (naming photos properly would allow for search I suppose) No way to quickly and thoroughly categorize photos with variables like print speed and layer height etc.. (besides the tag system?)
But I'm all for getting some sort of solution such as Flickr going, in order to learn by doing. Rather than guess what would be a perfect solution and spend too long implementing it (fear of failure!).
Hi Gary,
ReplyDeleteI agree, Thingiverse is not going to work, and we need high resolution images and lots of them, with comments etc. I have not used Flickr yet, but I will make myself an account and get up to speed.
If you want to kick it off I would be happy to join in with more photos and writing whenever I have time, it could be a great place to document all sorts of common and not-so common build issues, and setup problems.
Let me know how you get on and I'll post this on the forum for anyone else to help also.
Cheers,
Rich.
I've gone ahead and created the group on flickr so that we can have a play and see how it works out: http://www.flickr.com/groups/3d-print-failures/
ReplyDeleteWoodsmoke - I agree that there are some features which would make failure analysis much more useful - but as you correctly point out, finding the time to build it may result in it not being built :) I would love to offer to help out develop your ideas for such a site, but I honestly haven't the time to devote to it right now. I suggest we give the flickr group a go and take it from there.
@ Rich, Woodsmoke:
ReplyDeleteAs far as fails go, i too had x on the wrong way and didn't figure it out until i tried a Wade's.
My latest semi-fail was a mini-octopus at 0.2mm layers, the back of its head curled up a gave it a squid-like shape.
For an analysis of failure mode, i think the Reprap wiki or forum would be more appropriate than thingiverse, but i guess flickr would work, too.
I linked to this blog post here: http://techwall.net/the-art-of-3d-print-failure
ReplyDelete@Rich: Awesome post - as always. Would love to see the multicolor string gained from a remelting of all your failed prints. This would probably result in an even more galatic looking cow ;)
@Gary: I've asked Ultimaker operators to join the flickr group. Failures/solutions look the same on the UM ;)
Hi Florian, Thanks for linking, I'm sure we can get some really good info up on the Flickr group. I just printed some 'failures' to show the effect on perimeter outlines when using 0% infill on shallow domed objects, I'll pop them up shortly.
ReplyDeleteyou spotted the cow! cool.
I'm a big fan of the Ultimaker, some of the recent prints are looking just amazing. I'm going to have to try smaller nozzles and fine layer slicing soon.
Rich.
Hi Rich,
ReplyDeleteI should introduce you to Paul. He did some incredible work on the UM profiles (http://davedurant.wordpress.com/2011/10/12/ultimaker-faq-but-what-about-the-quality-of-prints/) and is living in the UK, too.
Regarding the "cooling problem" photos on flickr: I'm planning to write a summary of my observations soon.
Florian
PS: Any chance that you join quite some UM operators at 3dprintingevent.com ? (free entry if you bring a printer with you)
Hi Florian,
ReplyDeleteThanks! I just read Dave's blog, really great stuff. I would be very interested in talking to Paul and Dave.
The 3Dprintevent looks really good, I'm not sure I can make it, but If things change I will be there.
Rich.
Hey so actually you can recycle the plastic..
ReplyDeletehttp://www.heatingoil.com/blog/japanese-invention-turns-plastic-trash-into-oil828/
Stupidly obvious if you ask me..
But yeah great article! I wish I could find a giant page on this. IRC is nice, but it is a hair short when it comes to the what is wrong with my print questions. You should, if you haven't already, make a really large archive of this sort of thing. Perhaps make it a wiki on reprap?
Love your Blog. So much great info and photos. I am thinking of designing a slightly heavier, wider longer reprap based on Prusa. I am thinking of going to 10mm rods and bearings, seams that's the next size larger that is common for bearings. I plan on going about 300 X 300. Do you have any tips or warnings that may help me? Thanks so much.
ReplyDeleteDave.
Hi Dave, thanks.
ReplyDeleteI'm planning a similar thing on my next machine, mainly to get more build height.
My British mendel has a wider X carriage so I can use dual extruders over the whole build area.
If you stick to the normal Prusa frame vertex and just make the M8 threaded rods longer, you will get a 300 x 300 build area, and also extra height.
You should also still be able to use 8mm rails - I would recommend using Stainless steel or precision ground rods - also use Stainless for the frame. As the Y axis moves back and forth, but the LM8UU bearings do not move to the middle you could have another threaded rod supporting the smooth Y rods right in the middle, this will stop any flex and help if the heated bed is a little heavier.
The main issue will be the power required for the heated bed, this will be quite significant - maybe 400W or more.
Do you want to build big things? or lots of smaller parts in one go.
Also check out Dan's new machine - it's looking quite Awesome - http://dankimble7.blogspot.com/2011/10/i-have-been-having-lot-of-fun-printing.html
Rich,
ReplyDeleteI uploaded my solution to recycle 3d Printed plastic from failed prints, rafts, etc... I call them "Maracas". Maybe it's the "Sound of Failure."
Because Maracas need to be made as 2 pieces, I used a keyed hole betwen the handle and the top for a Recycled Material Piggy Bank. It also allows the maracas to be printed in two pieces on Makerbot Thing-O-Matic, Or Reprap printer.
Anyway, they're on Thingiverse at
http://www.thingiverse.com/thing:13149
and
http://www.thingiverse.com/thing:13153
Take Care,
Matt
Beekeeper
Hi Matt, That's great! really nice job.
ReplyDeleteI have been filling lots of printed things recently (with all sorts of stuff) - But I do have lots of spare scrap filament so it will be nice to see if it can make some noise with these Maracas, I will have to print some of them to keep handy at the side of my printer.
Cheers,
Rich.
Hi RichRap i have build a machine that do it !! it recycle the waste plastics and made a filamente of 2,5 /2,8 mm which i used to print a Rod clamp you can view it on my blog:
ReplyDeletehttp://kentstrapper.blogspot.com/2012/01/e-riciclo-fu.html
i also hope i can talk to you about some new things that i want to plan
Best Reagards
Lorenzo Cantini
Kent's Strapper
I too had the exact same problem of reversed lines to the x axis and like richrap, didn't realize I had a problem for several weeks (again because all prints up to that point were symmetrical). It wasn't until I was printing new Prusa parts that I kept thinking... "Man... somebody has their slic3r settings backwards".... then realized... it was me and my Prusa that were backwards.
ReplyDeleteRichrap, it has been quite refreshing reading through your 'experiments'... at least that's what I call em. Being new to 3D and still trying to master my Prusa, I was thinking only I was having these issues and have been looking high and low for information speaking to slic3r and Merlin settings.
Having had several months with it now... I am in full agreement.... you only gain a real appreciation for what you have here and how it works by 'living' the failures and learning the solutions.
Still... I am in full agreement with everyone suggesting that there be a site that everyone can contribute to and garner from the types of failures that can occur and at least identifying a general vicinity of where to adjust for solutions.
I own a national ISP here in the states and have been contemplating hosting such a site for some time. If we find that flickr is not necessarily the answer... drop me a line and let's see what we can do.
Thanks again RichRap for sharing your exploits and experiments with us all. I for one am really keen on your 3 color print head and am working towards that end.
Merry Christmas to all and look out 2013!!!
This is exactly what I wish I had read through when I first started 3D printing. Thank you SO much!
ReplyDeleteHello
ReplyDeleteVery unique information. Its good article and very helpful info.
epson ink reset
Thank you.