Showing posts with label test. Show all posts

Wednesday, 30 March 2016

3D Printing with Proto-pasta Magnetic Iron filament

Proto-pasta - Magnetic Iron PLA

This is part of a focus on 3D Printing materials series, I hope to cover as many materials as possible, from a wide range of manufacturers. From everyday to experimental filaments, print results and views on using them.

If you want to get involved, please feel free to contact me. (details at the bottom of this post).

I will be discussing all the Proto-pasta materials, first up is a rather special one, and it's my favourite material from Proto-pasta - Magnetic Iron. Making rusting stuff very, very cool again.


I you decide to try any of the Proto-Pasta materials, I would strongly recommend this one, it's really nice to print with and is so much fun to post process by allowing the printed parts to rust.

You can view my video on printing and rusting Proto-pasta Magnetic Iron filament below, or in HD on Youtube Here


I have tried both 1.75mm filament and 3mm (2.85mm) in various machines and drive systems - bowden feed and direct / geared. All operated correctly with only minimal adjustments over printing with standard PLA. Normally a little more retraction and slightly lower temperature - then check your flow rates and adjust +/- 5%


I was sent a roll for testing and feedback, so here is what I did with it - And I also need to thank Ben from Hawk3DProto for sorting me out with another roll when I rather quickly ran out.

You can get 500g of material on a standard sized roll, that's only around 42m in length for the 3mm filament (around 129m for 1.75mm). At the time of writing Proto-Pasta have some special offers for their Iron filament, so now is a great time to pick some up and experiment.

They also sell 125g samples and large 12" 2Kg spools if you are feeling adventurous.


The exceptional thing that Proto-Pasta seems to achieve very well, is that their composite filaments are easy to use. Wherever possible they try to make them as similar to using 'normal' PLA as they can. You are really going to appreciate this fact. It means you will waste less material getting it tuned in and you can be confident to print something almost straight away.

For the Magnetic Iron I found that dropping the temperature by about 9 degrees C (from 205 Degrees, to 196) was about right.
The other change was with flow rate -
  • On one RepRap machine running with the 1.75mm filament - Into a wade style geared extruder and a hardened spur drive, I had to lower the extruder flow by -3% to get perfect results.
  • On the BCN3D Sigma (Bowden) machine running with 3mm material I had to increase the extruder flow by +8% for perfect filling.
For choice of hot-end, I used E3D V6, and I tried both standard brass nozzles (0.6mm - with the 1.75mm filament) and hardened versions (0.8mm - with the 3mm material). Both work fine and showed no significant sign of wear after 500g of filament was used in each machine (1Kg in total).

Obviously when you use exotic or more costly material that's designed to be on show, you want to use as little as possible on a print. Here are a few tips I would recommend for minimizing material use.
  • Check what minimum level of infill you can use. Rectilinear will tend to use the least, and still provide some support for overhang and slopes. I typically use 6% in complex metal prints and for many vases, statue figures or busts you can use 0% and just have a single perimeter outline.
  • Select a slightly bigger nozzle - and then only do one outline. Using a 0.6mm or 0.8mm will print quickly, still show up all the detail you usually need in a metal print -considering that you will most likely post-process.
  • Don't print the bottom layers - in almost every metal print I do, I always leave off the bottom, it's almost always not going to be seen and I like to fill the object after printing, so it makes that process easier too.
  • Using minimal material means you may get a small hole or two occasionally, that's not the end of a print or a failure. Just melt a section of filament with a lighter, and drip or wipe into the hole, sand and post-process and you won't be able to tell it ever had a hole or defect. 
  • Fill with plaster for that added weight and feel.

With the Iron filament, you really want to be rusting it. It's not really possible to get a shine onto the Iron, so it's also not all that important to smooth or sand the object before rusting.


However if you do lightly sand or scrub areas of the print, then they will start to rust first, I have tried various methods of rusting, here are some good and bad options -


Don't fill your prints with cement or concrete! - That was the very first material I used and it done some serious damage to the structure and integrity of the printed model.


Plaster is not as aggressive and can be used as a filler for Magnetic Iron Filament (and other metal filled materials).

Expanding gap-filling polyurethane foam works very well, obviously not adding all that much weight, but great to help with strength - especially with 0% infill objects.

I have now settled on filling most hollow objects with dry sand and sealing with a plaster cap. This provided good weight and causes no damage to the Iron material.


You can use many different chemicals to generate rusting - ( just be careful and don't mix things if you don't understand what they will do together - Chemical reactions and gases can be very nasty )

Whatever rusting method you decide to try, I strongly recommend that you do not submerge the object or add substantial amount of fluid at any one time.

Proto-Pasta also have various tips for rusting here, and other people use soaked cloth or tissue for different and selective rusting.

Below is what I used - I'm not recommending any particular method, do this at your own risk.

I originally wanted to make a gel type solution I could paint on, but after much experimentation with various gels and substances, I reverted back to a known method. I'll attempt the gel idea again at some point in the future.

I like using a 100% saturated salt solution - That's 500ml of water at room temperature with as much table salt dissolved as you can. Stop when salt crystals remain and won't dissolve.
Then I added 100ml of white vinegar.
And 20g of oxy-action laundry stain remover.


Mix all this up and put into a spray bottle. - If you can warm up the liquid and ideally the printed objects it will help with the rusting process.

Wear protective glasses and gloves, then in a ventilated area spray onto the Printed object, leave to stand, or for accelerated rusting put in a warm place, spray again as required - usually after 4-5 hours and again 10+ hours. You should end up with a nice level of rusting in any area that has been lightly sanded. If you continue to spray and keep the part lightly coated, you will get more and more rust.

 Place in a plastic tray.

 Lightly spray with rusting solution.

 About 5+ hours later you should start to see rusting. Add more spray as you like.

Some salt crystals may form, these can be washed off after rusting.


I like to allow more rusting fluid to sit in pockets or gaps, then scrub, sand or polish off some of the other areas of rust, for a really nice old looking finish.

The longer you keep Magnetic Iron printed objects damp, rust will continue to form and grow.

Why would you not want a rusted old skull?. My only wish was that I printed it even bigger... Maybe next time.


Support structure works well with the Iron filament, it's strong and takes a little more effort to remove, but it breaks away cleanly.

I have much more to come in the materials series - (Continuing with Proto-Pasta, then looking at many other filaments - I'm also open to suggestion of whatever other materials you would like to see used and tested, just let me know.) -

Proto-Pasta Stainless steel filament requires a lot more work to get a pleasing shiny finish, I will take a look at that in the next blog post and video.

Proto-Pasta Carbon fibre (V1 and V2) material is strong and also really nice to use - look out for my thoughts on using that and where if can be a good option over other materials.

High temperature PLA (including the coffee material).


And finally I will be also looking at their conductive material (not tested yet). - And as a note on this - I have tested so many 'conductive' filaments in the past and still am yet to find a really good one.) < Yes, that's laying down a challenge to any filament manufacturer - We want real conductive, not just high-resistance / 'anti-static' and/or brittle carbon loaded materials that don't really work well as a conductor in an electronic circuit.


I will leave you with an extended collection of images and links to the 3D design files - from the Magnetic Iron printing and rusting experiments (October 2015 to March 2016).

Thanks again to all of the Proto-pasta team Over in the US. And Ben at Hawk3DProto in the UK.


Thanks for reading. Please leave a comment, subscribe to me on Youtube and if you want to get in contact -

Twitter - @Richrap3d
Google+ - RichardHorne_RichRap3D

Until next time, happy printing.

Rich.
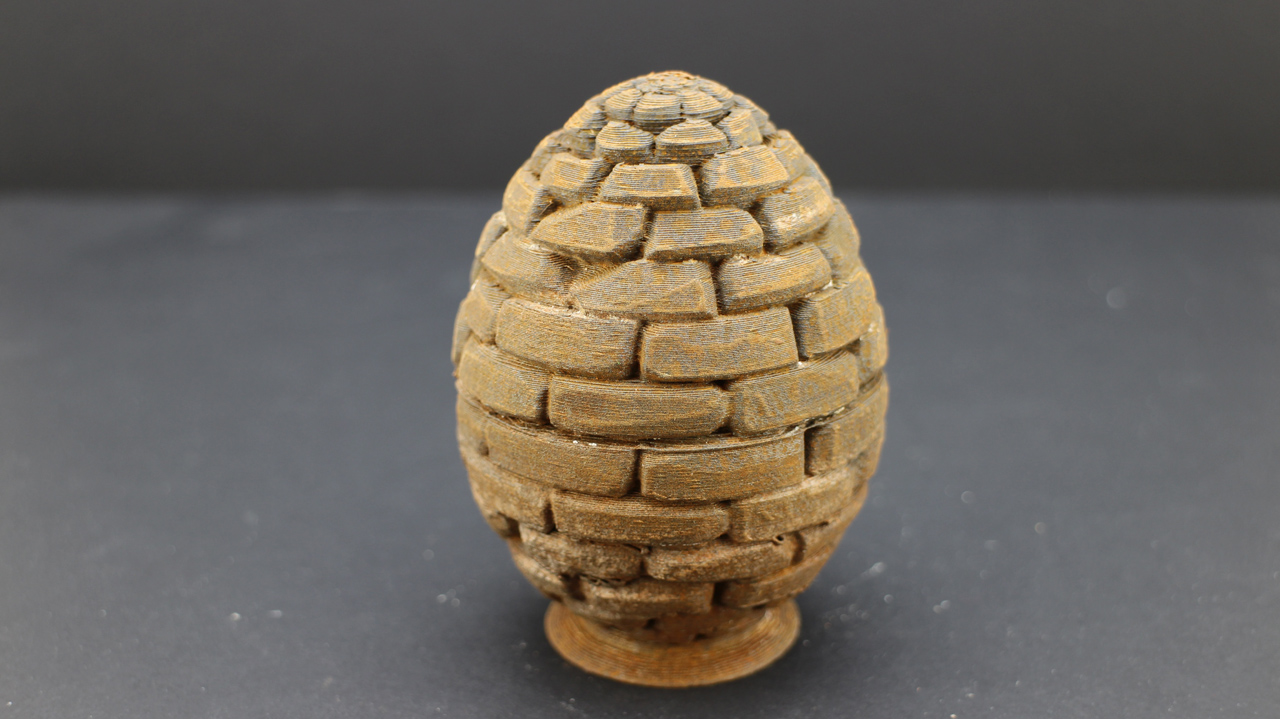

The EasterEgg Generator from 2015 - by Richard Swika - http://www.thingiverse.com/thing:719877


Another set of great models by David Mussaffi - Bottle and screw cap 41 - https://www.youmagine.com/designs/bottle-and-screw-cap-41


Above is the fantastic Skull keychain (printed bigger) By Paul Badeuille
 http://www.thingiverse.com/thing:984793


The Celtic Skull is an essential print in any material, especially good in Rusted Iron - by www.artec3d.com - http://www.thingiverse.com/artec3d/about


 The fantastic terracotta warrior - Great model by Lolita kuma - http://www.thingiverse.com/thing:1028560


One of my favourite designers designed this amazing shaped vase - Bump vase 1 by David Mussaffi - https://www.youmagine.com/designs/bump-vase-1


Pirates of the Caribbean Coin 1 piece -  by cyclone - http://www.thingiverse.com/thing:31536


Monday, 26 January 2015

Stick with it... 3D Printing - Print Bed Coating Materials. Part 1

Hello everyone,

We are looking at 3D print bed surfaces and coatings in this post.

This blog post contains an overview of the more common materials used as a 3D printing build surface. Plenty of tips and advice and we also take a look at a how well a bed coating 'skin' called 3D EeZ performs. And it's also a general call out for any other bed formula's or materials to test or experiment with. I hope you find it useful.


Most aspects of 3D Printing take time and some experimentation to refine what works best, if you already have good solution for the print bed surface, skip down to the end and take a look at how 3D EeZ worked in the test.

Will it stick?
For all the years I have been using home 3D Printers, one fundamental aspect is still causing frustration for new and experienced users alike. The issue here is getting the first layer to stick, then completing a print without unsticking, flying off mid-print or bending (warping) corners on objects.

It's now quite uncommon to have a non heated build platform, unless you choose to do so by turning it off.

One very common solution for printing in PLA, heated or not is blue 3M painters tape (multi-purpose #2090). To be honest this is fantastic for smaller machines like my 3DR design, Tantillus or the new Ultimaker 2 Go.


Have some 3M blue tape handy, it's still a really good solution for many objects and materials.

When printing small (or really tiny) and highly detailed parts, I often opt for blue tape and no heated bed. You can run cooling fans at full power and achieve highly successful and impressive prints.

Blue Painters tape - ideal for detailed tiny printing, using no heated bed.
A sheet of thick (~10mm) acrylic is another common choice when not using a heated bed, just be careful not to drive the nozzle into the surface as it will melt.

If you need to print bigger parts over ~100mm+ wide then a heated bed will help keep things flat and limit edge curl up on parts.

For PLA, PET and various filled/mixed materials (WoodFill / BrassFill etc.) you can often just use a clean sheet of glass as a suitable build platform.


Before trying to print anything, do check your nozzle is flat and vertically straight with the build platform. You also need the build surface as level as you can possibly achieve. A low cost mechanical dial shown above can really help get things set up quickly.


Top tip for using plain glass is to keep it clean, remove grease and fingerprints with alcohol or I really recommend window cleaner containing vinegar.

I use mirror glass. Handy sized 200mm x 200mm mirror tiles can be found at ikea (SÖRLIThe mirrored surface helps with checking the first layer is going down well and it heats up fast and evenly.

PLA sticks perfectly well to uncoated clean glass. If all I printed was small(ish) PLA parts,  I would always just use clean glass. The trouble comes when you want to start printing bigger (over about 170mm wide in size) or with other materials.

PVA or glue based washes are also commonly used on top of a heated glass surface. For a few years now I have most often used a 1 part PVA (elmers glue) and 8 parts water solution, it provides an excellent surface for PLA and PET printing.

PVA wash. Apply when bed is cold and leave to fully dry.
PLA being printed on a PVA coated heated glass surface.

Getting the first layer distance correctly set takes some experimentation. After a number of prints you should be able to tell when it's going down well. 


The print above is just on the borderline of being very slightly too close for the first layer. But you are usually better off being slightly compressed than not enough. Just 0.05mm more or less can make a big difference.


And this first print layer above was just slightly too far away from the build platform. 

When you print the first layer, you want to see the perimeter and infill join up, no gaps or plastic riding up in ridges. When you print the second layer, you do not want to see the hot end nozzle ploughing through the first, it should again be nicely layered on top, not digging into the first layer of material.

Gluestick, most brands seem to do a similar job. Mark Durbin kindly brought me back some genuine sticks of Elmers glue from the US. And while I remember Mark has a stunning lithophane generator up here, do check it out.

If mixing up glue and painting it onto your build platform sounds like too much work, you can also use a gluestick. Again applied when cold and leave to dry, I also recommend heating it at 60 degrees C for 30 mins before doing the first ever print.

Hairspray is another common choice. Not all brands work, you need to look out for 'extra hold' with ingredients including Vinyl, Acetate and Copolymer. No wonder it holds hair in place.


Hairspray gives a nice mottled surface to the printed object, less shiny than just sheet glass alone. I have had a few materials, like Laybrick & Laywood stick so strongly when using hairspray that the glass cracked trying to remove them, so test out your spray with small prints first.

Hairspray is easily applied and works remarkably well for PLA and PET. It does required frequent reapplication as some will stick to the surface of most printed objects. 

Nylon is a little different.

Tufnol / Garolite is often used as a heated bed surface for Nylon based print materials.


Nylon likes cellulose based fibres, so it will stick to almost anything made from wood, paper, compressed cardboard or impregnated cotton sheets (like Tufnol). The main issue is still massive warping forces as objects are printed, they will rip up or bend cardboard. I found Tufnol to be the best surface for Nylon.

Blue tape and wooden surfaces also work with various degrees of success for Nylon printing. 


A few quick notes on ABS - 

Printing with ABS is a little more tricky. You really can't print without a heated bed, and that wants to be running up at 100+ Degrees C. to get the best results. Only a fully heated chamber really provides the best way to print large ABS parts (over 200mm wide).

ABS just wants to warp and generally curl up, you really only have two choices -

Mechanical grip - 


Often a perforated board (Fibreglass FR4/FR5, shown above) can be used, this will transfer heat and also provide mechanical grip by the first layer (or raft layer) of ABS being forced into the many small holes.

Using this method a sacrificial 'raft' is often printed fist, then the object on top, when printing is finished the raft is peeled off. The raft also helps to minimise warp in the printed object, but objects printed in ABS over 150mm wide will almost always warp or have curled up edges.

The second option, and now the most common is to wipe on a solution of ABS dissolved in Acetone. This is often called ABS Juice, companies like LulzBot provide nice instructions on how to make your own 'LulzJuice', thanks guys.

I recently tested out PEI as a (heated) bed material (sample courtesy of Robox) , this is quite expensive but does work very well with almost all existing thermoplastic materials being used for home 3D Printing today. I highly expect many more 3D printer manufacturers to adopt the use of removable PEI sheets as the next generation build platform, for home and consumer machines.

PEI Sheet - expensive, but performs well.

Now to test 3D EeZ - 

Lets get on to the testing of 3D EeZ. Various materials, stickers, solutions and methods have been tried over the years. Often proving successful with one or two types of 3D print material, but usually not many or all.

Before Christmas, Tony Gaston mentioned he had a new paint-on 'skin' for 3D printer platforms.
It's not an 'open formula' and I still don't know what's actually in it, but I was intrigued by the video's and Tony is a nice chap, just trying to get people to try out his product, so decided to try it out.

Having to import the solution into the UK took some time and proved costly to get hold of, but anyone in the US should now be able to get it quite quickly to test out. I was unsure if it would work better than other home made solutions, but why not give it a test.

My existing heated bed - 

This is what my typical mirror glass build surface looks like, this particular one has a mix of PVA wash, gluestick and some hairspray for surface 'repair'. It would have printed around 100 objects to end up looking like this, and it still works fine for most materials apart from ABS and it's limited to small sized Nylon parts only. 


It's very easy to clean in a little warm water, this is an Ikea mirror cut to size. ~410mm x ~205mm and it's 3mm thick glass.


It's very thick but easy to apply, just wipe on using the sponge brush. Tony is working on a better applicators and an easier to handle container.

It's recommended to apply three layers, most recently I have dropped down to just two, but for all the testing below I had three layers of 3D EeZ - applied in opposite directions, across, up/down, and across. Each coat is applied cold and heated at 60 degrees C until it dried, about 10 mins.

It smells a little like glue, but you soon realise it's not just PVA in this mix.


My first print was just a few tiny cubes (10mm tall) in PLA with a 'brim' (skirt) to test how well it would stick. Normally after printing a PLA part I would knock them off, sometimes before the temperature of the heated bed dropped too low, so I could start another print quickly. That was not going to happen with 3D EeZ.

If you look closely at the picture above, you can see where I tried to pull off the front printed tower, I could not move it, and when I used a pair of pliers I was concerned about breaking the glass. But it did finally come off and bubbled the 3D EeZ coating. First print, first damage, not good, but it was my fault. (I think).

I decided to wait until the temperature dropped. It was a cold day and at 18 degrees C ambient the other two snapped off firmly but without any damage to the surface or part. I realised you must wait for the temperature to drop before attempting to remove the parts.

I would also later work out that it can be too cold with 3D EeZ, see later on below.

At this point I was concerned that if I printed anything too big it would simply not come off of the build surface. But don't worry that's not the case, Just don't use the brim (skirt) function for anything.


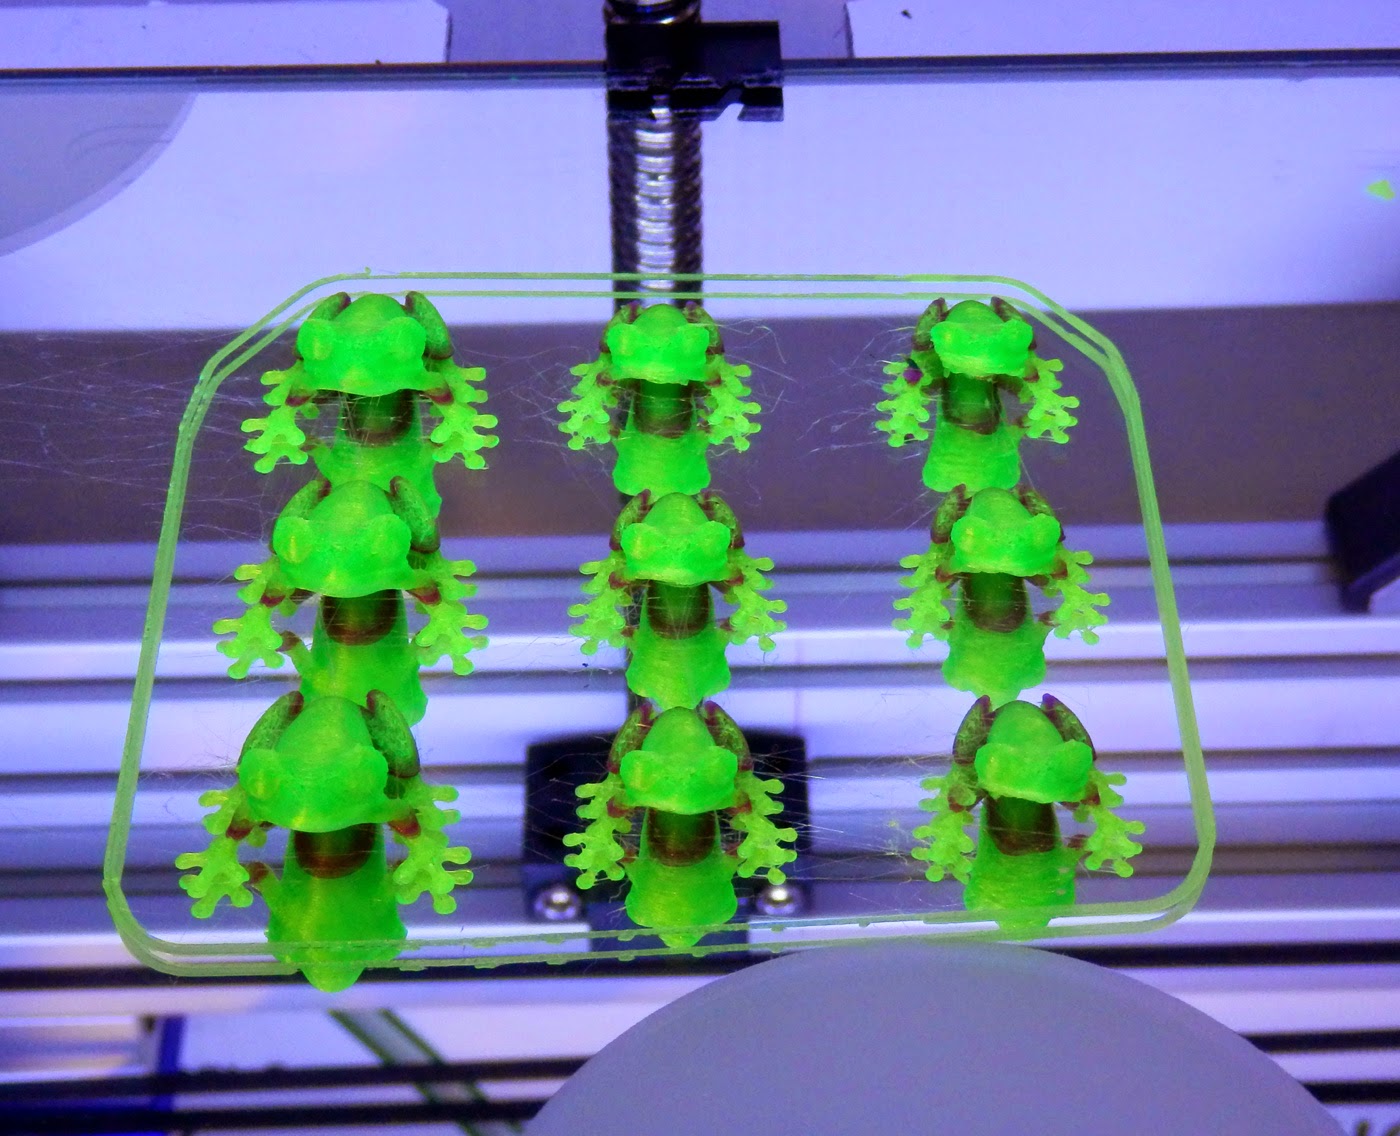
I printed various smaller parts (ok, lots of test tree frogs) in PLA, Ninjaflex, Filaflex, Bridge Nylon, Polywood and three different types of PET... And ABS too! All worked, well.


Tree frog Ninjaflex, he is quite tricky to print at the best of times in rubber, but stuck, printed and peeled off perfectly.


I didn't expect Nylon to stick, but it's actually really good.


Bridge Nylon sticks really well (almost too well), above you can see some signs of what looks like damage, but a wipe over with wet sponge and this disappears. Ignore the obvious surface damage in the middle, this was the forced 'hot removal' of the very first print tower. Again it was 'repaired' with a spot of water.


At some point printing different materials (and many more frogs) I didn't wait for the bed temperature to drop, and further damage was sustained to the surface. At this point I decided to work out what the ideal removal temperature was. It turns out that it's around 28 degrees C for most materials I tested. I believe the 3D EeZ coating changes from a semi-flexible surface to a more solid film at around ~40 Degrees C. But that's just from observation during use.

If you leave the printed part on the build platform and let it cool completely, it actually seems harder to remove than at around 28 Degrees C. I found that you can heat up a cooled bed to 40 and let it drop back to 28 for much easier removal of any stubborn parts you have let get too cold.

I now have my end of Gcode set to drop down to 28 degrees C at the end of a print making removal much easier.


It's quite easy to repair the surface, you just drip and smooth on more of the 3D EeZ solution into any damaged areas. After discovering the ideal removal temperature and repair, I managed around another 120 prints all without any further significant damage to the coating. I found a sponge wash over of water every 40 or so prints helped refresh the surface.


Getting bigger (Aria the Dragon)


And bigger - dolls furniture 


And for a really interesting test, the beautiful Astrolabe Tree Ornament by Don Foley


These rings just pop off with a normal scraper when the bed is around 28 degrees C.


Here you can see the nice matt finish you get on the underside of the print, this is particularly nice as it helps to make it look just like the other surfaces. Using just glass you get a very shiny base that can often look out of place.

The shadow rings you can see in the background will lessen next time the bed is heated, or a wipe of a wet sponge seems to help make them vanish.

I have also successfully tested ColorFabb WoodFill, BronzeFill, CopperFill and GlowFill, they all print perfectly and can be easily removed without damage to the surface coating.


I printed out bigger and more complex parts, all without the need of any form of 'brim' or skirting option.


I ended up printing a pot that filled the entire build platform, the only way to go any bigger is on my 3DRmega as soon as I find more time to pick that project up again.

The bigger parts were also quite interesting, as when they cooled some popped off the platform themselves, some had an edge stick but generally the bigger the part the easier it was to remove.

Does it last forever?

After around 120 prints I notice a slight yellowing of the surface.
No. For me when it starts to yellow and I can no longer revive it with a splash of water, it's time to change the coating. At this point parts were starting to stick much more strongly than before and clear ridges were visible on the surface.


It's very easy to remove, just soak in water and it will peel off. These sheets when dry feel quite different to dried PVA, they crackle and feel more crisp. They are flexible, strong and not brittle.

You can't apply it to every surface -  

That leads me on to one last bit of advice if you try out 3D EeZ - do not apply it to Kapton or PET Taped bed surfaces. You can print once, but it cracks and lifts off the surface. This makes sense really, it's just like having a PET printed part stuck to it.

I tested the material at bed temperatures from 30 Degrees C to 120 Degrees C with almost all the materials I had.

Like I said above even ABS sticks to it without a brim. I didn't print big in ABS, so that's one to do next time.

I sent over lots of feedback to Tony, he planned to tweak the formula, and try to get more manufactured as soon as possible. If he can get the volumes up and make it low cost, maybe more people can benefit.

If you are interested, Tony is also looking out for distributors in Europe/UK he is planning a launch soon.

I'm going to call this part one, as I do also intend to look at other solutions and surfaces now also becoming available. If you have any experiences of materials or coatings, want to share a great formula or have questions, do get in contact or leave a message below.

I hope that was useful and you get a chance to try out 3D EeZ at some point, it's a very interesting formulation, I wish Tony success with it.

Until next time.

Rich.