Showing posts with label Hawk3DProto. Show all posts

Thursday, 8 December 2016

Autumn 2016 3D Printing Adventures Update - TCT Show 2016 highlights, projects and new machines & materials


Autumn 2016 3D Printing Adventures Update 

The TCT Show was back at the Birmingham NEC Arena. This is one of the very best 3D Printing exhibitions anywhere in the world, if you get a chance to visit, make sure you register for next year and give yourself plenty of time. There are lots of suppliers, manufacturers and interesting people to meet and talk too.

I was at the show again this year for both days, here is a brief rundown of some highlights from the show, it's by no means all. This was one of those shows that I wished I had taken more photo's. I did manage to speak to many different people and visited almost all the exhibitors this time around.

My video update for Autumn is below, and contains both information from the TCT show along with materials, machines and an update on current and future projects.

You may also want to check out the new 3DHubs 2017 3D Printer guide - https://www.3dhubs.com/best-3d-printer-guide I mention a few machines that won awards in the video including the BCN3D Sigma, LulzBot TAZ6 and the Prusa MK2 i3


This is also over on YouTube in HD, click here for my channel.

First up a big thank you to everyone at E3D for providing me and Thomas Sanladerer with an operational base and generally looking after everyone in the desktop printing sector. The E3D stand's were buzzing all day, all the time, it was a great place to talk and meet people. Even the after-show party managed to congregate all around the E3D stand for most of the evening until around forty of us all packed into a local pub for a cracking roast dinner :)

So let's start with E3D and all the great things they had on show (and a few more that are/maybe coming soon) -


Firstly E3D had doubled the size of their stand this time, one half showing off their range of Spoolworks filament materials, and the other dedicated to hot-ends, nozzles, the Titan extruder and many other goodies.

E3D Copper Nozzles...

For anyone with a keen eye, you may have spotted that E3D had some copper nozzles on show. This may sound like an odd choice of material for a nozzle, but they will be appearing on 3D printers soon, so keep a lookout for more news.

Talking of nozzles, the E3D team have been working on some very special 'tiny' nozzles for super small and detailed 3D models.


These were printed with a 0.15mm nozzle in ABS. You really have to see them to fully appreciate the level of perfect detail and stunning quality being achieved with these nozzles.


More info - E3D Tiny little nozzles - http://e3d-online.com/High-Res-015-Nozzles

The detail in this chess set is astonishing for any 3D printing method, let alone FFF (FDM). A spool of filament would last for many, many models at this tiny scale.

These were also printed on a standard Mendel90 fitted with an E3D V6 hot-end, nothing special - but with a dedicated high-resolution machine we could see even more capabilities for these tiny sized nozzles.


E3D has invested heavily in expansion of their business in the past 18 months, taking on more people in development and research, we should be seeing many more great things coming from E3D so do keep an eye out.

Bondtech extruders and Emvio Engineering - https://emvioeng.com/extruder-mechanism-upgraded-bondtech-dual-drive/

Emvio Engineering had a really nice BCN3D Sigma setup with custom mounted Bondtech extruders.


They also kindly sent me a set for fitting and feedback in my BCN3D Sigma 3D Printer.


I'm doing a separate video and blog post on the entire process of fitting, setup and using the Bondtech extruders in a Sigma 3D Printer.

I'm really impressed with the upgrade and initial printing results. I'll post more as soon as I have completed more comparison prints and tested as many different materials.

LulzBot (Taz 6) - 

LulzBot was at their first international show for the TCT event. It was a total pleasure to talk to them and discuss all aspects of the LulzBot company, machines and amazing way they go about Open-Source 3D printing.


James Bruton from Xrobots.co.uk was also on the LulzBot stand, if you don't already know who James is, then do please check out his amazing YouTube channel (lots of robotics, 3D Printing and Cosplay)

James also did a great TCTshow video about LulzBot you can see here 

LulzBot also sent me a TAZ 6 in November, so look out for more video's, blog posts and discussion about my experience of using the TAZ 6 3D Printer soon.


Simple to setup right out of the box.


After a few minor issues, I was up and running - with a quick Benchy3D print in Colorfabb nGen.


The TAZ6 is very busy printing all sorts of models in different materials (lots of Christmas) so look out for an update soon on setting up and using the LulzBot TAZ 6.

Lulzbot (Taz 6) - https://www.lulzbot.com/store/printers/lulzbot-taz-6


More TCT Show and links - 

This time at the show there was almost too many more companies to list, but here are a few more I spotted and talked to at the 2016 TCT Show.

eMotion Tech - (Micro Delta Rework printer) - https://www.reprap-france.com/

Hawk3DProto was another great base for me to use during the TCTShow. A big thank you to Ben and also all the team from BCN3D.

Ben was also very kind to give me some Proto-Pasta Matt Fibre HTPLA Filament for testing - https://www.proto-pasta.com/collections/matte-fiber-htpla

I hope to be doing some hands-on 3D Printing training with Ben on-site at Hawk3DProto in the new year. If you are in any way interested in taking part of getting involved too, do get in contact with me on Twitter about this @RichRap3D


Hawk 3D Proto and BCN3D Technologies - http://www.hawk3dproto.co.uk/bcn-3d-sigma.html

HP and their Multi-jet fusion technology - http://www8.hp.com/uk/en/printers/3d-printers.html

Photocentric -

Photocentric - http://www.photocentric3d.com/

Polymaker (Polysmooth Polysher - Kickstarter etc.) - https://www.kickstarter.com/projects/polymaker/polysmooth-and-polysher-3d-prints-without-layers/description

Prusa Printers / Prusa Research (MK2 + 4 extruder add-on) - http://shop.prusa3d.com/en/printer-upgrades/118-original-prusa-i3-mk2-multi-material-upgrade.html

Silicone 3D Printing - http://www.picsima.com/

Magigoo (3D Printing bed adhesive) - https://magigoo.com/

Printrbot Simple V2 (2016) - https://printrbot.com/shop/simple-v2/

The team at 3D Filaprint had a great selection of materials, components and items to make 3D printing easier.
3DFilaprint (3D Printed Working Pinball machine - Wow!) - http://3dfilaprint.com/tonys%20pinball/


Haloween 3D Printing - (mostly testing out the Prusa i3 MK2 with lots of different materials) -

Halloween coffin pot (Design by Martin Moore - Files over on MyMiniFactory) Printed in Filamentum Cinnamon wood filament - https://www.myminifactory.com/object/halloween-coffin-pot-decoration-24554

Spider Pendant (Design by upalermo - Files over on Thingiverse) Printed in Flexfill 98A soft filament - http://www.thingiverse.com/thing:1785811

Treat bowl (Design by Tony Short - Files over on Thingiverse ) Printed in Polyalchemy Elixir Green and Orange using the colorprint software by Prusa research - http://www.thingiverse.com/thing:1074374


Autumn leaves (Designed by Faberdashery - Files over on Youmagine) - Printed in Recycled PLA filament - https://www.youmagine.com/designs/autumn-leaves


Graphica Mega Ghost (Designed by 3Dkitbash - Files over on Youmagine) - Printed in Fillamentum Extrafill PLA Luminious Orange filament - https://www.youmagine.com/designs/graphica-mega-ghost-print-play-via-3dkitbash-com

Ghosts (Designed by muzz64 - Files over on Thingiverse) Printed in Polyalchemy Elixir natural PLA (glossy white) - http://www.thingiverse.com/thing:1777164

We printed a lot more to add to the ever growing Halloween collection - Above includes many more objects that have been printed for Halloween over the last few years.

Lots and lots of Christmas printing at the moment, testing out lots of materials, devices and even a very cool Laser engraver upgrade (for 3D printers) - more on these projects soon.

It was really great to talk to so many people and companies at the TCTshow. If I missed you out in this post I'm sorry it was just such an amazing event this year, I spent almost all my time talking to people and not enough time taking pictures or video to share.

I'll try to get in a few more posts and video's before Christmas, I still have lots and lots more to share, many more projects and adventures with all manner of 3D printing devices.

See you all very soon.

Richard.


Wednesday, 30 March 2016

3D Printing with Proto-pasta Magnetic Iron filament

Proto-pasta - Magnetic Iron PLA

This is part of a focus on 3D Printing materials series, I hope to cover as many materials as possible, from a wide range of manufacturers. From everyday to experimental filaments, print results and views on using them.

If you want to get involved, please feel free to contact me. (details at the bottom of this post).

I will be discussing all the Proto-pasta materials, first up is a rather special one, and it's my favourite material from Proto-pasta - Magnetic Iron. Making rusting stuff very, very cool again.


I you decide to try any of the Proto-Pasta materials, I would strongly recommend this one, it's really nice to print with and is so much fun to post process by allowing the printed parts to rust.

You can view my video on printing and rusting Proto-pasta Magnetic Iron filament below, or in HD on Youtube Here


I have tried both 1.75mm filament and 3mm (2.85mm) in various machines and drive systems - bowden feed and direct / geared. All operated correctly with only minimal adjustments over printing with standard PLA. Normally a little more retraction and slightly lower temperature - then check your flow rates and adjust +/- 5%


I was sent a roll for testing and feedback, so here is what I did with it - And I also need to thank Ben from Hawk3DProto for sorting me out with another roll when I rather quickly ran out.

You can get 500g of material on a standard sized roll, that's only around 42m in length for the 3mm filament (around 129m for 1.75mm). At the time of writing Proto-Pasta have some special offers for their Iron filament, so now is a great time to pick some up and experiment.

They also sell 125g samples and large 12" 2Kg spools if you are feeling adventurous.


The exceptional thing that Proto-Pasta seems to achieve very well, is that their composite filaments are easy to use. Wherever possible they try to make them as similar to using 'normal' PLA as they can. You are really going to appreciate this fact. It means you will waste less material getting it tuned in and you can be confident to print something almost straight away.

For the Magnetic Iron I found that dropping the temperature by about 9 degrees C (from 205 Degrees, to 196) was about right.
The other change was with flow rate -
  • On one RepRap machine running with the 1.75mm filament - Into a wade style geared extruder and a hardened spur drive, I had to lower the extruder flow by -3% to get perfect results.
  • On the BCN3D Sigma (Bowden) machine running with 3mm material I had to increase the extruder flow by +8% for perfect filling.
For choice of hot-end, I used E3D V6, and I tried both standard brass nozzles (0.6mm - with the 1.75mm filament) and hardened versions (0.8mm - with the 3mm material). Both work fine and showed no significant sign of wear after 500g of filament was used in each machine (1Kg in total).

Obviously when you use exotic or more costly material that's designed to be on show, you want to use as little as possible on a print. Here are a few tips I would recommend for minimizing material use.
  • Check what minimum level of infill you can use. Rectilinear will tend to use the least, and still provide some support for overhang and slopes. I typically use 6% in complex metal prints and for many vases, statue figures or busts you can use 0% and just have a single perimeter outline.
  • Select a slightly bigger nozzle - and then only do one outline. Using a 0.6mm or 0.8mm will print quickly, still show up all the detail you usually need in a metal print -considering that you will most likely post-process.
  • Don't print the bottom layers - in almost every metal print I do, I always leave off the bottom, it's almost always not going to be seen and I like to fill the object after printing, so it makes that process easier too.
  • Using minimal material means you may get a small hole or two occasionally, that's not the end of a print or a failure. Just melt a section of filament with a lighter, and drip or wipe into the hole, sand and post-process and you won't be able to tell it ever had a hole or defect. 
  • Fill with plaster for that added weight and feel.

With the Iron filament, you really want to be rusting it. It's not really possible to get a shine onto the Iron, so it's also not all that important to smooth or sand the object before rusting.


However if you do lightly sand or scrub areas of the print, then they will start to rust first, I have tried various methods of rusting, here are some good and bad options -


Don't fill your prints with cement or concrete! - That was the very first material I used and it done some serious damage to the structure and integrity of the printed model.


Plaster is not as aggressive and can be used as a filler for Magnetic Iron Filament (and other metal filled materials).

Expanding gap-filling polyurethane foam works very well, obviously not adding all that much weight, but great to help with strength - especially with 0% infill objects.

I have now settled on filling most hollow objects with dry sand and sealing with a plaster cap. This provided good weight and causes no damage to the Iron material.


You can use many different chemicals to generate rusting - ( just be careful and don't mix things if you don't understand what they will do together - Chemical reactions and gases can be very nasty )

Whatever rusting method you decide to try, I strongly recommend that you do not submerge the object or add substantial amount of fluid at any one time.

Proto-Pasta also have various tips for rusting here, and other people use soaked cloth or tissue for different and selective rusting.

Below is what I used - I'm not recommending any particular method, do this at your own risk.

I originally wanted to make a gel type solution I could paint on, but after much experimentation with various gels and substances, I reverted back to a known method. I'll attempt the gel idea again at some point in the future.

I like using a 100% saturated salt solution - That's 500ml of water at room temperature with as much table salt dissolved as you can. Stop when salt crystals remain and won't dissolve.
Then I added 100ml of white vinegar.
And 20g of oxy-action laundry stain remover.


Mix all this up and put into a spray bottle. - If you can warm up the liquid and ideally the printed objects it will help with the rusting process.

Wear protective glasses and gloves, then in a ventilated area spray onto the Printed object, leave to stand, or for accelerated rusting put in a warm place, spray again as required - usually after 4-5 hours and again 10+ hours. You should end up with a nice level of rusting in any area that has been lightly sanded. If you continue to spray and keep the part lightly coated, you will get more and more rust.

 Place in a plastic tray.

 Lightly spray with rusting solution.

 About 5+ hours later you should start to see rusting. Add more spray as you like.

Some salt crystals may form, these can be washed off after rusting.


I like to allow more rusting fluid to sit in pockets or gaps, then scrub, sand or polish off some of the other areas of rust, for a really nice old looking finish.

The longer you keep Magnetic Iron printed objects damp, rust will continue to form and grow.

Why would you not want a rusted old skull?. My only wish was that I printed it even bigger... Maybe next time.


Support structure works well with the Iron filament, it's strong and takes a little more effort to remove, but it breaks away cleanly.

I have much more to come in the materials series - (Continuing with Proto-Pasta, then looking at many other filaments - I'm also open to suggestion of whatever other materials you would like to see used and tested, just let me know.) -

Proto-Pasta Stainless steel filament requires a lot more work to get a pleasing shiny finish, I will take a look at that in the next blog post and video.

Proto-Pasta Carbon fibre (V1 and V2) material is strong and also really nice to use - look out for my thoughts on using that and where if can be a good option over other materials.

High temperature PLA (including the coffee material).


And finally I will be also looking at their conductive material (not tested yet). - And as a note on this - I have tested so many 'conductive' filaments in the past and still am yet to find a really good one.) < Yes, that's laying down a challenge to any filament manufacturer - We want real conductive, not just high-resistance / 'anti-static' and/or brittle carbon loaded materials that don't really work well as a conductor in an electronic circuit.


I will leave you with an extended collection of images and links to the 3D design files - from the Magnetic Iron printing and rusting experiments (October 2015 to March 2016).

Thanks again to all of the Proto-pasta team Over in the US. And Ben at Hawk3DProto in the UK.


Thanks for reading. Please leave a comment, subscribe to me on Youtube and if you want to get in contact -

Twitter - @Richrap3d
Google+ - RichardHorne_RichRap3D

Until next time, happy printing.

Rich.


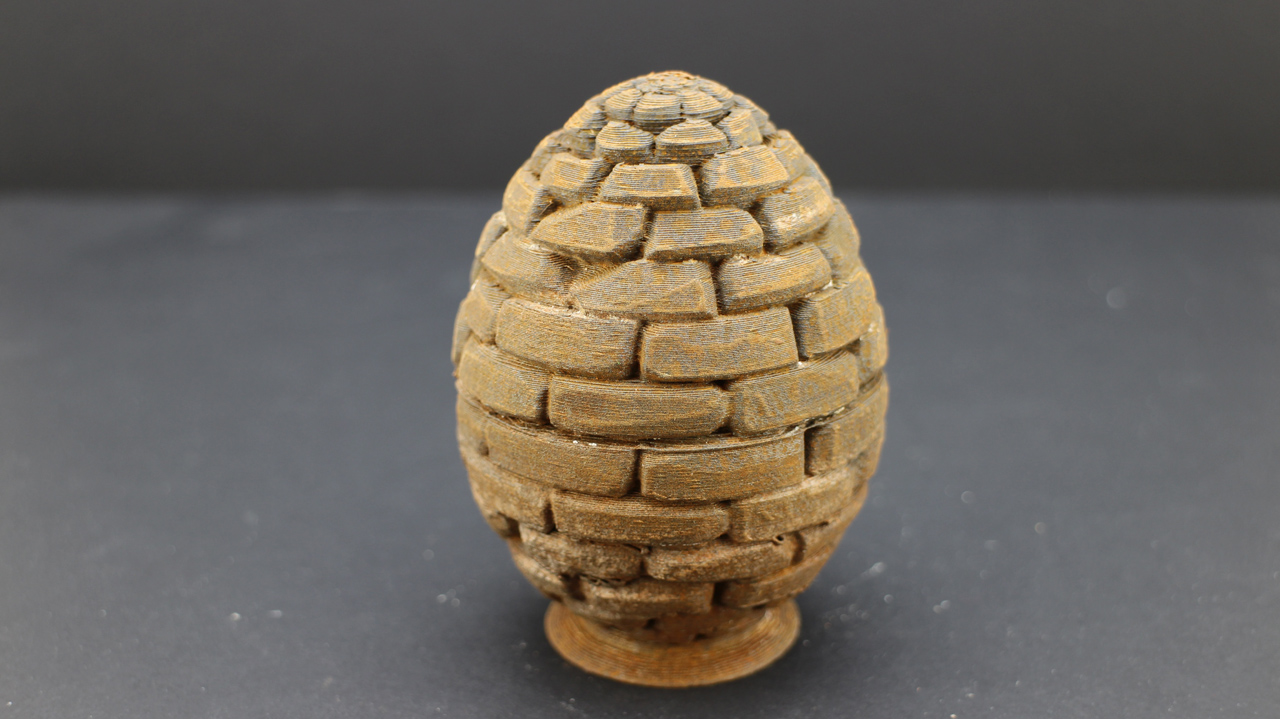
The EasterEgg Generator from 2015 - by Richard Swika - http://www.thingiverse.com/thing:719877


Another set of great models by David Mussaffi - Bottle and screw cap 41 - https://www.youmagine.com/designs/bottle-and-screw-cap-41


Above is the fantastic Skull keychain (printed bigger) By Paul Badeuille
 http://www.thingiverse.com/thing:984793


The Celtic Skull is an essential print in any material, especially good in Rusted Iron - by www.artec3d.com - http://www.thingiverse.com/artec3d/about


 The fantastic terracotta warrior - Great model by Lolita kuma - http://www.thingiverse.com/thing:1028560


One of my favourite designers designed this amazing shaped vase - Bump vase 1 by David Mussaffi - https://www.youmagine.com/designs/bump-vase-1


Pirates of the Caribbean Coin 1 piece -  by cyclone - http://www.thingiverse.com/thing:31536