The TCT Show was back at the Birmingham NEC Arena. This is one of the very best 3D Printing exhibitions anywhere in the world, if you get a chance to visit, make sure you register for next year and give yourself plenty of time. There are lots of suppliers, manufacturers and interesting people to meet and talk too.
I was at the show again this year for both days, here is a brief rundown of some highlights from the show, it's by no means all. This was one of those shows that I wished I had taken more photo's. I did manage to speak to many different people and visited almost all the exhibitors this time around.
My video update for Autumn is below, and contains both information from the TCT show along with materials, machines and an update on current and future projects.
You may also want to check out the new 3DHubs 2017 3D Printer guide - https://www.3dhubs.com/best-3d-printer-guide I mention a few machines that won awards in the video including the BCN3D Sigma, LulzBot TAZ6 and the Prusa MK2 i3
First up a big thank you to everyone at E3D for providing me and Thomas Sanladerer with an operational base and generally looking after everyone in the desktop printing sector. The E3D stand's were buzzing all day, all the time, it was a great place to talk and meet people. Even the after-show party managed to congregate all around the E3D stand for most of the evening until around forty of us all packed into a local pub for a cracking roast dinner :)
So let's start with E3D and all the great things they had on show (and a few more that are/maybe coming soon) -
Firstly E3D had doubled the size of their stand this time, one half showing off their range of Spoolworks filament materials, and the other dedicated to hot-ends, nozzles, the Titan extruder and many other goodies.
E3D Copper Nozzles...
For anyone with a keen eye, you may have spotted that E3D had some copper nozzles on show. This may sound like an odd choice of material for a nozzle, but they will be appearing on 3D printers soon, so keep a lookout for more news.
Talking of nozzles, the E3D team have been working on some very special 'tiny' nozzles for super small and detailed 3D models.
These were printed with a 0.15mm nozzle in ABS. You really have to see them to fully appreciate the level of perfect detail and stunning quality being achieved with these nozzles.
The detail in this chess set is astonishing for any 3D printing method, let alone FFF (FDM). A spool of filament would last for many, many models at this tiny scale.
These were also printed on a standard Mendel90 fitted with an E3D V6 hot-end, nothing special - but with a dedicated high-resolution machine we could see even more capabilities for these tiny sized nozzles.
E3D has invested heavily in expansion of their business in the past 18 months, taking on more people in development and research, we should be seeing many more great things coming from E3D so do keep an eye out.
Emvio Engineering had a really nice BCN3D Sigma setup with custom mounted Bondtech extruders.
They also kindly sent me a set for fitting and feedback in my BCN3D Sigma 3D Printer.
I'm doing a separate video and blog post on the entire process of fitting, setup and using the Bondtech extruders in a Sigma 3D Printer.
I'm really impressed with the upgrade and initial printing results. I'll post more as soon as I have completed more comparison prints and tested as many different materials.
LulzBot (Taz 6) -
LulzBot was at their first international show for the TCT event. It was a total pleasure to talk to them and discuss all aspects of the LulzBot company, machines and amazing way they go about Open-Source 3D printing.
LulzBot also sent me a TAZ 6 in November, so look out for more video's, blog posts and discussion about my experience of using the TAZ 6 3D Printer soon.
Simple to setup right out of the box.
After a few minor issues, I was up and running - with a quick Benchy3D print in Colorfabb nGen.
The TAZ6 is very busy printing all sorts of models in different materials (lots of Christmas) so look out for an update soon on setting up and using the LulzBot TAZ 6.
Hawk3DProto was another great base for me to use during the TCTShow. A big thank you to Ben and also all the team from BCN3D.
Ben was also very kind to give me some Proto-Pasta Matt Fibre HTPLA Filament for testing - https://www.proto-pasta.com/collections/matte-fiber-htpla
I hope to be doing some hands-on 3D Printing training with Ben on-site at Hawk3DProto in the new year. If you are in any way interested in taking part of getting involved too, do get in contact with me on Twitter about this @RichRap3D
Treat bowl (Design by Tony Short - Files over on Thingiverse ) Printed in Polyalchemy Elixir Green and Orange using the colorprint software by Prusa research - http://www.thingiverse.com/thing:1074374
We printed a lot more to add to the ever growing Halloween collection - Above includes many more objects that have been printed for Halloween over the last few years.
Lots and lots of Christmas printing at the moment, testing out lots of materials, devices and even a very cool Laser engraver upgrade (for 3D printers) - more on these projects soon.
It was really great to talk to so many people and companies at the TCTshow. If I missed you out in this post I'm sorry it was just such an amazing event this year, I spent almost all my time talking to people and not enough time taking pictures or video to share.
I'll try to get in a few more posts and video's before Christmas, I still have lots and lots more to share, many more projects and adventures with all manner of 3D printing devices.
It's early September and I had a surprise delivery from none other than Josef Prusa. It was double the surprise when I realised - not only did Jo send me a shiny new fully assembled and tested MK2 i3 Prusa 3D Printer, but he also included a kit build of parts for the same machine too. Wow!
For anyone that does not already know, the i3 is a many-times evolved version of the RepRap Mendel (And a bit of the Mendel90 is there too), a design by Ed Sells that quickly got simplified by Josef Prusa, and then highly adopted all around the RepRap 3D Printing community - we are talking around 2010 ~ 2011.
After removing the assembled machine from it's well packed box, the first thing I spotted was a dual colour 3D Print Prusa logo fixed to the heated bed. It made me smile for many reasons, but mostly because it reminded me of the first time I met Jo. This was at the very first RepRap UK Masterclass in Bath University - the birthplace of RepRap.
RepRap Masterclass July 3rd 2011 - Bath university (UK) - Image (C) by Dr Andrew Dent.
RepRap Masterclass July 2011 - Photograph above is by Dr Andrew Dent (Faberdashery) - who I also met for the very first time at the build weekend, just before Faberdashery was launched.
I'm on the far left and Josef Prusa is front far right.
After looking over the machine and it's components I obviously asked a few questions, many had an interesting story attached and really highlights why using your own products in production makes for a much better product being sold.
Firstly the heated bed is really solid, but not heavy - it's not an Aluminium plate and it's also not the standard bendy PCB material you normally find fitted to 'i3 style' machines.
This heated bed is the thickest FR4 PCB material I have ever seen. It's ~3.6mm thick and during it's manufacture it has also been compressed - for flatness and to make everything more solid.
I work in electronics every day, so over the years I have used 2.4mm and 3.2mm PCB materials for special things, but this is still the thickest PCB I have seen being used as a heated build platform for 3D printing. I'm confident this is going to do a really good job of keeping the build plate nice and flat, even at temperatures well over 120 Degrees C.
The assembled machine was super easy to get working, just a few printed clamps to remove and a simple procedure to auto-level the printer build platform.
Then the warm-up and loading of filament, and a quick test print from the samples included on the SD Card.
My daughter selected a file called buddy...
And it printed an awesome Pug. We discovered, this was Jo's dog, buddy.
The pre-assembled Prusa i3 MK2 printer was ready to go right out of the box. Just download drivers, and Slic3r profiles and you are ready to print whatever you like.
We then printed many, many more things...
Many people are recommending this as a 'great first 3D printer'. I would go further than that. It's simply a great and very capable 3D Printer for a good price. (The pre-assembled machine is outstanding value for money - when you consider the time to build one yourself). That said I would always recommend the kit if you have the confidence to build it up. 3D printers do break and you will need to service them. If you can do Ikea, you should be able to build this kit.
I will post more about the assembled machine and it's capability, but let's move on to the i3 MK2 Kit.
Dad and Daughter 3D Printer build -
Anyway, back to the subject of this blog post. My youngest daughter Sophia (now 8 1/2 Years old) is very excited to be building up her first 3D Printer. I'm going to document it and let you know how we get on with the Prusa MK2 Kit build.
The video below is looking at the Kit components and preparing to start the build with my daughter.
My oldest Daughter is now 11. Last summer she also built up her first 3D Printer. That was a RepRapPro Fisher Delta printer (yes, one day I will post all about that build too). It's done a fantastic job, but now I think they are both ready for a machine with a heated bed and greater build area.
Take a look at the unpacking and first thoughts on the fully assembled machine in the video below. Or you can watch it directly on YouTube here in HD.
Looking at the assembled Prusa i3 MK2 3D Printer
Thanks for reading. Join us next time where we build up the rest of the Prusa i3 MK2 3D Printer kit.
It has been a really amazing period from October-Feb with so many new machines being released into the community, my own needs and desires for the 'perfect' machine are now starting to materialise.
MendelMax isn't 100% perfect, but it's the best machine I have built to date - and I really like it.
I built up a frame concept back in 2010 out of 20mm Extrusions, but it never got past this picture -
It would have been an interesting machine. When I spotted MendelMax I just had to build one (or more)
I'm not going into too much details about building up MendelMax, most of it is straightforward, I'll focus more on where I have deviated from the 'standard' design. MendelMax home page is here and the MendelMax GoogleGroup is here
So firstly all the 4 different machine designs are +80mm or more longer on the X axis, so I can fit a Dual+ extruder (and my new X carriage, see below).
I decided to get different sets of Aluminium extrusions cut for four different sized machines. - I need better names but -
1) - The normal model is just 80mm bigger on X - this would be more than adequate for most situations and is very similar to a Prusa Mendel in size and shape.
2) - The mini model is more like a Huxley, it's going to be a single extruder (Bowden Fed) and designed to be very strong and transportable (150mm x 150mm bed size)
3) - The Big model is what I have built up first, this is going to be for my hack and test machine, with the ability to print upto 305mm x 305mm bed size.
Big Max and Mini Max
4) - The Massive one is a little silly really, and I'm not sure I'll build it up, and certainly not with 8MM smooth bars.
The Frame around the Mini Max above is the lower section of the Massive model, build area is about 450mm x 450mm, not sure what the Z would be, around 320mm+ I expect.
I'm using Bosch-Rexroth 20mm Aluminium Extrusions from KJN here in the UK - They are a really excellent company to deal with, and offer great pricing and cut to length service as standard! - Do take a look.
This was my stack of Extrusions - 2.7M long package on a wood base to keep it all straight.
You will need to Tap the ends of almost all the frame sections, and with Bosch Rexroth you need an M6 Tap - the Mitsumi Extrusions listed on the MendelMax home page use M5 - so check before you buy the bolts!
I have used a few of these on my first Max and they are holding up perfectly, I will try building the next one completely out of these.
I'm using some metal reinforcing brackets on the bigger models, it also means you can leave off the plastic bracing pieces from the top of the machine, looks a little nicer in my opinion.
It was about 5 degrees C outside when my Bling machine printed these.
I don't recommend printing in the cold! - Ambient needs to be over 13 degrees C for successfully printing in PLA, it's a nightmare below that temperature.
Y Axis - I'm now using the V2 Motor mount, not that I had an issues with the first version shown above.
Also two Idler mounts and two bearings, this allows the belt to drift a little and so does not rub against washers etc. - Well worth using two bearings on both X and Y axis.
NOTE : - Just spotted this really nice Y idler with built in belt tensioning by DanFineArt - very cool.
As this is a bigger machine, I'm using wider belts, about 8mm (cut-down from 10mm) with a 2.5mm pitch.
Simple MDF Clamp for the Y axis belt, I'll fit an adjustable one at some point, or change to this Y idler
I contemplated a 20mm Alu frame for the Y axis, opted for MDF just to get it running.
Heated build Bed.
I considered designing a bigger PCB heated bed, and also an aluminium one, but as this was a test to see if I would need, and actually also use a bigger build area. I firstly decided to use a standard V2 Prusa PCB and a standard copper clad PCB to spread the heat over a wider area.
I'm using the 'spare' hole in the middle of the Prusa V2 PCB to clamp using a countersunk M3 screw into my copper clad PCB board.
Simply wired up and clamped with M3 screws in the corners and middle, thermistor is on the copper clad board at the side. The middle screw is also acting as a cable strain relief.
I'm not a believer in measuring the temperature in the middle of a head bed, I always measure at the edge or corner.
Z Axis -
NOTE : - I'm still using M8 Stainless smooth rods on all the MendelMax machines, but if you are thinking about making a MAX (or any big machine) with a bigger build area than 300mm x 300mm then I really would recommend going to 10mm / 12mm, you will find 12mm costs less for the Bearings but the rods are quite a bit heavier, 16mm is overkill.
Back to the old style Z design (Clamp, rather than push-fit) - slight modifications including an adjustable Z- height screw/spring. Slightly, shorter, fatter and chunkier all around.
I always add Kapton tape to the X bar going into the Z ends, helps them grip in the plastic, I do this even if using push-fit Z ends.
I'm using Aluminium Flexible couplers on Max - these are really great if your Z axis is supported. They should not really be used on designs where the Z axis is hanging (Prusa and Huxley) or compressing (Printrbot and Wallace) without using some sort of support for the Z threaded rods.
I have started seeing a lot of people fitting these to designs that really need a solid coupling, for that I would always use Nopheads Motor coupler
On MendelMax the support for the Z rods are provided by Thrust bearings (shown above).
I'm also using M6 threaded rod for the Z axis over the more common M8, I find it gives better results and does not fight with the M8 Smooth rods for control over the X carriage placement in horizontal alignment when moving the X carriage vertically.
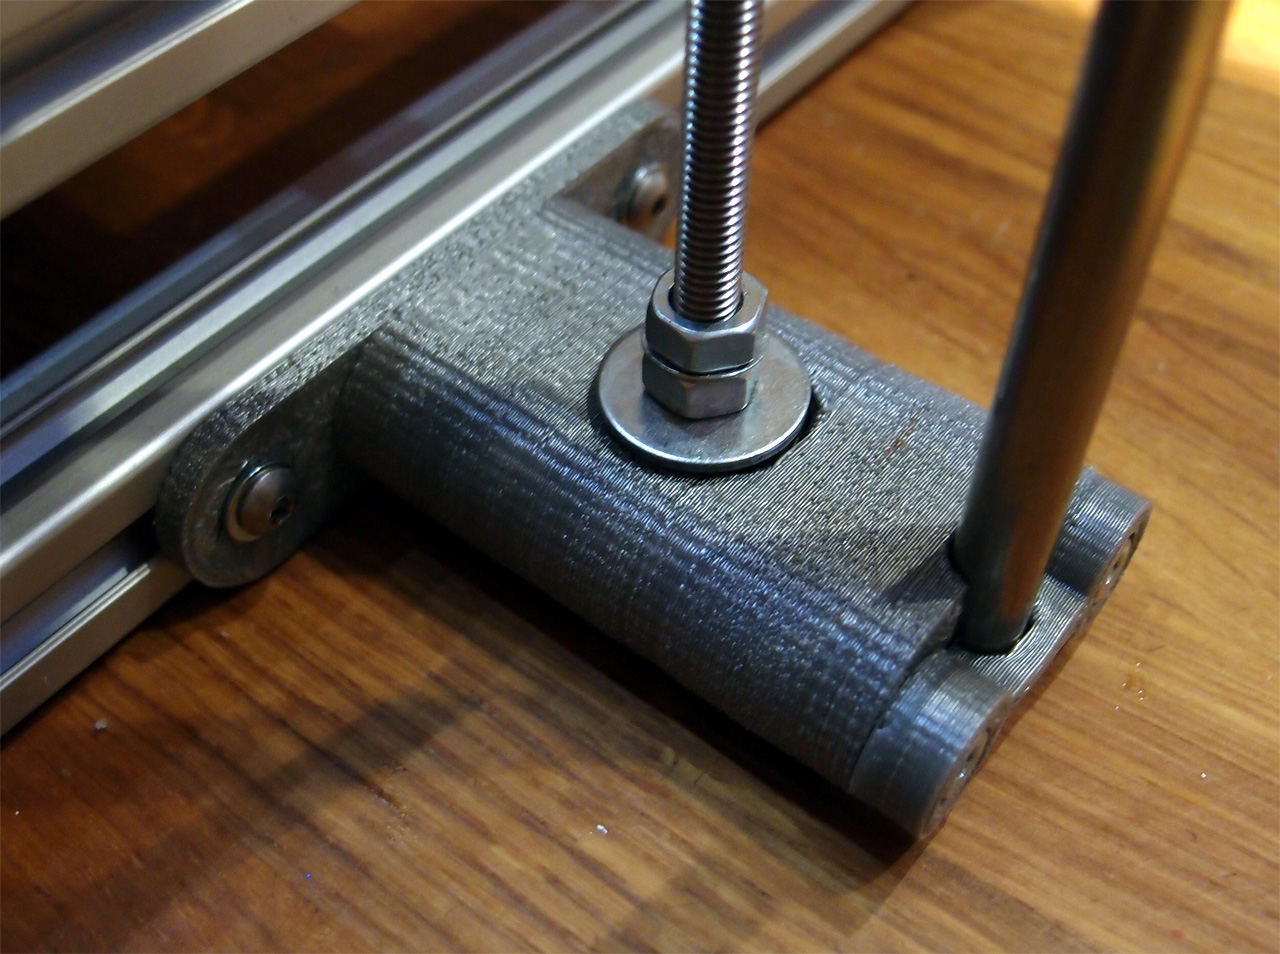
The original Z supports looked like this, and still used M8 Thrust bearings with a washer on top to allow for the smaller M6 threaded rod, quite a noisy arrangement, so they got changed to the below versions after first testing of the machine.
This is based on the Z axis mount design by AlephObjects my version of changes the Thrust bearing size so M6 Rods can be used and also fills up some holes in the AlephObjects version along with making it a little easier to print (mainly the vertical curve on the back - it now has a sharp bridge point).
Even with just two M4 bolts holding on my Greg's accessible extruder I still find it a pain to swap-out extruders so I decided to re-design the X carriage to allow a quick extruder change and also make it big enough for Dual extrusion and mounting other things -
I'm not yet experienced with OpenSCAD so I used Sketchup for this design, if anyone apart from me finds the idea useful it would be great to do it as a parametric OpenSCAD model, I can already see a need for a LM10UU version.
I'm getting to grips with Sketchup now, you can do quite a lot with it.
My aims for this design -
Horizontal X design compatible spacing with Mendel, Prusa Mendel and MendelMAX
Use Linear bearings (LM8UU) and make them very easy to fit.
Quick-fit and removal of Extruders (And other devices... more on that shortly)
Maximum space for extruder/hot-ends/heat-sinks between the smooth X bars
Allow dual or more extruder's to be fitted at once.
Allow for an easy extension of the X carriage (for future upgrades) - that needs some explanation, see below.
Printable on a Prusa, Huxley or TOM without support material.
This is my design for a 'Quick-Fit' clamp and expandable X-carriage -
It's printed vertically in two parts, without the need for support material - bolted together.
A key feature about the design is that you can extend it, even when it's fitted on the machine, you would unbolt the two halves and insert a printed spacer each side then bolt back together, allowing triple extruder's to fit or something bigger...
4 linear bearings LM8UU are used and provide the widest space for extruder's whilst keeping compatible with Mendel, Prusa, and MendelMax X bar spacing.
I know it looks big, but actually is only uses a little more length and when you have a normal Greg/Wade extruder fitted to any other X-carriage it usually overhangs by almost the same amount.
It uses a small Mendel style Bearing for the Quick-fit latch.
The latch is quite tall in this picture, it's a little smaller now.
I have updated Greg's Extruder to be Quick-Fit and defined the spacing for the standard carriage adapter plate to be 100mm wide.
It has an adjustable belt clamp.
This is an example adapter for a normal Wade/Greg extruder to turn it into a Quick-fit version.
Lower profile Catch
This shows a Dual extruder setup on the Quick-Fit adapter - using 2 x NEMA 14 (Huxley style) extruder's side-by-side.
Here is a Short video showing fitting and removal of the Quick-Fit Extruder on a Quick-Fit X carriage.
My version (shown above and here on Thingiverse) is slightly modified with a lever, more support for the guides and an M3 nut trap on both sides.
Hot end -
My current hot-ends of choice are J-Heads - I could do a whole post on how good they are. I do make a few changes before using them - Here is what I do to a normal MK-IV hot-end -
All of this is done for mounting, cooling, support of the PEEK at it's weakest point and to stop as much heat from rising up the PEEK as possible.
Take a standard M12 Linear Rail mount (£1.50) and drill out to 16mm or slightly under.
Widen the mounting holes (more than in this photo) and de-burr edges.
You then have the minimum amount of Aluminium for support and maximum cooling.
You could start with a M16mm rail mount, but they are much bigger overall and will be heavy.
You can drill more holes to allow better cooling.
Fit and tighten around the PEEK/Nozzle end this way around.
You can then fit 12/16mm M4 Nickel coated brass PCB stand-off's to the extruder body
Screw in Stainless steel M4 screws and washers, clamping the PEEK into the extruder nice and tight.
Optionally also fit a nut on the thread, to lock it on the stand-off.
After this fit your heating resistor (6R8 or 5R6) and thermistor and do remember to insulate the brass part with Ceramic rope/tape, glass rope/tape and/or Kapton.
For Printing in PLA I use a small 40mm directional fan blowing across the Aluminium rail block and across the fins in the PEEK, for Printing in ABS, don't use a fan.
New Heated Bed surface -
When building the big Max, I needed a glass bed, but wanting to keep down the weight I went looking for some 2mm glass, didn't have much luck and out of desperation I decided to try using a mirror, it was a good test size and easily came out of the nasty plastic frame. And it was only £1 from my trusty home shop.
If you try it, let me know, my results using mirror-glass have been really positive and interesting - a few observations -
The glass surface heats up fast and spreads heat very evenly over the surface, cool-down is quick but seems slower than just plain glass alone.
I hear less 'cracking' of the parts as they cool down.
For me PLA parts never seem to completely lift-off when cooled, don't ask me why this is, maybe thermal expansion, retraction is acting differently due the the reflective surface, but they stay a little stuck down - still very easy to remove with fingers, but all other glass surfaces I have used to date make the parts lift completely when cooled.
I needed to reduce my bed temperature from 60 degrees down to 45 degrees for PLA when using the mirror surface, if you don't do this it's like building on jelly, the PLA stays so very soft.
I think you could go lower than 45 degrees, I'll investigate at some point.
You need your first layer height set perfectly, (can be higher than normal) if not it seems to make more of a mess as the PLA is seems much softer for at least the first 3mm of building.
The mirror is also very handy for monitoring first layer bonding and looking at the underside of the X carriage.
I have just also started using mirror-glass with ABS (with PET tape on the surface) - I can reduce the bed Temperature to 85 degrees C and get no warp even on very large parts (120mm+ wide) I have tried with three different ABS types at the moment, but they were my worst for warping (Pink,Yellow and Blue).
2mm Mirror Glass with PET tape for printing ABS
I would be highly interested in any feedback on this topic - try it out if you can.
UPDATE - While I was typing this bit up, a post appeared from Theodleif on the RepRap Forum suggesting using a solution of sugar water painted onto a hot mirror-tile for printing ABS, sounds interesting and If we can ditch the PET tape it could be Great. I have not tried this yet, but will give it a go soon.
Electronics -
I used a scrap piece of Acrylic for the Electronics and PSU mounting, I wanted to make it all very super easy to access and tinker with on this machine.
The Acrylic plate slides into the vertical 20mm Slot sections that are also being used as reel mount for plastic filament reels.
A 240W 12V Power supply was mounted on the left.
With nice and easy Ring terminals for the connections.
One the left we have Mains 240V
Then the main +12V and GND connection to the RAMPS board
Heated bed source and Various other +12v signals for Lighting and fans.
RAMPS is simply mounted with M3screws and an ultra quiet, slow moving 80mm Fan for cooling the stepper motor drivers and Mosfets.
Using Stepsticks again and small heatsinks.
When you connect to screw-terminal connections (as on RAMPS) you should crimp the wires into wire ferules before inserting into the screw-terminals.
The smaller wires also crimped in are for an LED indicator on the outputs of Heaters 1 and 2 and also the Heated bed, quite handy to see what's energised. I need to make a little printed box for the LED indicators.
That's my first MendelMax - I'm really pleased with it.
A short video of the Big and Mini MendelMax machines
I have popped on to IRC a few times (as RichRap) It's really great, and opens up a whole new level of community spirit and help that the RepRap Forum does not convey. BUT it's a real time zapper, I would love to be on there more, but I'm going to have to finish some more projects first or they will never get done.
And I finally decided to get on Twitter, I going to blame Raspberry Pi :) for that, but I did eventually end up getting a RPi on order, so it was worth the early wake up, and Twitter looks another very interesting community for 3D printing.
I'm on Twitter as RichRap3D You can find me Here -
Mendel Bling Sold -
Many thanks to everyone that contacted me before, during and after the Bling eBay Auction, I spent the following week getting messages back to everyone, It really generated a lot of interest.
The Winner and new owner of Mendel Bling is James. Even though James had a long way to come, we had a great evening discussing 3D printing and I must have talked for at least a solid 3 hours straight. If I do that again, I'll video it as an intro tutorial.
James is planning to use his 3D printer to assist in one of his new businesses exploiting further work and research he did in his P.H.D.
James had some really good upgrades planned for Bling, I'm looking forward to see what he does with it and what it prints next. Almost everything on my Blog was printed on Bling, It did such a fantastic job for me printing most days for the last 7 months I'm a little sad to see it go.
James on the Left above and me on the Right
Thanks James, it was really great meeting you, I hope you enjoy using your new 3D printer !
Not a day goes by without something new going on in the 3D printing community, it's already a very interesting start to the year, I can't wait to see what comes next.
I'm really excited about my next Blog update, It's something I have been working on for a while now, finally it's fit for release, I'm sure some of you are really gong to like it.
Thanks for reading, let me know if you make a MendelMax or try out the Quick-Fit X-extruder concept, and I have many more extruder's and tools planned for this X carriage, I hope you find it useful too.