Showing posts with label Proto-Pasta. Show all posts

Thursday, 14 December 2017

Christmas Advent 3D Printing #Days 12 & 13 Advice using Proto-Pasta Matte Fiber HTPLA Cinnamon Pine and Glitterflake

December advent calendar - modular Christmas tree
3D Printing advice #Days 12 & 13

For the background and introduction - Day #1 Post click here

Last time - Day #11 Post (Potjie - cooking pot) was printed in Proto-Pasta Magnetic Iron and also Conductive Graphite HTPLA. It's still rusting nicely.

Christmas Advent 2017 Download on Thingiverse here - designed by Tom Van den Bon  With some help for each day by the South African Makers team.


It's time for Days #12 & 13.

Day 12 gift is designed by Gerhardt Breedt -  It's a Christmas Raptor complete with Santa hat! 


Day 13 gift is designed by Andries Smuts -  It's a crate of Christmas Beer.


I'm going on my second advent double day(te) with Proto-Pasta for both the day 12 and 13 gifts.

I'm catching up with this post and including two gifts that use a number of amazing Proto-Pasta filaments.

Lets start with Day 12 - Raptor...

As a child, I often woke up to plastic dinosaurs on Christmas morning, I had many of them. Ah, the memories, Mr Stegosaurus, T-Rex and Bronty were simply amazing to a ~7 year old.


I also have the most perfect 'dinosaur' filament. It's Proto-Pasta Matte fiber  HTPLA Green


Matte fiber is also very strong and rigid. The natural plant fibers add both strength and the rough matte finish.

I'm also using matte fiber Red for the dinosaur's hat.


I would have made it out of the new Proto-Pasta Candy Apple Red, but it's nowhere to be found in the UK and an exclusive colour batch (do take a look at the link, it's jaw dropping).

The surface finish is perfect for a dinosaur.


Day 12 - Done.

Now onto Day 13 - Crate of Christmas beer - 

First the beer crate. I could make it out of yet another wood filament, but that's a little obvious, so how about pine?


I still have a small amount of 2016 vintage Aromatic Pine to use for Day 13. It releases a wonderful smell of pine as it prints - really getting you in the mood for the holidays. (also do read the story at the end on how Proto-Pasta make it).


It's simple to use, just normal PLA settings and it's done.

Now the beer...

Beer filament is actually available (Buzzed from 3DFuel), but I don't have any, so the bottles for Day 13 are going to be non-alcoholic 'Cinnamon flavoured'.


Cinnamon HTPLA is another material that's all about enjoying the 3D Printing process. It smells like cinnamon as you print. The smell does not last after printing, but it's a really nice experience.
I have made the wooden crate out of Proto-Pasta High temperature PLA - (HTPLA) Aromatic Pine


The six pack of bottles have a black PLA base, it's not seen and will help save on exotic filament. And cinnamon PLA for the body. At the top I'm using some Proto-Pasta Glitterflake to look like bubbles. Finally they have red caps in matte fiber HTPLA.


Glitter flake is the most glittery packed filament I have found. It contains more glitter per inch than any other and the results look spectacular.
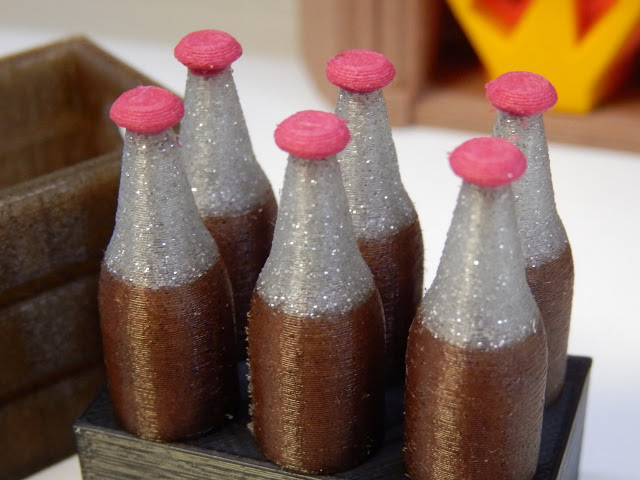

'Beer' Cinnamon bottles printed with a frosty top and red matte fiber bottle caps.

Day 13 tree is printed in Polyalchemy Elixir Emerald City Green

Print advice - (Proto-Pasta matte fiber HTPLA)

What settings did you use? - Matte fiber HTPLA's are really easy to use. You can start with normal PLA settings, but back off the temperature a little. 195 Degrees C is perfect. 
It's a good idea to increase extruder retraction distance by +20% this will help reduce angel-hair on the finished print.

The filament, it's not very brittle, and it produces surprisingly strong finished parts. I would say overall a lot stronger than normal PLA, and layer bonding is excellent.

Why use it? - It has a unique look after printing, like a slightly rough even sanded finish (almost sand-blast) in appearance. You can control the finish a little with layer heights and temperature, but it's never going to be silky smooth, that's not the point of this filament.

Is it strong? - It's surprisingly strong as a finished part, but small features are a little brittle. If you have ever used Carbon fiber materials, it's a little like that, but feels 'softer' to the touch.

Is it easy to use/print - Yes, super easy. Don't go too high in temperature (210 max) and use z-hop so you don't get any nozzle marks on the final top layers.

Do you have to dry it before/after use? - No - it's good as it is.

Do i need a 'special' nozzle? - No it's not abrasive at all. You also do not require a special nozzle to print, it does not wear nozzles.

You can think of matte-fiber like coloured wood filament, but it's even stronger than current wood-filled materials available.
Does it smell when printing? - No, not at all (matte fiber HTPLA). - Obviously the pine and cinnamon smell lovely. I'm still looking out for a good vanilla scented filament... maybe next year.

Does it come on a eco friendly spool? - Yes! :-) The Proto-Pasta spools are about the best cardboard spools you can get at the moment. They look great, and feed material well, and are 100% paper / card.

Conclusion for Proto-Pasta Matte fiber HTPLA - I really love this filament range, the colours are strong, the parts feel nice to the touch and layer lines vanish in the sand-blasted effect. Always have some on hand, as it's the only matte material with a non-smooth finish available.

Days 1 to 13 of the Advent Christmas Tree.

Day #12 and 13 are completed. I have also just about caught up, and i'm also ahead with tree sections for the next few days.

I think the story here needs to be about the special Aromatic Pine filament Proto-Pasta make every year. This is now a tradition for the Proto-Pasta family team - Every year Proto-Pasta uses last year's Christmas tree to make one very special and seasonal batch of 3D printing filament. It's a bonkers process or stripping pine needles, drying and pulverising them into a powder. This is added to their HTPLA to produce a very special and exclusive batch of Aromatic Pine filament to enjoy.

They do this for the fun, not the money, and they have just made this year's batch here.


Images by Proto-Pasta - source - website

Join me next time for Day #14 - (maybe a bit late to post, I have a Christmas party to attend...)

Thanks for reading.

Rich.

Please join me on Twitter @RichRap3D

My profile and posts over on Google+

Files and designs shared on YouMagine

Files and designs shared on GitHub

Files and designs shared on Repables 

My Youtube channel is here, all 3D Printing and Hi-Def video content.

Tuesday, 12 December 2017

Christmas Advent 3D Printing #Day 11 Advice using Proto-Pasta Magnetic Iron PLA and Conductive Graphite

December advent calendar - modular Christmas tree
3D Printing advice #Day 11

For the background and introduction - Day #1 Post click here

Christmas Advent 2017 Download on Thingiverse here - designed by Tom Van den Bon  With some help for each day by the South African Makers team.


It's time for Day #10, and today the gift is designed by Megesh Govender -  It's a Potjie (cooking pot)

Potjie - cooking pot - printed in three parts, and because it's Christmas, filled with sweets!

There is a material for every project. Today we have a Potjie (cooking pot) and that's usually going to be made of metal. Iron maybe. Perfect! Let's use Proto-Pasta Magnetic Iron PLA.


This 3D Printing filament if one of the most fun to use that's in existence today. I have had a lot of joy using this for all sorts of objects and art / sculptural projects. It's probably the material people ask me most questions about - usually after seeing the finished models.


The reason why this material often catches the eye, it that you can make it rust. It actually does not shine up like other metal filaments (you can get a little shine if you almost kill yourself polishing it).

It's also magnetic, I have found some geeky uses for that, but mostly it's all about the rusting.

I'm not going to be able to show you the rusting straight away (it takes a little while), but I will make it rust and show you when it's looking great.

If you want to know more about my adventures with Proto-Pasta Magnetic Iron printing, do take a look at this blog post and video here.

Do take a look at my previous blog post on Proto-Pasta Magnetic Iron for lots of info and prints.

The above blog and video link also explains more about the rusting process - (it's really easy).
Also it may help to read the blog if you are finding it tricky to use with a bowden setup, I had to tweak some of the retraction and flow rate settings to get perfect results.


Base of the Potjie is printed in conductive Graphite PLA

Because I don't have all that much Magnetic Iron PLA remaining, I'm going to slightly modify the model, and also make the bottom section from Proto-Pasta electrically conductive Graphite PLA.

Graphite PLA has a really nice shine-shimmer. It'll actually look more like an old blackened cooking pot than the Iron will after it's rusted.

To print with Graphite PLA, just use normal PLA settings, I get great  results from the material. It seems to produce tighter and more defined print features than many other PLA's on the market.

All printed (it really looks like an iron pot) - they will be rusting as you read this...

Print advice - (Proto-Pasta Magnetic IRON PLA)

What settings did you use? - You can use normal PLA temperatures , I use 190 Degrees C for Magnetic Iron. It conducts heat, so the hotter you go, the more likely you will have a runny flow, oozing and stringing / blobs.

You should not need to go over 210 Degrees C. If you start to see a blob forming on the end of your nozzle, then you are printing too hot and the flow rate may be slightly too high. Lower flow by 5% and try to use a 190 / 195 Degrees C temp range.

Apart from that, it's really easy to use.

Be gentle with the filament, it's not very brittle, but more fragile in filament form than normal PLA.

Why use it? - Because it's Iron, and you can rust it. Seriously if you don't want to use some immediately after reading this and looking at my previous blog post about it, I don't know what else to tell you.

Is it strong? - It's heavy, really surprisingly heavy. And yes it is reasonably strong in printed form. I would not recommend dropping the printed parts, they may crack.

Doing any rusting process will also weaken the parts. Not greatly, but they do get weaker and are more likely to de-laminate if dropped, knocked etc.

Is it easy to use/print - Yes, just watch out for dribble collection on the nozzle (you are too high temp).

You will also need to adjust your extruder feed rate by around. Do experiment, depending on the feeder type, grip and pressure I have founf anything from -5% to +15%

Use Z-hop it makes your nozzle last a bit longer!

Do you have to dry it before/after use? - No - it's good as it is.

Do i need a 'special' nozzle? - Yes! - it's abrasive. Use a 0.4mm or bigger nozzle. It will work fine with Stainless, Hardened steel, or as I'm using here a Olsson Ruby.

You can use a brass/copper nozzles, but they will wear out (and down). Quite quickly if you use more than about 500g of it.

Does it smell when printing? - No,  none at all.

Does it come on a eco friendly spool? - Yes! :-) The Proto-Pasta spools are about the best cardboard spools you can get at the moment. They look great, and feed well, and are 100% compressed paper.

Conclusion for Proto-Pasta Magnetic Iron PLA - I would happily spend much more of my spare 3D printing time using Proto-Pasta Magnetic Iron for further experimentation. It produces such interesting finished results after rusting. I'm sure there are neat and interesting ways to age parts with different rusting formulations. I will be doing more experimentation next year with this material.

For me it's just more fun than Proto-Pasta Stainless steel, but that's really cool too.

Day #11 Is Completed. With a bit of model adjustment, and good judgement on filament usage, I just managed to do another rusted Iron 3D Print.

Today's story, for people who ask is going to be about the Potjie - "In South Africa, a potjiekos, is a dish prepared outdoors. It is traditionally cooked in a round, cast iron, three-legged pot, the potjie, " - Tom Van Den Bon - via Twitter.

I also very much expect to be talking about why it's so heavy and if it's supposed to be rusting...

I'm really delighted with the Potjie printed in Magnetic Iron.

Join me next time for Day #12 - I'm slipping slightly further behind schedule every day, so I'm going to try and catch up.

Thanks for reading.

Rich.

Please join me on Twitter @RichRap3D

My profile and posts over on Google+

Files and designs shared on YouMagine

Files and designs shared on GitHub

Files and designs shared on Repables 

My Youtube channel is here, all 3D Printing and Hi-Def video content.

Monday, 13 March 2017

Using the LulzBot TAZ 6 3D Printer - Part 1 Setup


TAZ 6

LulzBot are without doubt (in my opinion) the most open-Source 3D Printing company in the world.

Here is the start of my journey with the TAZ 6 3D Printer.
I could spend an entire blog post just telling you how LulzBot have open-source in every single aspect of their business. Not just the 3D printers they design, develop, support and manufacture, but all the systems they use, computers running them and well just everything. If someone told me they only drank open-source coffee? I would not be surprised in the slightest.

To the point they will contact independent developers (anywhere in the world) and help them finish, refine and improve a little-known open-source software package, because they would like to use it in their business too.

Just have a poke around on the LulzBot development site if you want to be impressed by Openness - http://devel.lulzbot.com/

LulzBot (and the Parent company Aleph Objects inc.) support many independent projects and diverse developments, they don't always shout about it, they just get involved and encourage. If I lived in the USA I would be camping out at LulzBot HQ.

We need to see more of these manufacturers in an amazing community like 3D Printing. I hope LulzBot always manage to stay that way. Anyway, enough of that. You can see I have a lot of time for the LulzBot team, their products and everything they stand for.

My admiration of LulzBot is not going to stop me from a detailed (and sometimes critical) look at their 3D Printers, software and generally the user experience with all of it. They thrive on all feedback and it's one of the fundamental aspects of open-innovation, so here we go with a first look at the LulzBot TAZ 6 3D Printer.

I'm not going to attempt to 'sell you' on this 3D printer. It's been out for a while and has already won awards on 3D Hubs and has a good reputation in the 3D printing community. You can make your own mind up about the machine. See if it's right for you and at the price point and feature list you need.

I'm not even going to go into detailed specifications about print size or capacity, you can google that or just look on the LulzBot website. I'm going to focus on the experience and how reliable it is over a long period of use and abuse in the real-world and how it handles lots of different materials.


I hope to be able to show you what it can and can't do over this and more blog posts and video's. If you have any questions or want me to try something specific, just send me a message (twitter is best, but anything usually works - apart from carrier pigeon).

If you watch the first video below (it's long, but I make no apology for that) you will see that you get a really good first experience with unboxing, assembly and setup of the TAZ 6.

I hardly ever do 'unboxing' video's, but this machine just deserved a showcase.


Quick jump index -
01:28 - Materials
03:35 - Unboxing the TAZ 6
06:15 - MOARstruder ???
12:30 - Approvals, regulations, safety
17:00 - Taz 6 Assembly
28:50 - Power ON...
30:30 - Handheld Gaming (3D printed)
32:55 - In the next TAZ 6 Video

I have always been a huge fan of the LulzBot 3D printers, I printed out and built up one of the very early prototype TK-0 machines back in 2013 (an early version of the TAZ design) I made many modifications and eventually dedicated my variant as a portable machine to use at shows and events.

During discussions after the TCT Show in 2016, the team from LulzBot kindly offered to send me a TAZ 6. This is not only great, but as it's a machine that is not normally seen in the UK / Europe I really want to help support the growth and awareness of LulzBot products (and their open-source / Open-Innovation nature).


I did have some initial setup problems, I will go into detail in Part 2 of this blog post and video series.

A pesky dislodged connector caused me some initial setup problems, but it was quickly identified and resolved. Much more about the problems, issues and resolutions in the next video / blog post - along with lots of 3D Prints and feedback about both print quality and user experience.

LulzBot also sent me over some materials that are tricky to find over in the UK or Europe. These have been really great to try out and do work exceptionally well in this 3D printer.

 LulzBot standard ABS Filament.

 Chroma Strand Labs Inova-1800 Co-Polyester.

 The only Taulman3D material I had yet to try out - Taulman n-vent
 And Verbatim PLA.

LulzBot also included some sample filament in the TAZ 6 Box. This is what you would get if you just ordered the printer - Very nice filament from Proto-pasta and Colorfabb.


Initial assembly is very straightforward, a detailed manual guides you through all the steps and provides great advice along the way.


Every single part (including the full set of tools provided) feels high quality and 'engineered' to a fine level.


I talk a lot about the approvals and regulations for this 3D printer in the video (it's a very good thing). I'm not going to repeat myself here, but do watch the part about 3D printer approvals (12:30 onwards) as it's good to know why fully assembled, well designed and tested machines are worth the extra cost etc.


Noise level is acceptable during setup and also full operation. It's around the same overall noise level as a Prusa i3 MK2 (normal setting) the Prusa quiet setting is slightly lower. The TAZ6 has a lower frequency to it's noise level output (slightly bigger fans than many 3D printers) so feels less annoying and less distracting in the background. The TAZ 6 is a lower overall noise level than the BCN3D Sigma (2016 version).

I have no problem with the TAZ 6 running in the same small room when I'm 1.5M away from it.

 Bucket O' Octopi by yeoldebrian, published 

A test print Octopus (Above) was included, I had no problems replicating and exceeding this print quality with the Taz 6.


We did plenty of  'play printing' over Christmas, lots of the standard objects, test prints and plenty of decorations. When it was all dialled in I started to explore what the TAZ 6 could really achieve.


The Red Chroma Strand Labs filament was really nice to use, and strong. I designed and printed some hooks for hanging objects to rafters, they were clean prints (just look at those perfect layers) and very strong indeed. I'll see if I can work out a way to break these and compare the results with PLA or ABS for the next blog post.


It was not long before 17+ hour prints were being tested and then multi-day objects in ultra fine and full build area dimensions. (more on that next time).


As default it is set to print quite slowly. The default profiles for Cura have a low speed of travel rate, it can handle a lot faster. The firmware (Marlin) acceleration feels slower than my normal settings. There is nothing wrong with going a little slower and having a lower acceleration, in fact it can improve both print quality and further reduce noise level.

The issue is more with the fact this printer can print BIG, so really you are going to need a compromise of both speed and quality for some bigger prints if you want them to finish in a working day or before going to bed. That's no different to many 3D printers, so this issue is not aimed at the TAZ, just an observation with bigger build areas in general.

LulzBot have installed a 0.5mm nozzle as standard. This provides a a good mix of speed v quality in many types of printed model. The original RepRap 'standard nozzle size' was 0.5mm, but over the last five+ years it's now much more common to see a 0.4mm being fitted to almost all 3D printers.

You could replace the nozzle, but if anything I may decide to go even bigger, this machine is just crying out for a great big nozzle to produce some serious 3D prints fast and accurately. And on that point I had hoped to be testing out the now MOARstruder, but sadly it was not quite available when I asked about it.  (see below).

MOARstruder is now fully available for the TAZ5 and TAZ6 directly from LulzBot on the website, you can check it out here.

After a lot more printing and testing with the TAZ6 Hexagon hot-end, I'm probably going to make a new extruder for the TAZ6 using the E3D Volcano. The Volcano is very similar to the new MOARstruder, in fact the nozzles are interchangeable for the Volcano ones, so you can fit hardened, stainless, brass or copper types.

In the next LulzBot TAZ 6 blog post (and video) will go into a lot more detail about the print quality, settings and use of both Cura and other slicing engines on the TAZ 6.

The TAZ6 did a lot of printing towards the end of 2016 and over Christmas. I now feel I understand many of the limits and balance between quality and settings for this 3D Printer. I significantly tweaked the profiles and then also stopped using Cura. It's producing solid and consistent results and has handled all materials I have thrown at it.

This 3D Printer is a very well engineered (slightly over-engineered, but in all good ways). It feels solid and always in control, the bed-level system is low-tech, but reliable and more importantly it works really well.


I'm totally enjoying the 3D printing experience with the TAZ 6. Plenty of things I would (and will) change, but for an out-of-the-box experience, it's delightful from delivery to first print (apart from the issue I had, but more on that next time). I have a lot more feedback for anyone considering this 3D printer, so join me text time for a closer look at the prints, profiles and capability of the LulzBot TAZ 6.

I almost forgot, in the video I talk about a Handheld Retro Gaming PC system I made up (Windows 10 to emulate older games and the like) - it was a simple and fun 3D printing project (anyone could do), I'm happy to go into a lot more detail, let me know if anyone would find this sort of project interesting. I do a lot of projects using 3D printing and often electronics / Arduino etc. - Not really sure if I should post more of these here or not?


Not printed on the TAZ 6, but I found it and talked about this project in the TAZ 6 video above, let me know if you want to see more projects (and maybe a design / assembly guide?) on these sort of things.


This was just a brief introduction to the TAZ 6 experience. Lots more next time, I hope you enjoyed it.

Rich.
@Richrap3D
RichRap on Youtube