But I'm back on with development now, My Repstrap has been named (Screwball strap) and all the mechanical construction has been completed.
I also got my parts from Mendel-Parts (Camiel) So I can finish my Dual extruder design and start experimenting with 1.75mm PLA.
Also had the rest of my deliveries so I now have lots of new parts for quick DIY build of RAMPS+ electronics and more work on my own controller.
Screwball Strap
Y Bed Forwards and Back with frosted Glass Build Area Aprox 32cm x 42cm
So A quick DIY RAMPS+ PCB Shield for the MEGA.
Some tips if you want to know how to do this, the easy way -
- Make sure your Artwork is reversed !
- Laser Print out the PCB onto Photo-Glossy Inkjet paper. - I have not yet found one that does not work.
- Clean your Copper clad board really well (Yes I had a fingerprint -top right and even that caused a problem later)
- You can also pre-etch it to clean it (Only a little) if you like, until it goes pink (Just 20-30 seconds is usually enough), this really helps the toner stick (I didn't this time, but will make a few more doing that)
- Put your Iron to the hottest setting (Cotton or Linen).
- Pre heat your copper clad board, and don't scratch the copper, just lay the Iron on it for 10 seconds all over.
- Lay on the Paper toner side down and just place the iron in the middle to stick it in place.
- Then you can iron the paper all over, it helps to do this on a flat surface or even better place a round bar or dowel under the PCB and roll the Iron over the top paper, this produces the best results.
- Lift a corner to check the toner has transfered, if not just heat it longer.
- The Toner should completly stick to the Copper, if any is on the paper, you need more heat.
When you know it's all fused to the copper, let it cool down, you can run it under a cold tap but try not to get the paper wet.
Then remove the paper, it should only lightly stick and not toner should come off.
You can heat up your etchant, I did this at room temperature so it will take a little longer to etch.
You can also use a bubble tank and ideally the PCB should be on it's side not flat down.
If you do use a tray like me, then just make sure you move it around every few minutes.
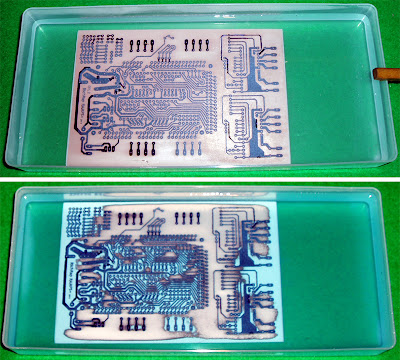
Going, Going...
Keep it moving and after about 10-12 mins it should look like this.
Gone.
Clean and dry it off.
I used 2oz Copper, so the etch time was longer and some parts started to over etch (it does this by eating into the sides of the tracks) but it turned out ok.
Next time I will go back to normal 1oz copper and spend a little more time doing it well.
Clean off the Toner and you have a pcb ready to drill and build.
And remember the fingerprint, well that caused a track break in the top right of the picture (6th Setpper controller), easily repaired but make sure you have clean copper before you transfer the toner.
And if you are wondering what RAMPS+ is, well it's RAMPS but with better motor terminal outputs, another two Pololu stepper positions (that can be remote from the main PCB). Two extra ADC (Thermistor inputs) and also another Mosfet (Heater output) for the Third Extruder.
Now to build it up and wire up the Screwball Strap.
Rich.


Glad to see you back on the project Rich. That larger print bed will give you a nice large print area. Nice work. Keep us posted.
ReplyDeleteHi Rich Rap, I am Lucus from Singapore, happen to saw your blog and hard work. I am in the process of doing a same setup as you. Mind if I ask you a few question in person? My blog is at http://www.simplyengtech.blogspot.com/ Cheers.
ReplyDeleteHello Lucas
ReplyDeleteReally nice looking machine you have there.
I hope to get back onto my machine hardware assemble soon, the electronics have taken longer than planned to get ready.
I have just finished another Extruder design (bowden) so I will try to blog about that soon.
Feel free to e-mail me - richard.richrap@gmail.com
I will keep an eye on your blog, good luck with the new setup.
A great result! I'm also going to make RAMPS home, but can not find an image for printing. Could you please send it to me domingo@tut.by or to share information, where you can download it?
ReplyDelete