Thursday, 27 September 2012

TCT2012 show report and Industry growing pains.


I don’t normally do wider 3D printing industry news on this Blog as it’s a technical resource, but quite a few big things have happened over the last few weeks, that have made many people look in a slightly different light on the whole 3D printing industry. (Makerbot's decision to close source is discussed below)

I visited the TCT Liveshow at the NEC in the UK this week.


Todd Grimm opened the show with his presentation of where the 3D printing and Additive manufacturing industry is in it's life-cycle in a nutshell, "we are not yet ready for consumers using 3D printers" 

I had an interesting & mixed experience at this years TCT show – Quite a different one from last year, let me explain –

So last year I visited TCT in a professional capacity with suit, shirt and tie, this year I decided to go along as a Maker – Jeans and a Woolly Jumper – general enthusiast to see what reception I would get from all these many (different sized) companies looking to sell machines for the next desktop industrial revolution to the ‘general public’

I’m calling my dress code the ‘maker test’ would I get any attention at all from these companies?, I’m sad to say generally most of the companies failed, ignoring me for people in suits that actually had very little interest in their product offerings.

Last year, only Bits from Bytes and A1 technology were representing the lower-end market sector and entry level machines.

This year was very different.

The A1 technology stand was empty; they didn’t turn up on Day 1. 

 3D Systems - Cube - 

My very first stop was on the 3D systems stand, just by accident, but the Cube was on display at the front of the stand with the Cathy Lewis guarding the Cube printer.


(Cathy lewis is the 3D systems representative in the Cnet video shown lower down in this post, in an interview with Makerbot on the Replicator at CES2012)


The Cube was trying to print, but unfortunately very badly, the drive mechanism looked like it was partially blocked resulting in terrible surface quality with lots of little holes and pips where variable extrusion was occurring. It was also printing very slowly and at one set speed (I estimate about 20mm/Sec), with only slightly faster travel speeds.

What is it doing with that bridge? and why is the surface quality so bad. And why has it wasted Raft material on sections with nothing on them! - Poor software!

I stood looking at the Cube for many minutes, many other people in suits asked the same things time and time over, how much is it “$1300” says Cathy, do you have a brochure, “no, sorry we don’t” – How much are the cartridges “$50 each, and they can print about 10 of these” – pointing to a 1.5” high chess piece.


Finally, after everyone else had gone I said to Cathy it was nice to see a big company doing a reasonably low cost machine “yes, some people think we are crazy”.
I asked if she likes the printed cases (pointing to a number of Raspberry Pi cases scattered around the Cube printer) – “yes they are wonderful, people really like them”


Do you know who designed it? I ask, no says Cathy, Well I had a hand in it’s design, really says Cathy, not really believing me. How did we get hold of it then asks Cathy...
Well, you would have got it from Thingiverse, I said. At this point Cathy’s face says it all, she looks really uncomfortable and clearly wants to stop talking to me as soon as possible. We then briefly discussed what a Raspberry Pi actually was, Cathy had no interest whatsoever, and I was left wondering how they were going to sell and support this machine to the general user and enthusiast?

In many ways it was worth going to the show just to see her face, in that moment and short conversation.

It was then that I realised the Cube had not printed any of these cases they had on display around the Cube printer, but they had been printed on a Bits from Bytes machine. BFB showed my same printed RPi case on their blog Aug 16th, with no mention of the case origin or designers. – so much for Creative commons Attribution – So I’ll do it here – the Original case was designed by HansH

I then changed it in Sketchup after using a Raspberry Pi for a little while and released my derivative to Thingiverse.

Makerbot - Replicator 1/2

Makerbot had the Replicator V1 at the show, I didn’t see it actually printing anything all day, everyone else had running machines.

If you want to be a Makerbot Distributer, the Minimum order quantity is 10 machines and for that they will give you 25% discount, Makerbot has two resellers in the UK, and they were very keen to sign up more on these terms.


I was fortunate enough to be standing on the Makerbot stand when Todd Grimm asked the Senior American Makerbot Sales representative a few interesting questions, the response coloured by recent events and the Replicator 2 launch.

Todd asked about the Replicator 2, what makes this machine a pro grade (prosumer) machine and how is it different from Version1?
Makerbot – It’s now 100micron layer resolution and we have tightly controlled PLA printing materials that deviate less than 100micron in size.
This machine is PLA only, we have removed the heated bed so users can get printing faster and we have a simple 3 point levelling system.
It’s also a single extruder system only.

I was thinking – That’s a lot to remove, why is it then so much more expensive than a Replicator V1? And can’t a Replicator V1 do 100micron? It should be able?

When pushed on the reason it was now a Pro machine, the support staff were talked up as the main reason for Makerbot being different at the lower-end machines – Thingiverse was also mentioned a lot in the conversations and is obviously very important for them -

Makerbot – “Some people will not like that we have gone closed source, but they all use Thingiverse whether they like it or not, we have the biggest community”

The discussion continued, I moved on.
Sadly, they also failed the Maker test; I was reasonably ignored every time I went on their stand. I didn’t pick up a Makerbot sticker… Where would I put it now?

Maketbot are obviously seeing a change on Thingiverse, they are trying to focus on the Terms of Service questions that also sparked up debate and fractures in the community along with the bigger issue of going closed source – They even have their Lawyer trying to explain that ‘everything will be ok’ Trust us.

Can people in the community trust a company that changes one of its most fundamental founding principal’s?

Will Makerbot’s new Pro-sumer customer appear, and will 3D Systems now be free to take the entry level sector with the Cube? Do any of us now really care?

It’s never a dull moment with 3D printing.

Remembering back - On 3Dprinting.com the blog post in Jan2012 stated this about the video below –

This is a great interview that shows the development in the personal 3D printer market and the differences between the open-source product of MakerBot and the closed-source product of 3D Systems.”


I do now wonder how different 3D systems and Makerbot will look in Jan2013 at the next CES?
If it's consumers or pro-sumers they are after then maybe the closed source 3D printer war has now started, while the open source community just marches on regardless, I hope Makerbot does not regret it's decision.

Also look out for the comment about the Replicator case looking wooden, I bet they was the point Replicator V2 got a metal overcoat!


Enough of all that.


Here are some really great things I spotted at the Show - 

3D printed Mug - Bits From Bytes had a separate bigger stand (last year just a corner of 3D systems) I spotted Ian Adkins and Ed Sells (Sells Mendel) walking around; they were doing a lot of research by the looks of things.
Another one from BFB, they ignored me and so failed the 'Maker test' this time around.

There was a lot of 3D scanners at the show, this chap with the beard was being 3D scanned with a hand-held unit.

This is a Prop for a Film printed with a Voxeljet 3D printer - they can print 4m x 2m objects!
Voxeljet printers are used by Car companies to make massive prototype parts.

Propshop model-makers Ltd - Passed the 'Maker test' with flying colours, he even showed me some secret new massive 3D printed models for a new film coming out on his iPad.

Another Voxeljet print
Ultimaker - 
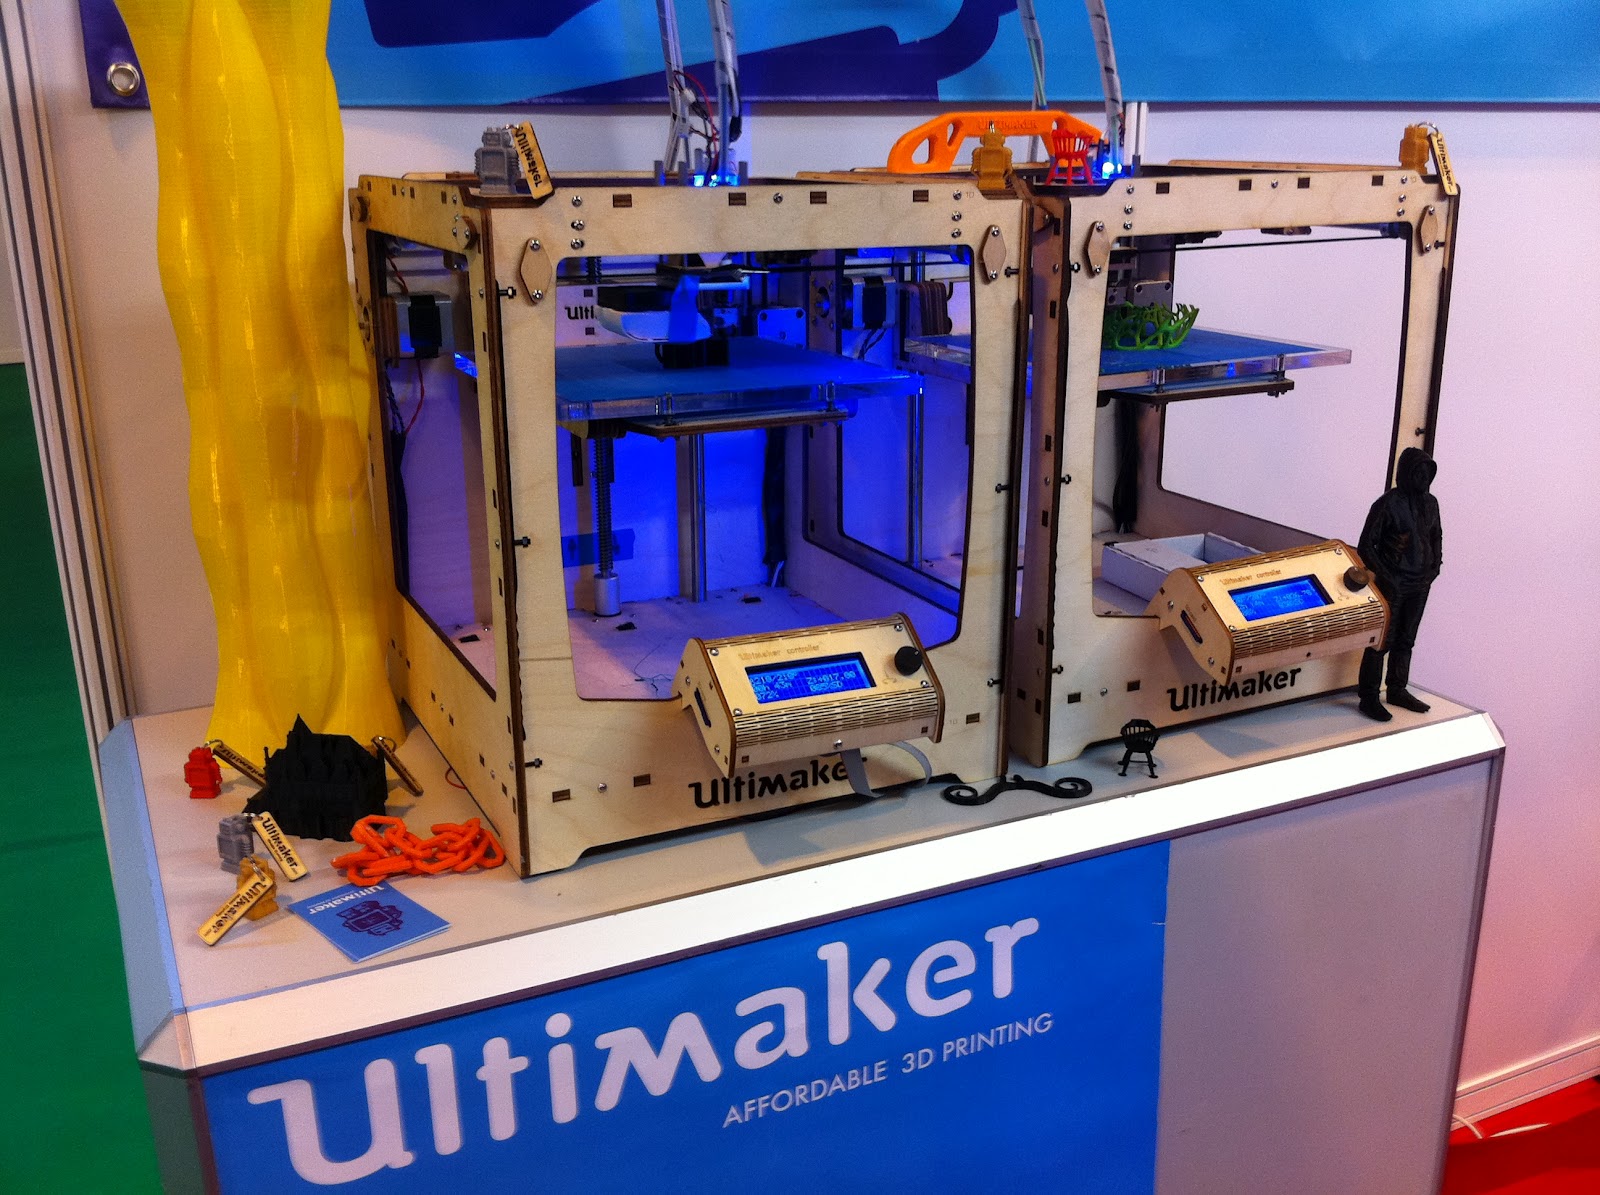
Yea! Ultimaker! - Always had their machines running all day! - They had the busiest stand out of almost everyone, including many of the really big names. 

Very friendly people and amazing quality things on display, thanks Ultimaker you made my Day!

I also met Paul Candler on the Ultimaker stand, he has made some of the finest profiles for Netfabb. Ultimaker users are enjoying resolutions down to 20microns!

Needless to say Ultimaker passed my Maker test.

Leapfrog - 
It's big, slow printing and looks like a BFB printer with a metal overcoat. I could not find out much more about it as they didn't talk to me :( 

Fabbster - 

Fabbster have a Closed source printer (Sintermask) that operates in a similar to most RepRaps, it has no heated bed at the moment and uses Rafts for prints. Quality is reasonable.

They have a patented stick deposit system, this is basically Injection moulded plastic sticks of material that are loaded into a magazine and snap together as they exit into a PTFE tube onto it's way to the extruder.
They have many materials including a flexible (soft PLA style) that was very nice to handle.

The machine is big and well built. They were very nice at the show and passionate about people using their printers and materials. They passed the Maker test and we chatted for some time about the machine.

MiiCraft - 
I ended up with a very bad photo of the Miicraft printer, so I'll just show some of the printed objects.
Very nice people and happy to tell and show you everything about their resin based 3D printer.
Ships from Taiwan, UV resin is quite expensive, machine is $2200 but the results were stunning! - Very good, Maker test - pass

PP3Dp - 
The PP3Dp printers are looking a little old now, but still performing well, if not a little slow to print.
Didn't talk much, they were not really communicating with the people showing interest. 


They had some free samples of screw-pots and a few different machines. Maker test - Poor (D-)

Mcor - 
Inside an Mcor 3D printer (not really a printer, it cuts models out of sheets of office paper)

They are all paper. I'm not sure it that's a good thing or not. They must be selling machines? and I expect they will do well in the movie industry, props, and animation maybe even some product design etc. but I can't quite see a good use as functional models and certainly not with consumers.

Very friendly and animated about their machines and low-cost process. Maker test - Pass


Lots of other companies were at the show, some interesting, others looking very dated. Most of the others ignored me.

Thanks for reading,

Rich.


Other news - 

The open Hardware summit is going on as I type this - Follow it and check out what's being said.

We may be getting our own Mini Maker Faire down in Bristol (UK) - keep looking out and googling for further announcements.

Check out this video featured on the Discovery channel - 


Thursday, 23 August 2012

3-way Quick-fit Extruder and Colour Blending Nozzle

Three extruder's and One Nozzle - RepRap material blending

Hello everyone, I'm really excited about this one, I hope you like the results - 

Very first print.

It’s taken a while to get this post written up, but a few recent things have really spurred me on to get it finished.

It’s been over a year now since my first layer selective colour experiments and filament joining, not a month of RepRap has passed that I have not thought about multi-colour/material 3D printing.

I started work on colour mixing earlier this year and had some promising results with a basic, manual setup. Things moved onto other 3D printing developments and I got sidetracked for a few months.

Dual extrusion has been the focus for many machines, but this has some significant problems of alignment and oozing of the inactive hot-end and the fact you cant mix/blend materials with two separate hot-ends.

Background - 

I always wanted a single hot-end with multiple driven feeds, so that’s the focus of this particular development.

Before I forget, the files for this project are up on Thingiverse here.

In recent months we have seen some more movement with filament mixing, Adrian Bowyer and Myles Corbett have done ground-breaking work on both multiple fed hot-ends and mixing of plastic filament. The final Report Myles submitted recently is an essential read, great work indeed.

Another wonderful advanced example of layer selective of colour printing has been this set of stunning 3D printed iPhone cases by Matthew Bennett (norcalbarney).
Photo and 3D printed iPhone cases by Matthew Bennett - Thingiverse
Seeing the work by Myles on the RepRap Blog and the prints by Matthew spurred me to re-start and finish off my own rather elaborate colour blending extruder development.

Stop-Start -

I had previously stopped my development because I was having some issues getting two colours to mix well in the nozzle; I introduced mixing slits and a spiral in the PTFE tubes (in and after the PEEK block) and added steps in the nozzle barrel, it had reasonable mixing results but was very tricky to make up by hand.

The same month I saw that Myles had exactly the same issues with the black and white mixing I decided that not mixing the colours well would produce more interesting effects and give more artistic looking prints. So during #30DOC in June I restarted the development and added three feeder tubes. I had initially intended these to be separately driven Cyan, Magenta and Yellow feed, but after some testing realised that all sorts of blends could be made by running single or multiple extruder's at intervals separately or together.

That’s why I’m not calling this extruder a colour mixing setup. I’m opting for blending together 1 2 or 3 materials to produce some really interesting effects. 

Unfortunately my Antique Lathe died in February, which is one of the main reasons this multi-head hot-end didn’t get further development, but with a bit of work I managed to do everything I needed (all of the following below) with just a Pillar drill and hand-tools.

Introduction Video Part 1 -


Building the Extruder's (X3) - 

I’m using a custom variant of the Huxley sized quick-fit extruder from June’s 30 Days of Creativity, along with Herringbone gears and push-fit Pneumatic connections on the bottom.


Many thanks to RepRap Pro for supplying me with the M6 Hobbed bars, these really are made so well and work perfectly with this extruder as it's a modified eMaker Huxley variant.

Quick-Fit 3-way adapter - 

I was going to design a more complex bracket, but I decided to keep it simple for the first test, and as I had plenty of room on my MendelMax X axis, this was the simplest design to test out the idea.


I know! what a monster!


It’s designed to fit on the Quick-Fit Xcarriage.

3-Way Hot-End - (Version 1 - ... it dies a bit later on, but bear with me, it gets better with V2)

Without a Lathe, I decided that I needed a simple hot-end that clamped together; this would allow easy manufacture and experimentation.


First steps were to make a simple over-sized heating block and using a step-drill I bored a stepped hole in the middle, 4mm at the bottom and 14mm at the top.

The nozzle is a M6 brass bolt with a 0.5mm hole, this is cut down to 8mm long and held in place with an M6 brass half nut.

The filament feed tubes would be held in with a block of PEEK clamped down onto the heating block. 

And clamped to the hot-end with a Stainless steel plate.

 Nice and simple construction.

The PEEK block has three holes (you could have more), drilled on a slight angle so they spiral into the stepped heating block. It uses 4mm PTFE tubes to allow the extruders to be angled around the Quick-Fit X-Axis plate. 


I was aware this was not going to last a long time, but I wanted something simple to test the idea with actual driven extruders first.

I was expecting rope seal adhesive to be a good way to bond the PTFE tubes into the PEEK, but this turned out to be a very bad plan. Maybe my Rope seal is just no good, I still have yet to get any reasonable results using it. Nophead however uses a different brand for bonding his heating resistors without any issues at all, so I may revisit this compound in the future.

Blending nozzle V1, assembled – the Stainless plate is clamped to the heating block using long M3 Stainless screws, the PEEK has some Copper tape wrapped around it to aid cooling.


This only has a single 6r8 Resistor, so takes a few minutes longer to get to temperature than a ‘standard’ sized heating block, but gives a good stable performance when insulated up.

First manual test, very easy to push the separate filaments by hand, this might just work!


I finished the manual tests and mounted it all on the printer, ready for test and calibration.
Testing each stepper driver, extruder, hot-end heating and thermistor feedback took about 1 hour.

I got it all working and 'calibrated' well enough for a first print, when... the hot-end assembly died. :(
It did print the striped heart box shown in the very first picture in this blog, then slowly the tubes started to pull out of the PEEK block.

The Glass rope adhesive was soft and had allowed the tubes to be pushed out, quite a mess.
I really think my glass rope adhesive is bad or out of date, it only ever seems to get semi-set no matter how long I leave it, even at elevated temperature.

Never mind, lesson learnt and I know exactly how I'm going to make the next one -

3-Way Hot-End - (Version 2 - ... the one that didn't die! and worked gloriously well)

The heating block and nozzle worked perfectly, so I'm re-using that. I just need to make a much better PEEK and tube holder -

Start with some raw materials, 4mm PTFE tubes, PEEK and Aluminium bars. I'm saving up for a new Lathe, but it's going to take a while to get a new one. So at this point I still only have a pillar drill and hand tools, here goes -

PEEK was cut, drilled, then filed and sanded in the Pillar drill to get a domed plug.

Aluminium bar was also cut, drilled and grooved (with a hack saw!) all rotating in the Pillar drill. (who needs a Lathe!)... - I still do actually :(

Holes are tapped M4 threads.

Use a pencil sharpener on one end of each tube, just cut a little.


Picture shows, normal tube at the bottom, lightly sanded (500 grit) middle, top is threaded (see below)

Before you try to cut the thread on a PTFE tube it VERY important that you lightly sand the outer surface of the tube or you will never be able to grip and turn it in the die!

It's quite easy to cut the thread, you can use a piece of sand paper to grip on the sanded tube while you rotate it in the die, don't cut too fast and go both directions.


You do not need to use the liquid PTFE, but I had some and wanted to try it out.


The thread is more than enough to hold in the tube, but I wanted to see if the Liquid PTFE made it easier or harder to screw the tube into the PEEK.

It did add some lubrication, but does not seem to make much difference, most of the Liquid is pushed out, but I feel a little happier knowing it was added.


All done, let it dry and trim the tubes at a 45 degree angle to each other and to the walls of the heating block. 


Once cut you must drill/ream out the PTFE tubes back to be 2mm internal bore, it will have narrowed due to the threading and fitting into the PEEK block. Do this very carefully and make sure you remove all the PTFE swarf.

Then you can assemble it.
This time the stainless plate is clamping both the aluminium heat-sink and PEEK, this works exceptionally well, the Aluminium block stays warm and can be fan cooled if required, Stainless plate is cold.


New V2 hot-end and extruder assembly.

I know what you are thinking, how heavy is that lot! well it's not as bad as you would think, the extruders are lighter because of the Nema14 motors, but still, it's a significant weight - Note:- I'm running this on my BIG MendelMax using M8 smooth rods and it's still working fine.

I'm getting an X/Y travel speed of 170mm sec without any issues at all on my bigger MendelMax, I changed the acceleration down in firmware to 4000mm/sec, and set X/Y jerk to 15mm/sec.

I have tested print speeds of between 20mm/sec and 65mm/sec at the moment. It seems to be most happy at around 45mm/sec and a 1.4mm extruder retraction. (using 3 x 1.75mm Faberdashery filaments)

Electronics Expansion -

Ideally you would need to drive all three (or more) extruder's as separate outputs from the firmware and send sets of Gcode commands to enable and mix the colours for the object being printed. That’s all future stuff and quite doable as the next stage.

For now I'm using my standard RAMPS 1.3 setup with a modified Sanguinololu PCB to act as a stepper expansion board.


I decided as a first development to expand a single Extruder channel to drive 4 separate stepper drivers and control these stepper enable lines separately so filament blending could be tested with just standard Gcode and normal firmware. Slightly crude, but simple and very effective.

You still need to populate some components on the Sanguinololu, and fit Pololu or stepstick drivers. Components around the steppers are required, including the Microstepping select jumpers, these should be set to whatever your normal Extruder drive is set (mine are x8)


You do need to make sure each extruder drive has a separate enable line. Some are shared on the Sanguinolou, so cut the tracks to make them separate.

Also use a 4k7 resistor for the enable pull-ups as the main controller has a very weak pull-up (100k) already fitted on the enable line, if you don't fit smaller ones on this expansion board it won't switch the extruder's off quickly when you disable them.

You only need 5 wires coming from the original Extruder driver, Step, Dir, Enable, and +5V.

The Sanguinololu board must have +12V and GND connected to it's normal power rail input.

The 3 separate extruder drivers on the Sangunnolo are controlled by the single enable line from the main electronics. For ease of testing the enable line can therefore be switched on or off for each extruder. Spare output pins from the micro could easily be used for enabling each extruder, but for a proof of concept, switches allow the easiest way to experiment and evaluate performance and operation.

Make sure you set the trim-pot reference voltages to about 0.42v for NEMA14 motors if you are using Pololu setpper drivers. If you are using Stepsticks, that’s turned about 95% of the way around (about 1A)


All ready to go...

Setting the Firmware-

Now that 1, 2 or 3 extruder's will be driven together, you need to set the Esteps in firmware

For me the Esteps are 360 (x8 micro-stepping) for one extruder. So if you want to run a single extruder at a time and switch individually between them, 360 is the correct number.

More interestingly you can run any two extruder's at the same time, so the two filaments are combined / blended together, you still have three output combinations and it's actually possible to swap out the 3rd inactive filament for a different colour while it's printing using the other two, then switch to another set of two extruder's using the new colour/material. to do that the Esteps need to be half the value as you have two feeds both giving half the volume to the nozzl, 1/2 of the number above = 180

And finally running all three at a time can give some great looking prints and different colours from each direction of the object! to do that you will need 1/3 of the Estep value = 120

It's easier to see the different effects in the video than in the pictures below, but take a look at both.

Video Part 2 - Construction and Prints -


Prints!-

You must be wanting to see some prints by now :) - Here you go -

Single extruder feed at a time, Gold, Red and Blue filaments used.

Single extruder feed at a time, Gold, Red and Purple filaments used.

More pots, Single extruder at a time.
The one at the back also had a colour swap of gold for the last section.


Two extruder's at a time, Pink, Blue and Pearl White filaments used.

You can see in this picture, that Pearl White is the common colour and Pink and Blue are alternated as the print progresses. (Ignore the yellow outline, that was the purge from the previous used colours)

This picture shows the two extruder colours and how they work on a printed object, this is the same part just rotated 180 degrees, using Orange and Silver filaments.

Two extruder's at a time, Punk star Pink (Magenta), Electric Blue (Cyan) and Mellow Yellow filaments.
Here you can see Greens, Oranges, darker Blues and Reds in the mix. 

Lots of stretchlets.

Orange and Glitter*.

This shows the same pot, rotated 180 degrees - Using Cyan, Magenta and Yellow.

Lower part of the frog printed with Magenta and Yellow, top has Magenta one side and Cyan on the other.


Frog - Red, Purple and Gold filaments.

Left frog - Pink and Silver.

Orange, Purple and Glitter*.


A Universal Paste Extruder body printed with Red, Yellow and Pearl White filaments (2 extruders enabled at a time). - Same part, just rotated.


Mega Stretchlet bangle, Red, Yellow and Blue, all on together.

Close-up of Stretchlet - see the 'toothpaste' effect.


I used up all my 1.75mm filament stock in these test prints, but I'm keen to build up a whole printer in glorious multi-colour blended wonderfulness!

And Imagine using different materials, soft PLA for modifying hardness or doing a flexible 'hinge' in the part. or Glow in the Dark with a hint of whatever colour you like for daytime and night viewing.
Mixing both ABS and PLA together would be an interesting experiment, maybe one to try at some point.

For now more work getting the electronics a little more integrated and maybe a multi-fed Bowden version?

Other news - 

Raspberries - 
I had the pleasure of presenting at the recent Raspberry Jam in Bristol on Monday this week, (not 3D printing this time around, but maybe next time) it was a splendid evening and we had some really great presentations and demo's. Thanks to everyone that came for the Jam.

And a big thank you to Patrick for giving me one of his first really nice Laser-cut (home-made) Acrylic Raspberry Pi cases. If you don't want to print one, you can get hold of his very nice version here -

Clay -
I do get lots of messages about the Universal paste extruder, thanks and keep them coming, and I am planning on doing much more, both on clay and other materials and also the Peristaltic pump extruder as soon as I can.
I do have Metal clay to try and also Paperclay (very good for low warp - perfect 3D printing material)


Rostock - 
Finally I need to mention the Rostock delta printer. If you don't already know?, go and read all about it , Right now, it's totally Awesome with a really big A.

Thanks as always for reading, and please post a comment or contact me to say what you think.

Until next time.

Rich.