Showing posts with label polymaker. Show all posts

Wednesday, 20 December 2017

Christmas Advent 3D Printing #Day 19 Advice printing with support materials

December advent calendar - modular Christmas tree
3D Printing advice #Day 19

For the background and introduction - Day #1 Post click here

Christmas Advent 2017 Download on Thingiverse here - designed by Tom Van den Bon  With some help for each day by the South African Makers team.


It's time for Day #19

Day 19 gift is designed by Gerhardt Breedt -  It's a totally awesome little Jeep, with a lot of detail.


Great little Jeep - printed in Faberdashery Greenery Green (It's Army-Man-Green really)

Because this model is a little more complex to print, and requires the use of support structures, today I'm giving advice about the use of different support materials available and how well they tend to work.

Single extruder setup - 

First let's look at what a 3D print will look like if support material is enabled using a single extruder machine.


Support structure enabled - Support in Green, model in Yellow (top faces shown in red-orange)

Lets print that...


It printed just fine, but now you have to remove all that support material. 


For removal of PLA you will need - 
  • Cuticle Nippers (Top-Tip - they work great) - For MEN, or WOMEN - :)
  • Pointy thing (left hand side - very pointy)
  • tweeters, 
  • time, 
  • patience, 
  • cup of tea, 
  • soothing music, 
  • etc.
Have a guess how long the above support removal was, I'll tell you down below, after we look at the alternative method.

Dual extruder setup - 


I'm using Faberdashery PLA( above) and Polymaker Polysupport (Below)


Another reason for doing this intensive advent calendar every day, was to test out the Olsson Ruby nozzles. They are doing really well, so today they get a short break. 

I will be using the Faberdashery PLA and Polymaker Polysupport in the BCN3D SIGMA R17 3D Printer.

The SIGMA can't fit the Ruby nozzles :(


The 500g roll of Polymaker Polysupport material fits really well in the SIGMA R17


Here I am using the support material in a different way, it's an interface rather than full structure.

The above Gcode image shows the model car in blue (PLA on left extruder), with a blue support structure (also in left PLA).

The interface (Dense support material) between lower PLA support and the model is shown in green, and is using the right extruder fitted with Polymaker Polysupport.

Let's print that on the SIGMA R17 -

The main PLA material is used for both the model and 98% of the support structure, just the interface is in Polymaker Polysupport.

Printed great, no problems at all - Polysupport prints a lot like PLA (just slightly higher temperature).

Lets remove the green support material...

The only tools you need for Polysmooth support removal are 'pointy thing' and a toothbrush,

It comes off clean and easily. Just a quick brush and a poke here the there.


Support cleanup time compare - 

The Pink Jeep, using just PLA support (Single extruder) was 16 minutes and 23 seconds. I also used a flame to smooth off a few sharp edges. (+10 seconds)

The alternative Green Jeep, using Dual extruder 'IDEX' SIGMA PLA and Polysupport was exactly 1 minute and 18 seconds. That was including brushing time, I also did not need to use a flame for cleanup.

With big and complex print projects, a break-away support material saves you many hours of cleanup. The material basically pays for itself in time saved. You also only use a small amount of it, when using it as an interface layer as I have above.

The only reason you may want to use it for full support, would be if you were using an expensive material like Bronzefill, you would not want to waste Bronze material as supports.


Print advice - (Support materials)

I think I'm going to do a few more blog posts on different support materials and the best settings to use (in New Year 2018), it was not long enough today to really go into full details about all aspects of support structures and other materials available.

With that in mind below are my top-tips, advice and general experience of support materials.

There are other options for a dedicated support material.

PVA is often talked about as a soluble support material, designed for use in dual or multi-extruder systems. But it's usually a massive pain to use.


E3D spotted the pain that PVA was causing users and made a modified version called Scaffold (See below for more details)


PVA – I have tried around 10 different manufacturers and suppliers over the years. Still not impressed

General conclusion for PVA - I have wasted more time trying to print with ‘PVA’ than any other 3D printing material. It is possible, just not sensible or normally worth all the effort. It’s only fun/exciting and interesting the first time you try to use it. (I basically HATE it now).

Good aspects –

  • It is a support material…
  • Water soluble, good but also leads to many, many of the problems below.
Not so good – (my experiences with various printers and extrusion systems) - 


  • It’s very soft; filament deforms easily in extruders and does not pop-back into shape – it just tends to get squashed / squeezed - and then stops feeding/extruding.
  • It will ‘cook’ in the hot-end – don’t go over 190 Degrees C for any long period of time - (long, being more than ~15 minutes) – take it out of the hot-zone.
  • It’ll often stop working (extruding) half way into a print job.
  • It’s quite expensive.
  • Few people make it, and many wished they didn’t when customers complain.
  • It will take on moisture, and in some cases become destroyed / useless.
  • It does not tend to stick all that well to many 3D printer build surfaces
  • It does not stick well enough to many materials, so not great at building on top of a material like PLA/ABS.
  • You really need to use a lot of it – dense supports for it to usually be successful – cost / time / risk of print failure increased.
  • It can leave residue inside the hot-end, causing problems if not fully cleaned out.
  • Most 3D printers (extruders / hot-ends) are not setup / designed to use PVA.

E3D Scaffold – 

General conclusion for E3D Scaffold - It's so much better than PVA, but still not great in every machine or extruder setup. I can get it to work really well in my SIGMA that's fitted with Bondtech extruders and E3D V6 Hot-ends. It's just about perfect (apart from the general moisture problem).

Unfortunately in the standard BCN3D SIGMA R17, It will not work well enough, or for long enough to be of any use.

I really want to see a water soluble support material in general use, but until a formulation actually delivers ease of use in more 3D Printers, I'm going to find it hard to struggle on with PVA based materials.

Good aspects –

  • It is better and easier to use than a standard PVA.
  • Water soluble and also break-away easily.
  • Compatible with some materials PLA/PET, and tends to stick slightly better than most PVA only materials.
  • It’s grey, which actually makes it easier to see if it’s extruding well.
Not so good –


  • It’s still quite soft. In some extruder systems this will still be a problem.
  • Moisture will still damage this filament, keep it dry and out of sunlight.
  • It’s slightly less prone to ‘cooking’ but still use under 190 is possible and retract out of the hot-zone when not being extruded.
  • It’s about the same price as PVA, that’s good because it can actually work, unlike many PVA’s.
  • It seems less prone to leaving immovable residue inside the hot-end, but it will still require regular cleaning.
  •  Still causing problems if not fully cleaned out.

Polymaker Polysupport – 

General conclusion for Polysupport- It's so far the only support material that delivers on ease of use. For me it's the only dedicated support material worth using at this point (for my needs) It is not ruined by moisture, and that's a big bonus. It also works in the SIGMA extruder system. every other PVA material does not work as expected in SIGMA.

Good aspects –

  • It is a dedicated support material, and you can also print objects with it too.
  • It’s like using a normal PLA material. Quite easy in most systems.
  • Water soluble and also break-away easily.
  • Compatible with common materials PLA/PET/ABS, the bond is just strong enough to hold, but straightforward to remove from most materials.
  • It does not have a moisture problem, but keep it sealed when not in use.
  • It does not ‘cook’ in the hot-end, does not leave permanent residue.
Not so good –


  • It’s not water soluble, so you will still need to break-away, can’t be used in the same way a water soluble material could.
  • It’s quite expensive - but I also just demonstrated how it saves time and it ACTUALLY WORKS! - Bonus.

I'll go more into support materials, settings and techniques in a future blog post. But please ask questions and I'll make sure they are included next time.


Days 1 to 19 of the Advent Christmas Tree.

Day #19 is done.

Today's story is all about reminding people that not everything can or should be 3D printed, and the things that use support material structures can be a right pain, if you don't choose the correct materials.

Join me next time for Day #20 - getting close now...

Thanks for reading.

Rich.

Please join me on Twitter @RichRap3D

My profile and posts over on Google+

Files and designs shared on YouMagine

Files and designs shared on GitHub

Files and designs shared on Repables 

My Youtube channel is here, all 3D Printing and Hi-Def video content.

Monday, 4 December 2017

Christmas Advent 3D Printing 2017 Day #3 - PolySmooth & Edge

December advent calendar - modular Christmas tree
3D Printing advice #Day 3.

For the background and introduction - Day #1 Post click here

Day #2 Post (mini spool of 3D Printing filament) -  printed in Colorfabb Brassfill and Recycled ReForm rPLA filament from Formfutura. 

Christmas Advent 2017 Download on Thingiverse here - designed by Tom Van den Bon  With some help for each day by the South African Makers team.

The original advent calendar from 2012 is on Thingiverse - designed by from Peter Leppik.

Here we are on Day #3 of the calendar, and today the gift is designed by Andries Smuts. It's a Christmas Rubber Ducky :)


The Christmas Rubber Ducky has been dual designed to be printed in multiple (different coloured) parts, or as a single (single colour) model.

I'm thinking that Polymaker Polysmooth is the ideal material for this gift. Anyone that has a rubber ducky, will want it to be smooth and shiny, so lets make that happen -


If I had more time (and the right Polysmooth colours) I would have printed out the multi-part model in different colour Polysmooth filaments and then assembled, and smoothed as one object. That would look just about perfect. But for now, as I have a very nice Polysmooth Yellow, lets use that.


Print time was 1 Hour and 22 minutes (it's +150% Sized)
0.15mm Layers and the 0.4mm Olsson Ruby High Flow (V6 Volcano) nozzle fitted to the TAZ6. (Remember to disable contact probe levelling if you use the Ruby on the TAZ6)

A quick sanding of the tail and bobble, to remove some plastic residue.


Smoothing time (with 99.9% Alcohol) was around 55 minutes. I'm still using the Original style Nebulizer. Polymaker now have a new style design that pushes out a lot more vapour. I'll have to upgrade soon as one has worn out, this last one is about to die (they are a consumable).


This could have been smoothed for another ~5 minutes and the final layer lines would have vanished on the body. You can always put it back in the Polysher for another smoothing session. For now, this is quite good enough.

Before being polished.

After polishing.

The tree section for Day #3 is printed in a very stunning E3D EDGE filament called Krypton Green 46 (it's basically 'sparkling' shimmer-glitter? dark green, and it looks great.) It's really adding some bling to this tree.


0.4mm Olsson Ruby High Flow (V6 Volcano) nozzle fitted to the TAZ6 MOARstruder - E3D EDGE Filament - Krypton Green 46


E3D EDGE is easy to use, treat it as you would PETG or nGen. I'm sure I'll be talking more about PET/T/G type (polyethylene terephthalate) materials in the rest of this series at some point.

Printing advice -

I will focus the advice below on PolySmooth as it has a few more steps to use.

I plan to have a more complete Blog post about Polymaker Polysmooth and the Polysher machine in early 2018, for now, here are the highlights -

What settings did you use? - Go slightly lower temperature than a normal PLA, I use 200/190/185 Degrees C for PolySmooth. Almost every other setting you can use as you would PLA.

Remember if you are going to Alcohol vapour polish to use a higher number of top/bottom solid layers (I use 6 @ 0.2mm) to give a good, smooth, solid finish.

Print speed - it's good from 30-120mm/sec. Works fine in Direct drive or Bowden extruders.

Why use it? - PolySmooth is a PVB based Plastic. It's very similar to PLA when printing, but it can be smoothed using 100% Alcohol vapour - Specifically in the Polymaker Polysher machine. Other materials can be smoothed (ABS and Acetone - Not recommended), but the fact PolySmooth uses just normal Alcohol, rather than nasty solvents is a real bonus, and the reason why I like using it.

Is it strong? - Yes, the filament feels a lot like PLA. Maybe slightly more flexible and higher impact resistant. It produced very good definition prints. After polishing in Alcohol vapour the model surface is sticky (don't touch it!) You need to let it dry naturally. 
Even after it's touch dry it has not regained all it's strength. After many weeks of Polysmooth printing and polishing I realised that the models do end up hard, and stronger than the non-smoothed parts. You just need to wait or accelerate drying in a warm room etc.

Is it easy to use/print - Yes, you can use a slightly lower temperature PLA settings to start with. Polymaker Recommend using 210 to 230 Degrees C, but I would to start at 200 Degrees C and plan to bring that down to near 190 when you get skilled at using it. As usual, tune retraction distance and temperature to limit oozing. 


Above was my Temperature testing using Clear PolySmooth. I had the best results around 185 Degrees C.

Do you have to dry it before/after use? - Ideally, Yes - Keep it dry and sealed in the bag, it will take on moisture and that will affect print quality. Polysmooth is hydroscopic, it wants to take on water from the atmosphere. A 'damp' Polysmooth filament will tend to pop and crack as you extrude it out of the nozzle. You can dry it out and use it, but try very hard to keep it dry and sealed whenever it's not being used.

I'm still not totally sure if it's affected by light before use, I will ask Polymaker at some point. But for now I always keep my Polysmooth in a sealed bag with desiccant in the original Polymaker cardboard box.

Do i need a 'special' nozzle? - No, it's not abrasive, I have used it with all aidderent sizes of nozzle from 0.25 to 1.6mm - It will work fine with Stainless, Hardened steel, Copper, Ruby or Brass nozzles. Use it it as you do PLA.

Another really good and handy thing about Polysmooth is that you can print quite chunky layers, the smoothing will make 0.2mm layers 'disappear' and look like 0.0mm layers :)

Does it smell when printing? - No, No smell at all. Not even a slight sweet smell like PLA. 

Does it come on a eco friendly spool? - No, It's not marked with what plastic it's made of and it does not have a Recycle symbol :( - Vacuum sealed bag and in a very high grade 'Premium cardboard box'.

Conclusion for Polymaker Polysmooth  - It's very good material and works perfectly with the Polysher machine. It would be nice to see more suppliers make PVB materials, so we have more choice of colours and maybe some sustainable filament spools being used / less packaging and different weight spools.

In 7+ months of use, I have still not had any failures using PolySmooth, or any nozzle jams. It's a really nice and easy to use material. I'm using it a lot for all sorts of projects, concept product models and demonstration equipment.


Day #3 Completed. I think it turned out exactly as I wanted, a rubber ducky that looks like it could have been 'production made in China' :-/ At least it has another story attached to it when someone asks - 'That can't be 3D Printed! how is it so smooth?

I didn't mention before But I'm printing this entire Christmas advent tree at +150% size, so it's really rather big... I'm slightly concerned.

Join me next time for Day #4

Thanks for reading.

Rich.

Please join me on Twitter @RichRap3D

My profile and posts over on Google+

Files and designs shared on YouMagine

Files and designs shared on GitHub

Files and designs shared on Repables 


My Youtube channel is here, all 3D Printing and Hi-Def video content.

Friday, 9 June 2017

3D Printing Adventures Summer 2017 update

Summer is coming up fast, so here is an update on my current and future 3D Printing adventures.

Firstly the 3D Printing for Dummies book has now been issued as a revised and updated Second Edition, I was surprised to receive the author copies as I was not expecting it to be published until mid-late summer.


But here it is, and thank you to everyone who contributed to it's updates and revisions. Also a big thank you to my co-author Kirk and the great team at Wiley for making this update happen.


Some really great projects, printers and material updates have been added to the book, along with a lot of updated topic's and sectors where 3D printing is growing.


I can only find a USA link for the new version, but worldwide stocks should be available soon if you wish to buy a copy. And if you do, thank you.


I go over a lot of updates in the video below, and here is also a quick-jump index if there is something specific you want to hear about -

Quick jump index -
00:50 - 3D Printing for Dummies (2nd Edition)
02:10 - The Olsson RUBY Nozzle
02:26 - The Sorceress - printed with the Ruby
02:40 - Pongo PLA - interesting translucent white
03:20 - PEI Print bet 3M sheet from AndOrNot
03:50 - Fuel3D Scanner is no longer for sale :(
05:15 - Polymaker Polysher & Polysmooth Kickstarter
06:08 - Glitter machine...
08:27 - Sigma R17 Noodle catcher upgrade
09:25 - Learning SharkCAD3D V10
10:00 - 100% Recycled Filament by ReFlow

You can also find this and more on my YouTube channel in HD over here


Olsson Ruby nozzle - 

I was very excited to receive an Olsson Ruby nozzle for testing, this is an upgrade I have been fascinated about for some time. I'll be doing a lot more testing, but the initial results are very smooth and it's printing really well on the Prusa i3 MK2.


The construction is quite simple, but exceptionally engineered. This has a real ruby embedded inside the tip of the hot-end with a 0.4mm nozzle hole.


The back is plugged and then drilled out to allow a 1.75mm or 2.85mm filament path.


They are E3D and Ultimaker Olsson block compatible.


It's easy to fit - as always, be careful with fitting, and I would certainly advise to lock the heater block and thermal break down on to the nozzle, rather than trying to screw the nozzle tight into the heater block directly. 
When fitting any E3D nozzle I always leave a small gap with the nozzle because for the E3D V6 the stainless steel thermal break is designed to lock flat to the nozzle, not for the nozzle to seal against the heater block.


This image does not do justice to the great model by Louise Driggers (The Sorceress) you can get it from Pinshape here  but I wanted to show a print from the Olsson nozzle - this is printed at 0.2mm layers in Fillamentum  PLA Rapunzel Silver

The finished print quality looks like you would expect from a 0.15mm layer height. But I will do a lot more testing with the Ruby nozzle - especially with filled and composite filaments.


Many thanks to Pongo for the 'water clear PLA' filament sample. We had a discussion over on Twitter about this material - I'm looking for translucent white (not clear, but also not opaque) filaments to use as Optical LED light guides. This looks very promising, I'll update you on the results.


Andrew from AndOrNot sent me over a new sample (Test) bed material (3M sticky-backed PEI Sheer) - It's going to be fitted to the Sigma R17 glass bed so I can print PETG without damaging the glass build surface.


Polymaker Polysher (Kickstarter)

I'll have a dedicated post all about the Polysher and Polysmooth materials, I have done a lot with the machine and am impressed with the results, here is a quick overview example below -


The Polysher and Polysmooth materials are now becoming available around the world. For an overview and feedback from early users, do take a look at the Kickstarter here.


Don't print at these high (210 - 230) temperatures! - Really it's way too high - I'm printing around 190 for 55mm/sec print speeds and that produces great results without micro-bubbles or angel-hair.


I'll talk more about temperature and print settings for Polysmooth in the next blog post and video, but do take a look at the simple temperature test above - and as it's a constant speed spirial vase, no retractions or pauses were experienced, so it's a good test for material temperature stability.

Before (Top) and After smoothing (Bottom) - This was a 'draft mode ' print made quickly at 0.2mm layers - it's quite small and detailed, but the Polysmooth helped make it a really great finish.

Voronoi D Tower 
Math Art by Dizingof


Testing out the transparent Polysmooth - Above shows both Clear and white - they both become flat smooth, but the internal layer lines remain for the clear material, the surface feels smooth for both.


Another example above - white, natural and clear, smoothed in IPA for around 35 minutes. Make sure you watch out for fluff and dust because it'll stick and bond into the surface finish (see lower left above).

Designed by  Mark Durbin (MakeALot)

For Sigma R17 and TAZ6 updates, do check out the video above. I'll have a lot more on these machines, projects and developments over the summer.

SharkCAD3D V10 - 

I have also been learning a new 3D CAD package (SharkCAD 3D V10) From Punchcad )


So far I'm really impressed with this package, It's amazingly powerful and has a lot of great 3D printing features for both design and model processing. I'll be posting a lot more about this package as I learn how to use it over the following months (and years) - This is going to be my new CAD software for all existing and future developments from this point on.

If anyone is interested in me posting some training video's or anything specific about this software, and it's capabilities, do let me know. It'll help me learn, and after doing a lot of screen-casting last summer I would like to do more.

Punchcad also have ViaCAD 2D/3D and many other SharkCAD packages at very low to high price points, so something for every maker or 3D design professional. I would encourage you to check them out, if for no other reason than the fact I accidentally stumbled over them, and was amazed I didn't already know they existed.

It's still early days for me learning the tools and user interface, but I'm quite sure you will be pleasantly surprised if you decide to try out the trial software or buy a version (Mac and PC available).


Quad Extruder printing? - 

I also hope to receive my Quad extruder upgrade for the Prusa i3 MK2 at some point in the next month. The Prusa team have quite a big backlog of orders and I didn't place my order until October, so the September shipments are going out first. I'll keep you updated on the progress with that, but I'm excited to get hold of it and experiment with multi-materials and colours.

ReForm Recycled filaments - 

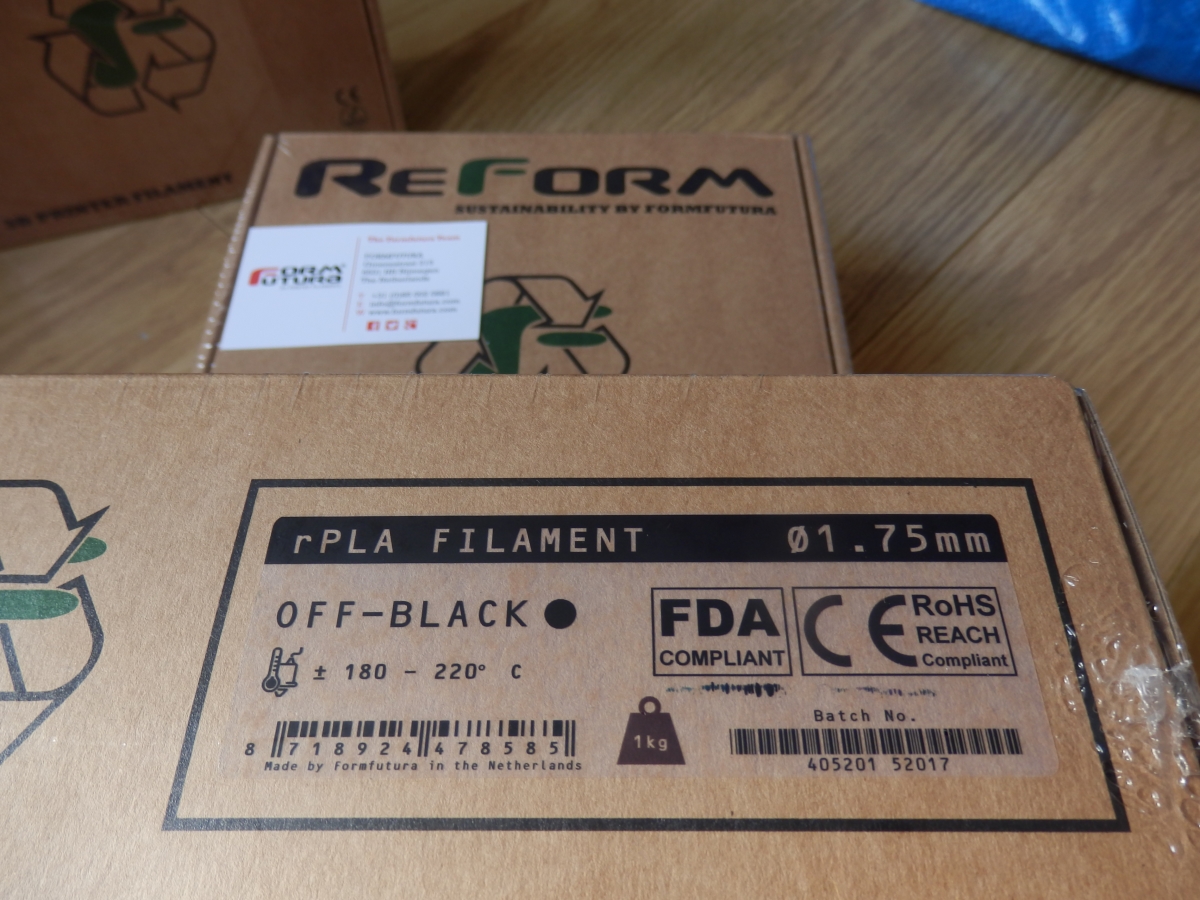
And just as I was editing this video and blog post, I received some really nice 100% fully recycled 3D Printing filaments - You can find out more here - > ReForm by Formfutura


Cardboard spools, 100% recycled rPET, rPLA and rTitan materials. It's exactly what I have been asking suppliers to make for many years now.


I'm really impressed that Formfutura have managed to manufacture these materials, I hope they print well and I also hope more manufacturers will also think about sustainable materials and packaging for 3D printing filament consumables.


I'll let you know very soon how I get on with these materials, spools and how they perform in various 3D printers.

I hope that was a useful update, lots more to come from me this summer -  do comment and please subscribe to my YouTube channel for more 3D printing adventures soon.

Thanks for reading and watching.

Rich.

Please join me on Twitter @RichRap3D   -  https://twitter.com/RichRap3D

Files and designs shared on YouMagine - https://www.youmagine.com/users/richrap

Files and designs shared on GitHub – https://github.com/RichRap

Files and designs shared on Repables - http://repables.com/u/richrap/

My Youtube channel is here, all 3D Printing and Hi-Def video content.


Thursday, 8 December 2016

Autumn 2016 3D Printing Adventures Update - TCT Show 2016 highlights, projects and new machines & materials


Autumn 2016 3D Printing Adventures Update 

The TCT Show was back at the Birmingham NEC Arena. This is one of the very best 3D Printing exhibitions anywhere in the world, if you get a chance to visit, make sure you register for next year and give yourself plenty of time. There are lots of suppliers, manufacturers and interesting people to meet and talk too.

I was at the show again this year for both days, here is a brief rundown of some highlights from the show, it's by no means all. This was one of those shows that I wished I had taken more photo's. I did manage to speak to many different people and visited almost all the exhibitors this time around.

My video update for Autumn is below, and contains both information from the TCT show along with materials, machines and an update on current and future projects.

You may also want to check out the new 3DHubs 2017 3D Printer guide - https://www.3dhubs.com/best-3d-printer-guide I mention a few machines that won awards in the video including the BCN3D Sigma, LulzBot TAZ6 and the Prusa MK2 i3


This is also over on YouTube in HD, click here for my channel.

First up a big thank you to everyone at E3D for providing me and Thomas Sanladerer with an operational base and generally looking after everyone in the desktop printing sector. The E3D stand's were buzzing all day, all the time, it was a great place to talk and meet people. Even the after-show party managed to congregate all around the E3D stand for most of the evening until around forty of us all packed into a local pub for a cracking roast dinner :)

So let's start with E3D and all the great things they had on show (and a few more that are/maybe coming soon) -


Firstly E3D had doubled the size of their stand this time, one half showing off their range of Spoolworks filament materials, and the other dedicated to hot-ends, nozzles, the Titan extruder and many other goodies.

E3D Copper Nozzles...

For anyone with a keen eye, you may have spotted that E3D had some copper nozzles on show. This may sound like an odd choice of material for a nozzle, but they will be appearing on 3D printers soon, so keep a lookout for more news.

Talking of nozzles, the E3D team have been working on some very special 'tiny' nozzles for super small and detailed 3D models.


These were printed with a 0.15mm nozzle in ABS. You really have to see them to fully appreciate the level of perfect detail and stunning quality being achieved with these nozzles.


More info - E3D Tiny little nozzles - http://e3d-online.com/High-Res-015-Nozzles

The detail in this chess set is astonishing for any 3D printing method, let alone FFF (FDM). A spool of filament would last for many, many models at this tiny scale.

These were also printed on a standard Mendel90 fitted with an E3D V6 hot-end, nothing special - but with a dedicated high-resolution machine we could see even more capabilities for these tiny sized nozzles.


E3D has invested heavily in expansion of their business in the past 18 months, taking on more people in development and research, we should be seeing many more great things coming from E3D so do keep an eye out.

Bondtech extruders and Emvio Engineering - https://emvioeng.com/extruder-mechanism-upgraded-bondtech-dual-drive/

Emvio Engineering had a really nice BCN3D Sigma setup with custom mounted Bondtech extruders.


They also kindly sent me a set for fitting and feedback in my BCN3D Sigma 3D Printer.


I'm doing a separate video and blog post on the entire process of fitting, setup and using the Bondtech extruders in a Sigma 3D Printer.

I'm really impressed with the upgrade and initial printing results. I'll post more as soon as I have completed more comparison prints and tested as many different materials.

LulzBot (Taz 6) - 

LulzBot was at their first international show for the TCT event. It was a total pleasure to talk to them and discuss all aspects of the LulzBot company, machines and amazing way they go about Open-Source 3D printing.


James Bruton from Xrobots.co.uk was also on the LulzBot stand, if you don't already know who James is, then do please check out his amazing YouTube channel (lots of robotics, 3D Printing and Cosplay)

James also did a great TCTshow video about LulzBot you can see here 

LulzBot also sent me a TAZ 6 in November, so look out for more video's, blog posts and discussion about my experience of using the TAZ 6 3D Printer soon.


Simple to setup right out of the box.


After a few minor issues, I was up and running - with a quick Benchy3D print in Colorfabb nGen.


The TAZ6 is very busy printing all sorts of models in different materials (lots of Christmas) so look out for an update soon on setting up and using the LulzBot TAZ 6.

Lulzbot (Taz 6) - https://www.lulzbot.com/store/printers/lulzbot-taz-6


More TCT Show and links - 

This time at the show there was almost too many more companies to list, but here are a few more I spotted and talked to at the 2016 TCT Show.

eMotion Tech - (Micro Delta Rework printer) - https://www.reprap-france.com/

Hawk3DProto was another great base for me to use during the TCTShow. A big thank you to Ben and also all the team from BCN3D.

Ben was also very kind to give me some Proto-Pasta Matt Fibre HTPLA Filament for testing - https://www.proto-pasta.com/collections/matte-fiber-htpla

I hope to be doing some hands-on 3D Printing training with Ben on-site at Hawk3DProto in the new year. If you are in any way interested in taking part of getting involved too, do get in contact with me on Twitter about this @RichRap3D


Hawk 3D Proto and BCN3D Technologies - http://www.hawk3dproto.co.uk/bcn-3d-sigma.html

HP and their Multi-jet fusion technology - http://www8.hp.com/uk/en/printers/3d-printers.html

Photocentric -

Photocentric - http://www.photocentric3d.com/

Polymaker (Polysmooth Polysher - Kickstarter etc.) - https://www.kickstarter.com/projects/polymaker/polysmooth-and-polysher-3d-prints-without-layers/description

Prusa Printers / Prusa Research (MK2 + 4 extruder add-on) - http://shop.prusa3d.com/en/printer-upgrades/118-original-prusa-i3-mk2-multi-material-upgrade.html

Silicone 3D Printing - http://www.picsima.com/

Magigoo (3D Printing bed adhesive) - https://magigoo.com/

Printrbot Simple V2 (2016) - https://printrbot.com/shop/simple-v2/

The team at 3D Filaprint had a great selection of materials, components and items to make 3D printing easier.
3DFilaprint (3D Printed Working Pinball machine - Wow!) - http://3dfilaprint.com/tonys%20pinball/


Haloween 3D Printing - (mostly testing out the Prusa i3 MK2 with lots of different materials) -

Halloween coffin pot (Design by Martin Moore - Files over on MyMiniFactory) Printed in Filamentum Cinnamon wood filament - https://www.myminifactory.com/object/halloween-coffin-pot-decoration-24554

Spider Pendant (Design by upalermo - Files over on Thingiverse) Printed in Flexfill 98A soft filament - http://www.thingiverse.com/thing:1785811

Treat bowl (Design by Tony Short - Files over on Thingiverse ) Printed in Polyalchemy Elixir Green and Orange using the colorprint software by Prusa research - http://www.thingiverse.com/thing:1074374


Autumn leaves (Designed by Faberdashery - Files over on Youmagine) - Printed in Recycled PLA filament - https://www.youmagine.com/designs/autumn-leaves


Graphica Mega Ghost (Designed by 3Dkitbash - Files over on Youmagine) - Printed in Fillamentum Extrafill PLA Luminious Orange filament - https://www.youmagine.com/designs/graphica-mega-ghost-print-play-via-3dkitbash-com

Ghosts (Designed by muzz64 - Files over on Thingiverse) Printed in Polyalchemy Elixir natural PLA (glossy white) - http://www.thingiverse.com/thing:1777164

We printed a lot more to add to the ever growing Halloween collection - Above includes many more objects that have been printed for Halloween over the last few years.

Lots and lots of Christmas printing at the moment, testing out lots of materials, devices and even a very cool Laser engraver upgrade (for 3D printers) - more on these projects soon.

It was really great to talk to so many people and companies at the TCTshow. If I missed you out in this post I'm sorry it was just such an amazing event this year, I spent almost all my time talking to people and not enough time taking pictures or video to share.

I'll try to get in a few more posts and video's before Christmas, I still have lots and lots more to share, many more projects and adventures with all manner of 3D printing devices.

See you all very soon.

Richard.