Thursday, 26 May 2011

Printing progress.

I finished my first 750grams of PLA at the weekend printing a collection of things so I can really check calibration and quality. It's clear I need better Gcode generation and further control over my Bowden setup, so the next challenge is learning and getting Skeinforge to work with Screwball-Bot.


Printing the 3D Knot by MakeALot

And the Double helix challenge by chylld


The other objects from Thingiverse are as follows if you want to try them out -


Bearing for filament spindle by chylld

Bucket O' Octopi by yeoldebrian

Frog by owenscenic

Whistle by Zaggo

3D printable Heart by emili


For size reference, here are all of them on Screwball-Bot.

I now want to print some really big things, but a heated build platform is going to be required for doing that... 


Thanks, and happy printing!

Rich.

Thursday, 19 May 2011

First real useful printed thing from Screwball-Bot.

I'm well away now, it's printing nicely (much better) after the snapped flexi-drive replacement.
Whosawhatsis Filament Spool Holder
Added another aluminium support to do the filament guide, the split is 2mm so perfect for 1.75mm  loading .

Spool arm number 1.
Bearings fitted perfectly.

The above image may not look it but it's as smooth as glass bar just a few blobs.
I am very happy with the results from Reprap Java host, but as I was printing these filament arms I noticed exactly the same flaws in the print, above left and right are two printed arms and both have blobs on the corners at exactly the same point in the print, this must be a GCODE generation thing in Java host?

I really need to start using Skeinforge to get better prints I think...

Now to print more things.

Thanks for looking.

Rich.

Wednesday, 18 May 2011

Unexpected mechanical faliure

After my filament tangle and snapping incident printing the Octopus I started printing the great looking minimalistic spool (thing 8472) by whosawhatsis when half way through the print some odd noises started to happen and then my X axis Flexi-drive snapped.

After removal.

I was just about half way through the print when it happened, I shut the machine down and investigated.


Just after it snapped.


Old photo of before the failure - clearly bad motor-shaft alignment.
I found a photo of what is looked like before it snapped and the only thing I could see were two of the flexi-compression rings seemed to be very close together and the whole flexi-drive looked compressed.
So I expect that it was under some strain and eventually failed.

I still don't really know why it snapped. I'm not using acceleration so maybe along with the NEMA23 motors running with 24V  I'm pushing my machine too fast and hard?

New installed flexi-drive and silicon pad + washers to help get better horizontal alignment.
I had a spare flexi-drive so I fitted that and used washers to space the motor out to give better alignment and a small silicone pad under the motor mount to allow some freedom for any oscillation, I hope this will not make the problem worse, time will tell if this happens again or maybe I was just unlucky with a weak part? or it was just the bad motor shaft alignment.

Not wanting to waste a good hour of printing I wanted to restart it, so after a height measurement of the part I concluded it must have failed around Layer 62, so a quick edit of the GCODE to start at layer 61, I re-started the print, the first layer bonded well with the last and it was off again. 
First useful part printed. and one of the largest things I have printed so far.
The print finished later with no other issues and part is usable if not a little out of alignment where I nudged the opto-switch when taking the motor off.

I also checked the Y axis motor mount and that looks fine, so I hope this was just a one off event.

I will print the Filament mount arms tonight and hopefully assemble it, that will be the first useful thing it's printed and it should allow me to leave the machine for longer without worrying about filament tangle.

Thanks to whosawhatsis for the great model, I'm sure this is going to look great on my machine.

Rich.

Sunday, 15 May 2011

Extruded filament analysis - Microscopy

I started today wanting to print something other than a test cube so an Octopus was first up, but half way through just as I popped in to make a cup of tea my Filament bundle got jammed and the extruder snapped it clean in half. The machine was still printing Mr Octopus in mid-air without any filament.

So I decided so take the opportunity to look at the already extruded Filament from in the PTFE delivery tube.
And also slice open one of my test cubes with a knife to take a closer look under a microscope - (the red ring is where we will be looking at in the next photos below)

At least I know my extruder has a powerful drive, even though this is only 1.75mm PLA I would not have imagined it would have just snapped.
I am very happy with the drive marks, the filament is not mangled as much as I would have expected.
I have not compared this to a filament driven with a hobbed bolt, but I imagine that looks more dramatic.


This is the close-up of my test cube, the red line indicates the box edge and at it's 1 0.25mm layer, 4 of them make 1mm.
 The infill is +/-45 degrees to the Box and at 1.75mm spacing so you get a nice criss-cross pattern.
It's also a 0.35 nozzle that extrudes 0.42mm filament in open-air.

That a nice picture if I do say so myself.
I would be grateful if any experts can comment if that is a good fusing of filaments or not? 
I was expecting them to be more squashed down so maybe my flow is not enough?
I think they must be stretched as they are thinner than extruding just into air.

Looking down the stack, and you can see the blue 'sharpie' ink at the end.

Cube side at the top, cube bottom on the left.

This is just a close-up of the cube outside edge, it feels very smooth to the touch, only a very slight ripple as you draw a finger nail over the surface.

This was the closest my microscope would go, this is a picture of the foreground filaments.

And the same shot with change of focus to the background vertical filaments.


I only got to this point with my Octopus and tomorrow I know exactly what I'm printing - 

A Filament spool holder ! - I'm off to select one from the many fine offerings on Thingiverse.

Until next time, thanks for reading and I hope you liked the close-up photos.

Rich.

Saturday, 14 May 2011

Extruder with Filament guide - now working.

After my little error on the Bowden extruder caused my filament to slip off the drive wheel  I have remade the idler with a guide and now it's working really well -

On the left is the original, the filament slips off.
On the right is a new design with washers to stop filament drift.

It will be really nice when I can print these sort of upgrades rather than getting out the file and drill.

Installed on my Extruder.


This worked well and allowed me to print a few calibration cubes to check everything was working.

20 x 20 x 10mm Test cubes with different infill density (1mm, 2mm and 3mm)

The Hot-end in my Bowden extruder has a 0.35mm hole and layers are set at 0.25mm
I'm using Reprap Java Host to generate the Gcode and send to 5D firmware

Size and shape is good, layer stack is smooth, some small bobbles on the corners.

Natural PLA does not look that nice in photographs but I'm really happy how smooth the first cubes turned out.

Time to print something other than cubes now...


Thanks for reading,

Rich.

Wednesday, 11 May 2011

A few microsteps forward... and then a jump, for Joy?

The ScrewBall-Strap Bowden extruder with 1.75mm PLA is working, but with one small problem, I'll explain below.

ScrewBall-Strap is Assembled and working* (almost).
I'll take a better set of photo's of the completed build, but notice the built-in Filament holder at the top. I just need to make some reel spools to hold all the PLA and ABS Filament now, it's designed to feed down and enter the back of the extruder's and come out via a Bowden cable to the many hot ends I hope to have fitted.


Path through the extruder - 1.75mm Natural PLA

PTFE Tube 4mm Outer and 2mm Inner.

The PTFE tube is push-fitted into the Pneumatic connector, this holds very tightly, no play at all but it still allows rotation of the tube (o-ring).

And at the hot-end the PTFE tube goes through a guide (not sure I really needed this) and then into the Pneumatic Push-fit connector.

The Bowden extruder configuration looks like this while the Z axis is in the lowered state (home).

And this is it with the Z Axis raised by about 130mm

So my very first print on ScrewBall-Strap could start. I'm still using the official 5D firmware and Java Host program for now until I get everything running well, I'm then going to look at alternative firmwares and take the plunge with Skeinforge.

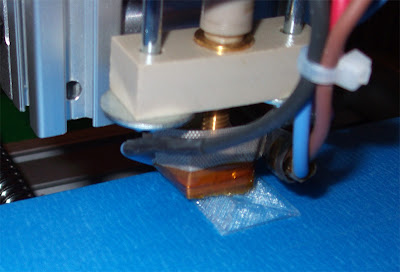
Not a bad start, the extruder is working well and it seems to be sticking down well, but could do with some more filament flow.

Then...

After the first layer the extruder made a mechanical sounding 'BANG' and the flow stopped but the print and the extruder motor all continued.

I could not see what was going on but the filament was not being drawn into the extruder so I wondered if I had the pressure set to high on the idler bearing and maybe the filament had snapped? I loosened the bolts but the filament was intact.

I tightened up the idler and started the print again, the same thing happened but this time I spotted that when the 'BANG' noise happened the idler block moved (jumped) towards the drive (by about 2mm).

I stopped the print and started to think about it.

What had happened was the filament has slipped off the drive wheel into a gap, these pictures should explain.

The drive wheel. (underside of extruder) 

The green section is where the idler bearing sits over the drive wheel.
The red lines show where the filament was ending up and causing the bearing to jump (BANG) into the drive wheel.
The bearing block is smaller than the drive wheel width. I'm not sure why I didn't see this when I was building it.
I know the a Hobbed filament drive would stop this from happening, but I specifically did not want to use one in this design as I want to be able to load different sizes of filament and just change over the Pneumatic connectors and PTFE cable, so a specific Hobbed bolt would need to be made for either 1.75mm or 3mm Filament.

I'm going to make a new idler block with some guide wheels to stop the filament jumping out.and see if that's the only problem before I can successfully print out something.

I now think ScrewBall-Strap is going to work, so that's a good reason to celebrate, hopefully in the next few days I can see how well it will perform. 

Rich.