Showing posts with label quality. Show all posts

Friday, 15 December 2017

Christmas Advent 3D Printing #Day 14 Advice for using and selecting generic no-brand filaments

December advent calendar - modular Christmas tree
3D Printing advice #Day 14

For the background and introduction - Day #1 Post click here

Last time - Days #12 & 13 were printed in a variety of Proto-Pasta filament, including matte fiber HTPLA, cinnamon, pine, and the almost religious experience of *glitterflake*

Christmas Advent 2017 Download on Thingiverse here - designed by Tom Van den Bon  With some help for each day by the South African Makers team.


It's Day #14 already, wow, this month is going so fast.

Day 14 gift is designed by Tom Van den Bon - It's a Lego block.


 Day 14 LEGO block - printed in generic-unknown 'no-brand' PLA.

The point of today is to talk about generic 'no-brand' 3D printing materials (filaments). Some are good, some are bad, some totally waste your time, your money and can even damage your printer.

It was the LEGO brick (LEGO's for USA) that made me think about generic materials. This is because in the early days of desktop 3D printing, many manufacturers stated 'it uses the same type of plastic found in LEGO bricks (ABS)'. But in reality the ABS used in LEGO is drastically different (and superior) to what's being used for most 3D printing filaments.

I also decided to print it in generic PLA, just to make the point that you can't really tell what plastic is being used, by looking.

I'll try to describe some of the things I have worked out about no-brand filaments over the years. Hopefully it may just help you, if you decide to buy from a supplier that offers no actual information or evidence, about where the filament is from or who has manufactured it.

General advice - 

One of the most important factors of any 3D printing material is a correct and consistent dimension of the filament. Look for a round (not oval) shape, consistent +/-0.1mm diameter and a smooth surface.

Note:- Some filaments do have a 'snake-skin' finish, that may be intentional or a sign that it may have been extruded at a very high temperature, fast. That does not necessarily indicate a negative, but it's worth being aware of.

Next, do try to find out what it's made of. Resin types, blend and any additives that may be used. Any good manufacturer will provide this information, most will point to a datasheet and have links to resin suppliers like Natureworks.

Get a sample, and if possible get a sample in 'natural' and also black material.

Most natural (not coloured) filament is usually the most straightforward to test and evaluate.

Black is a good test of quality. It has been known for some manufacturers to take old or incorrect batches of materials and mix them back into black plastic materials (to hide them). So if I really want to test out a filament supplier, I always ask for a black sample or buy a black roll of filament first.


I have had black filament 'shatter' and also have a blue or other colour tint in some rolls and not others from the same supplier.

Also if it smells bad when you print with it, decide if you really want to continue using it.

Look at the spool, you can tell a lot from a spool. For example, Dutch filaments make a lot of materials, and also private-label (white-label) many filaments for companies and manufacturers all around the world. Dutch filaments make some really fantastic materials, so when I see a no-brand / re-brand / white-label material being sold, I try to check the filament spool. I have discovered quite a few that have probably been made by Dutch filaments because of the spool. That alone makes me happy to buy them and try them out. I know it's going to be good quality.

Other manufacturers do this too, but they often also change spool type at the request of the end customer.

If you want to look at one of my blog posts here from way back in 2012, it shows one of the most odd and frustrating experiences I have ever had with filament.

You don't always get what you pay for, but you should at least make some effort to find out exactly what you are buying...

PLA advice - 

Like most plastic materials, many different grades and formulations exist. PLA is no different. and it's  worth knowing a little more about the grades. Just saying PLA, is almost as bad as saying 'ABS' (see ABS advice below).

PLA can be made from corn starch, or other starches, potato for example. Biome3D has a potato based PLA. 

Common older PLA types are often still used for manufacturing 3D printing filament - often 4032D, 4043D, 4044D, 4060D.

You may find that these are world specific, for example it's common for 4032D to be used in China.

Natureworks have now designed 3D850 and 3D870 formulations that are specifically made for 3D printing. You will see come manufacturers using these Resin's but they often have their own names for these rather than state 3D850 etc.

Lots more PLA types exist, PHA and PLLA are also from a similar family / process.

ABS advice - 

ABS, yea. That's a tricky one. ABS is one of those materials that can be mixed in so many different ways and have a lot of quality grades. I have had a few good experiences with 'generic' ABS, but mostly a lot of really bad ones.

As I have said before, I don't like using ABS, and some spools I have had in the past only strengthen that view. Some ABS materials can become very brittle over time, especially in sunlight. Some printed parts have almost crumbled when touched into fragments after 18 months in a window. They can tend to fade in sunlight, and become yellowed.

I have seen 1Kg spools of generic ABS for around £4.50 with free UK delivery. Raw ABS resin pellets can be around $3-4 per Kg so that's an amazing deal... if it's any good. Some are okay, many are not.

The only ABS I really buy now is Easy ABS from Prusa and various types of PCABS (Proto-Pasta / E3D and other quality suppliers).

Buyer beware! when selecting 'ABS'

Nylon advice -

I don't buy 'generic' Nylon it's usually not worth doing. It can be very hit and miss. Honestly stick to branded and well controlled materials from manufacturers like Taulman3D.

PET advice - 

PET, PETG and PETT can be amazingly strong and useful 3D printing materials. Often they can print well and give some unique optical properties. They can also warp like mad, take chunks out of your build plate and be hell to tune or have 'odd' print setting requirements.

I really like using ReForm rPET by Formfutura, and I have tried many, many other PET based materials over the years. Here I'm saying to experiment, but don't expect 'PET' to be the same, it's a good material to have as an option for use.

On a related note, we are starting to see many more polyester and co-polymer materials coming onto the market. Prices are lowering making it more accessible for everyone to use strong and reasonably easy to print PET type materials.

Day 14 'generic' LEGO brick in an emerald Polyalchemy Elixir Emerald City Green tree section.


I can cover other generic materials if this sort of advice is useful? if not, let me know.

I'll carry on with all the other great manufacturers, I use on a regular basis anyway.


Join me next time for Day #15 - (The Christmas party was very good indeed, time for bed.)

Thanks for reading.

Rich.

Please join me on Twitter @RichRap3D

My profile and posts over on Google+

Files and designs shared on YouMagine

Files and designs shared on GitHub

Files and designs shared on Repables 

My Youtube channel is here, all 3D Printing and Hi-Def video content.

Wednesday, 25 May 2016

Upgrades and printing with the BCN3D Sigma dual extruder 3D Printer

My update on using the BCN3D Sigma 3D Printer for the last 6 or so months.


Do check out the video for a more visual feast into the madness of my modifications :)


You can also watch it in HD over on my YouTube channel here (and please subscribe, thank you)

A few months back  Last year (2015), I posted about my first few weeks using the BCN3D Sigma 3D Printer, here is an update on some of the changes and how I have been getting along with the machine.

As I said in my previous video and blog post, the BCN3D Sigma is a really great 3D Printer. It has many of the key features people are looking for in a machine they need to produce 3D Models.

Because the Sigma is a fully built and tooled up machine, it's not really aimed at the low-end or to compete with the kit build market. That said, it's excellent value for money with the bonus of having dual independent print heads, it's a great 'production quality' desktop machine.

I have just now, in early 2016 spent my own hard earned cash on buying a Sigma, not something I do lightly. And I could not afford a brand new one, so it's actually second hand. I was very lucky someone in the UK wanted to sell it. (thank you so much for driving it to me, you know who you are, I am highly grateful and now use this machine every single day).


That's probably the best and most genuine endorsement I can give a machine. Spending my own money on a printer, now, when I already have a few is significant.


The Sigma is still the best built production machine I have used (so far) - finally on-par with my own custom 3D Printers I have built and still use over the many years of doing this.

I have done all the usual things with Sigma, printing fast and 'draft quality' to slow and fine layer models to examine the details that can be produced. I'm not so concerned with ultimate quality when 3D printing. I would much rather a fast and accurate, strong print using a fat nozzle.

All these dual colour pots were using 0.6mm nozzles and a fast print profile with 0.2mm layers.
The print time was under 5 hours for each one. The quality is not 'perfect' but more than good enough for kids to use and for 'practical' applications.


In fact I have a 5 hour rule, if I can't print it in under 5 hours, then I use a bigger nozzle, or lower quality or wait until the weekend (and then it may not happen). So for me, 3D printing is more about getting something that's accurate and strong, not ultimate quality.

Sigma can do quality, but with a change of nozzle size and pushing the speed, it also does fast too.

Dual printing is where this machine really stands out from the other 'dual extruder / dual nozzle' systems available. This is an area where I am most excited for FDM, Having useful models, and an ability to 'actually print almost anything' is a fundamental goal for desktop 3D Printing.

 Two ways to dual 3D print - Above bigger tool-change retractions and no purge tower.

 Or use a tower and avoid jamming up the hot-ends because of long retraction <<< Do this method!


Above is the Nervous System dual treefrog - a tricky one to dual 3D print. It was the second thing I printed on the new machine, right after the test calibration pattern (above). Both at 0.4mm nozzles, and a 0.2mm layer height, set to print fast (65mm/sec) - not ultra-fine quality, but a solid and fast 3D print in under 4 hours.


Like everything that's designed or configured for you, it's possible you will want to change or tweak things to make it easier for you to use every day. That's exactly what this update is about - my changes to the machine and what I have been printing for a few months.


Firstly I need total flexibility for spool sizes and all different types of coiled plastic. We don't quite yet have a universal spool size standard, or any sort of agreement on the ideal diameter of filament coils.


I found I could not fit 1Kg reels of filament inside the Sigma, they almost fit, and I even printed new spool adapters. But everything was just a little too tight fitting, and not easy to change out.


After some considerations, as this is a fully built machine that can't be taken apart. I opted for an external filament rack and to re-mount the bowden extruders outside of the machine. Sounds quite drastic, but it's a simple re-routing of the motors.

The upgrades were obviously 3D printed on the Sigma - and to keep everything as light as possible a painted wooden frame was built to take two spools at the back.

The other change was to provide more options for materials and nozzle sizes. The Sigma comes with 0.4mm brass nozzles fitted. If you want to print in filled materials or abrasive carbon fiber or glow-in-the-dark then you really need a hardened nozzle.


Sigma on the left and E3D V6 on the right


I was also finding that the second print head was starting to be used more for support materials, rather than a different colour. Dual colour prints are nice, but the second head is great for using as a different support material. And I found that a 0.6mm nozzle allowed me to print support materials faster and with more success.

I can now swap out nozzles for almost any size or type. I leave a 0.6mm on the left and a 0.4mm on the right. This way I can print fast or fine or with dual materials - very complex models.


On the prototype machine I added a simple strip of Kapton to catch stray 'noodles' still a good thing to do to any Sigma.


On the new Sigma, you can fit these 3D Printed stiffening supports, this helps the silicone strip wipe off any excess plastic, and reduces the chances of noodles being pulled out and onto your build platform.


I'm really happy with the Sigma, and I can't wait to hack it some more.

BCN3D Technologies tell me that they are about to fully release the entire machine and even all it's manufacturing secret's as a complete open-source package. (I'll link here when that's announced).

* EDIT - 26/05/2016 - BCN3D have released everything, check out the press release here

They seem very serious about the Open-Source route, and don't sound like they are holding anything back at all.

Thanks for reading - and watching (I do go into more detail about the changes in the video).

Until next time.

Rich.


Sunday, 25 October 2015

Recycling Plastic for 3D Printing - Why not the default?


In this post I will be looking at Re-filament Refil PET 
(Recycled plastic for 3D Printing)


In a subject I'm very keen to promote, this time we are looking at recycling of plastic into filaments for 3D Printing.


This won't be the only post on this subject. In recent months we have seen a  number of companies setting up to address the issue of making recycled plastic filament for 3D printing, I'll do my best to report on how they are doing and what the various finished materials are like to print with.

And if you are a new company looking at recycled 3D printing filaments, do get in contact with me.

Recycling is not as easy as it sounds, and many companies have tried before, but now further refinement and focus into this area for 3D printing should anyone to start using recycled filament for their 3D printer. And before you dismiss, they are not 'bad', so read on and think about giving it a try.

Anyone that has tried to manufacture their own 3D printing filament on a small scale, will understand how tricky it is to get consistent results, even when using new plastic pellets.


Last year I was very lucky to be given a desktop filament maker, in need of a lot of repair and attention, and as it turned out a total re-design including a new drive motor and power supply.

This Filament extruder was kindly was donated to me by 3DFilaprint, it was a great repair project to work on, and one thing it taught me is that making quality filament is a very, very tricky job.


I have produced batches of high quality ABS for a local makerspace, and some reasonable PLA. I even tried to recycle some Polypropylene and PET, with limited success.


Certainly the most easy method was using ColorFabb PET, PLA and WoodFill Pellets. Making my own custom coloured WoodFill filament was fun, and unique.


Doing it professionally - 

To take scrap plastic, sort into material type, clean it, process and extrude into accurately dimensioned feed-stock for a desktop 3D printers is not an easy task.

3DHubs recently ran a competition encouraging people to post failed 3D Prints, I sometimes have interesting fails on a 3D printer - usually when testing a new machine, experimental materials or settings.


I posted this image above of a failed print - the print failed due to a mechanical issue on the prototype machine being tested - it was not the fault of the filament or plastic extruder system used in the 3D printer.


I was rather delighted to win a roll of Refil Re-filament PET plastic. This contains up to 90% recycled plastic drinks bottles.

The team at Refil have been working on this problem for the last three years.


Now the thing with using recycled plastic for 3D printing is not so much about cost, but rather time and success rate.

Exactly the same requirements exist for new or recycled material that will be fed into a desktop 3D printer. No allowances can be made just because it's recycled.

If brand new or recycled filament causes print jams, inconsistent extrusion or poor quality prints, then it's not going to be a product any 3D printing operator will want to use or recommend.

I would not use 'bad' or inconsistent, poorly dimensioned filament even if it was free. The time and effort to produce 3D printed parts is not worth trying to use 'bad' materials with current 3D Printing extruder technologies.

Raw new plastic pellets are around ~$3 per Kg - the main reason why people pay 10x the cost or more for this to be produced into a dimensionally controlled filament coil is mostly about good quality.

Maybe if we ever have reliable pellet or recycled chip based extruders available for 3D printers, we can be a little more forgiving, but at this moment filament needs to be really good for people to use and get high quality finished results.

If plastic filament is made to the correct dimensions the 3D printing process should be reliable. There should be no reason why recycled plastic can't be as good as new.

Packaging -

As you would hope and expect, the packaging of Refilament is also recycled. The compressed cardboard spool works well, without any loose cardboard fibres to spoil or clog the delicate heated nozzles used in most desktop 3D printers.


The empty spool is also slightly lighter than an equivalent plastic spool, so you are paying less in transport too.


How much do you get -

750 grams of filament, whilst the total weight including packaging is around 900 grams.

What does it look like -


I had a complete roll of clear PET re-filament and a sample of the black ABS filament that is made from recycles car dashboards.

The overall look is something many people can be more flexible with, sometimes you just need the 3D print, so colour and shade, shiny or matt is something that can be allowed to deviate. Ideally it should be as consistent as possible.

The clear PET, is indeed very clear. In fact it's so clear and 'new' looking I was even slightly concerned that this was indeed new material and not recycled. I was expecting some bubbles and maybe even a few slight colour tints or a slightly opaque tone.

Plastic PET bottles and the (1 PET) recycling symbol

PET is not a specific description. PET (polyethylene terephthalate) Or 'Polyester' comes in many different types and formulations, PET-T, PET-G, PET-E and PET-P.

Dimensions and tolerance -

The most important aspect is a good tolerance and accuracy of dimensions. My roll was 1.75mm, and that's more demanding to keep in tolerance than the bigger 2.85mm filaments also used for 3D printing.

I measured around 50 points during the roll of filament usage, start, middle and end.

The filament feels consistent when you run it through your fingers, that's a good starting point.

The entire roll was 1.76mm - Virtually no deviation in size or roundness at all, nothing that would be of any concern for 3D printing.

The filament was round (you want to avoid oval shaped filament).

If you didn't know this was recycled PET, you would have no idea from looking at it, using it, or seeing the finished printed parts. It's some of the best tolerances on 3D Printing material I have used.

How does it print? -

I started at a normal PET temperature of 230 Degrees C and printed out a simple single walled vase for a test of optical clarity.


The classic Hobbleskirt 'Coke style' bottle. Designed by ShaAli - Model here


Printed life-sized - for a comparison - Left is Glass, middle is printed in PET and Right is White PLA


It was once a PET bottle, and now after recycling and 3D Printing it is yet again a PET bottle :)

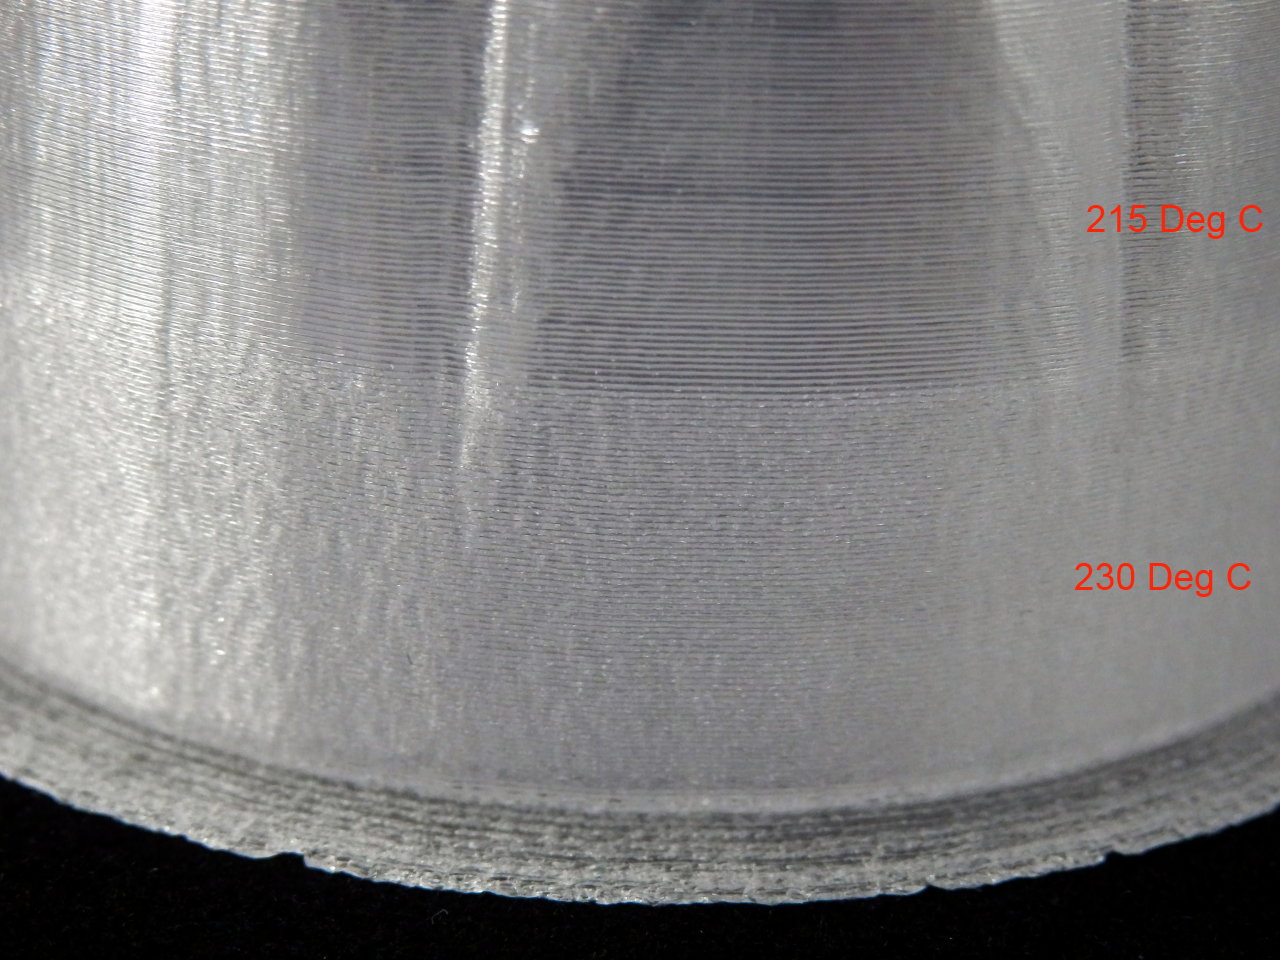
But that Print temperature of 230 was not good for this particular type of PET material -


If we look close at the bottom section of the bottle print, you can see where I adjusted the temperature. I spotted that we had bubbling in the filament - Lowering to 215 was a good temperature. I later found you can go down as low as 195 Degrees C.

As far as I can tell, the bubbling is not from moisture content. Lowering the print temperature fixed all 'frosting' issues with Refil.

You can't really ever get clear prints, even with clear PET, the 3D Print layering process causes a slightly translucent final print.


I really like PET of all types, I regularly use Taulman t-glase and ColorfabbXT. In the above image you can see the exact same print done with these different PET materials.

It's interesting to note that I print ColorFabb XT materials at 235 Degrees C - the one above is at 235.

Taulman t-glase is printed at 230 - Again interesting if you lower the t-glase temperature it tends to do the exact opposite of Refil and will fog with a lower temperature, t-glase has no problems at higher temperatures and you don't see the bubbling (frosting) seen on the Refil at 235 Deg C.

Whenever you get a new material (especially translucent types), it's important to test out and calibrate for the print temperature, at different print speeds and also remember to check fan cooling or when your printer automatically slows down towards the end of a print.

Refil was slightly more sensitive to temperature and also print speed. It's easier to see the difference in the image below -


Watch out for the effects of slow-down on a print, this can cause overheating in the material. It was really easy to check and tune Refil to a perfect 205 Degrees C - I printed everything else at that temperature without the need for any further adjustment.

The above and all prints in this article were printed at 55mm/Sec at 0.2mm layer height, using Slic3r.


When you get the correct print temperature for the speed you normally print, then print quality is exceptional. They have slightly different physical properties, but for print quality they are very similar, and light transmission (see below) is all excellent.

If you compare this to PET filaments based on new materials from other suppliers, the Refil material performs like 'new'.

Colorfabb XT Co-Polyester (manufactured with Amphora by Eastman chemical company)

Taulman T-glase is a PETT based formulation.

Printing things - 

As it was the build-up to Halloween, we naturally had to print a lot of pumpkins. And we wanted some to light up the path to the house - Refil PET came in very handy. (My kids love them).


These pumpkins designed by Jeremy Gillick (get them here) are quick to print as a single walled object and look great with some LED or torch lighting.


Day time setup - looking good, but...


Awesome at night.

We have around 25 different sized Refil PET pumpkins now in residence at our house, looking forward to Halloween :)


LED's and PET were made for each-other.

Not just pumpkins - 

You can print whatever you like with PET, although single walled prints do look fantastic especially with some LED lighting and they make your plastic filament go a very long way.


A totally fantastic bottle and screw cap 45 - model designed by David Mussaffi


Another great model design by David Mussaffi - The Geosphere Vase 25, This is a more tricky print, especially when small, cooling is essential, but the results are very good and you can feel the strength of PET with models like this.


I'll be printing even more with PET, it's starting to be the material of choice, even over PLA for some users. It will be interesting to see is the fact it's now finding a recycling route into 3D Printing will help further promote it's use.

I would personally like to see more filled PET materials. Maybe we will also start to see recycled PET colours and natural fibre filled mixes available soon.


You can see the Refil story in this video - Perpetual plastic.

I hope that was both interesting and encouraging you to think about trying out recycled plastic? If you do, please let me know how you get on.

Due to frequent requests I'm planning to do a lot more review's on 3D Printing plastic filament. If you have any specific makes or types you want me to talk about and print with, do let me know.

Thanks for reading and please do comment / get in contact. - Comments below, Catch me on Twitter @RichRap3D or over on G+ here

Rich.