This particular 3D printing adventure started last August (2011) after seeing a few news reports on 3D Chocolate printing, it had always been on my list of things to try, after reading the reports and looking at the rather over marketed video of a machine doing essentially nothing... I was really frustrated that the technology didn't seem that accessible or even that revolutionary considering they described it as the "worlds first Chocolate printer"
It looked like the University of Exeter had decided not to show any videos of the printer actually doing anything to do with the printing process. - See the PR page and video Here. It does make a reasonable point about the end user specifying the custom design for themselves, much as we already see with 3D printing.
So they were giving no clues to how fast they had it running, or how long they cooled between layers etc. Just what you can see in the pictures. I decided not to go down that route of molten chambers of chocolate being pumped to a nozzle, it seemed overly complicated and limiting of what foods you could print with. It could be fine for industrial scale custom manufacture or a more adventurous Chocolate shop, but not that great for people with 3D printers to experiment with - and that was my angle.
Various paste extruders existed for RepRap, Makerbot and Fab@Home and both peristaltic pumps and moineau pumps were being experimented for paste extrusions, I looked at some of these, but went a different route.
I was quite aware that paste printing and especially Real molten Chocolate was a very difficult material to print with and I also didn't want to have to use a Air compressor or other types of valves to achieve my food printing.
I decided on two development paths, both of which I'm still working on for different reasons you will see below.
1) - The Universal Paste Extruder
Chocolate was not the only Goal, I really wanted to be able to experiment with lots of pastes, foods and especially Ceramic materials.

A short introduction video is shown here and also on my YouTube page in HD here
It uses my Quick-Fit X carriage mounting, so can be swapped over in seconds, you can also fit it to a normal Greg/Prusa style X carriage and most other designs.


Slightly out of data photo, but here are all the printed parts.

It uses normal 10ml Syringes - Either Luer lock or centre depending on what nozzle size you want.

Centre slip type
Assembly -

A full assembly video is shown here and also on my YouTube page in HD here


The motor is a normal NEMA17 type and small drive gear.

The Large gear is secured by using a modified M4 PCB stand-off to lock to the M4 threaded bar.
You can also fix it with an M4 Wingnut.


A standard 16tooth T5 metal gear is used to drive the belt.


Trapped M3 nuts for the idler, 608 bearing.

Middle gear, fit this last.

The middle gear M4 shaft also clamps the end of the T5 belt in one of it's groves, it will be a tight fit.

The other end of the belt gets fed under the metal gear and is compressed by the idler bearing.

The Syringe is supported well around the flange, and is deliberately loose, you can fit a strip of card, plastic, PTFE or some other material if needed, the M4 bolt and pressure block can also be used if you want to clamp in the Syringe, but it does not really need it.

Insert a loaded syringe, fit the Cap with bearing and extrude until tight.

At this point you need to have a sensible figure in your firmware for the Estep value, you can calibrate steps per mm in the same way as you would with a plastic extruder, see here for help on that.
It's also possible to leave it the same value as your normal extruder and then just alter the packing density / extrusion multiplier in your slicer.
I'm using Slic3r V0.7 and using 570 for the Esteps (8x microsteps) or 1140 for 16x Microsteps.
Slic3r profiles for various materials are up on the thingiverse page
Below are my initial efforts over one weekend with as many materials I had on hand, the kids really enjoyed helping me with this experiment.
I'm hooked on Ceramic printing now, so I'll be doing a lot more of that along with more chocolate experiments. Some of the chocolate things didn't exist long enough for a photo.
Printing with Sugar paste (Icing sugar)
Printing with Sugar paste video is shown here and also on my YouTube page in HD here

I highly recommend using a centre syringe with a big nozzle for first testing and also using a sugar paste as the first material to experiment with. This nozzle is 2.4mm.
I'm printing on mirror-glass (Not heated) but you could warm it up to help things dry out (Apart from Ceramic, don't use any heat at all, any time printing with Ceramic before or after printing.
(See below for more on Ceramic printing)

This was my first print result, not bad, not good, too fast and the paste was a little runny, you are looking for about the consistency of cream cheese or Nutella (chocolate spread).

Second print , slower, need to adjust the fill and maybe use lift.

After a while I found really nice print settings for Slicer ( I put them up on thingiverse too)

I did quite a bit of Sugar printing, but as it's slow to dry most of them were wiped off and put back into the Syringe, so it's the ideal first paste material to experiment with in that respect.

If you use the other type of Syringe (Luer lock) you can fit removable needles of different sizes (Blunt or cut-down) to give very fine printing, this picture above is sugar paste with a 0.6mm needle (pink).
They have different gauges and colours as a guide - There are many more available than listed below -
Amber = Gauge 15 = 1.36mm internal nozzle
Pink = Gauge 20 = 0.61mm internal nozzle
Blue = Gauge 22 = 0.41mm internal nozzle
Red = Gauge 25 = 0.25mm internal nozzle
Yellow = Gauge 32 = 0.1mm internal nozzle
TopTip - It's a good idea to cut-down the length of the needles, even the blunt ended ones -
I used Pink and Blue and snipped the needle with cutters and then filed down and sanded the end until it was nice and round, see in the above photo how much I cut it down from the normal length, you could go even shorter and would need too for the really smaller sized needles.
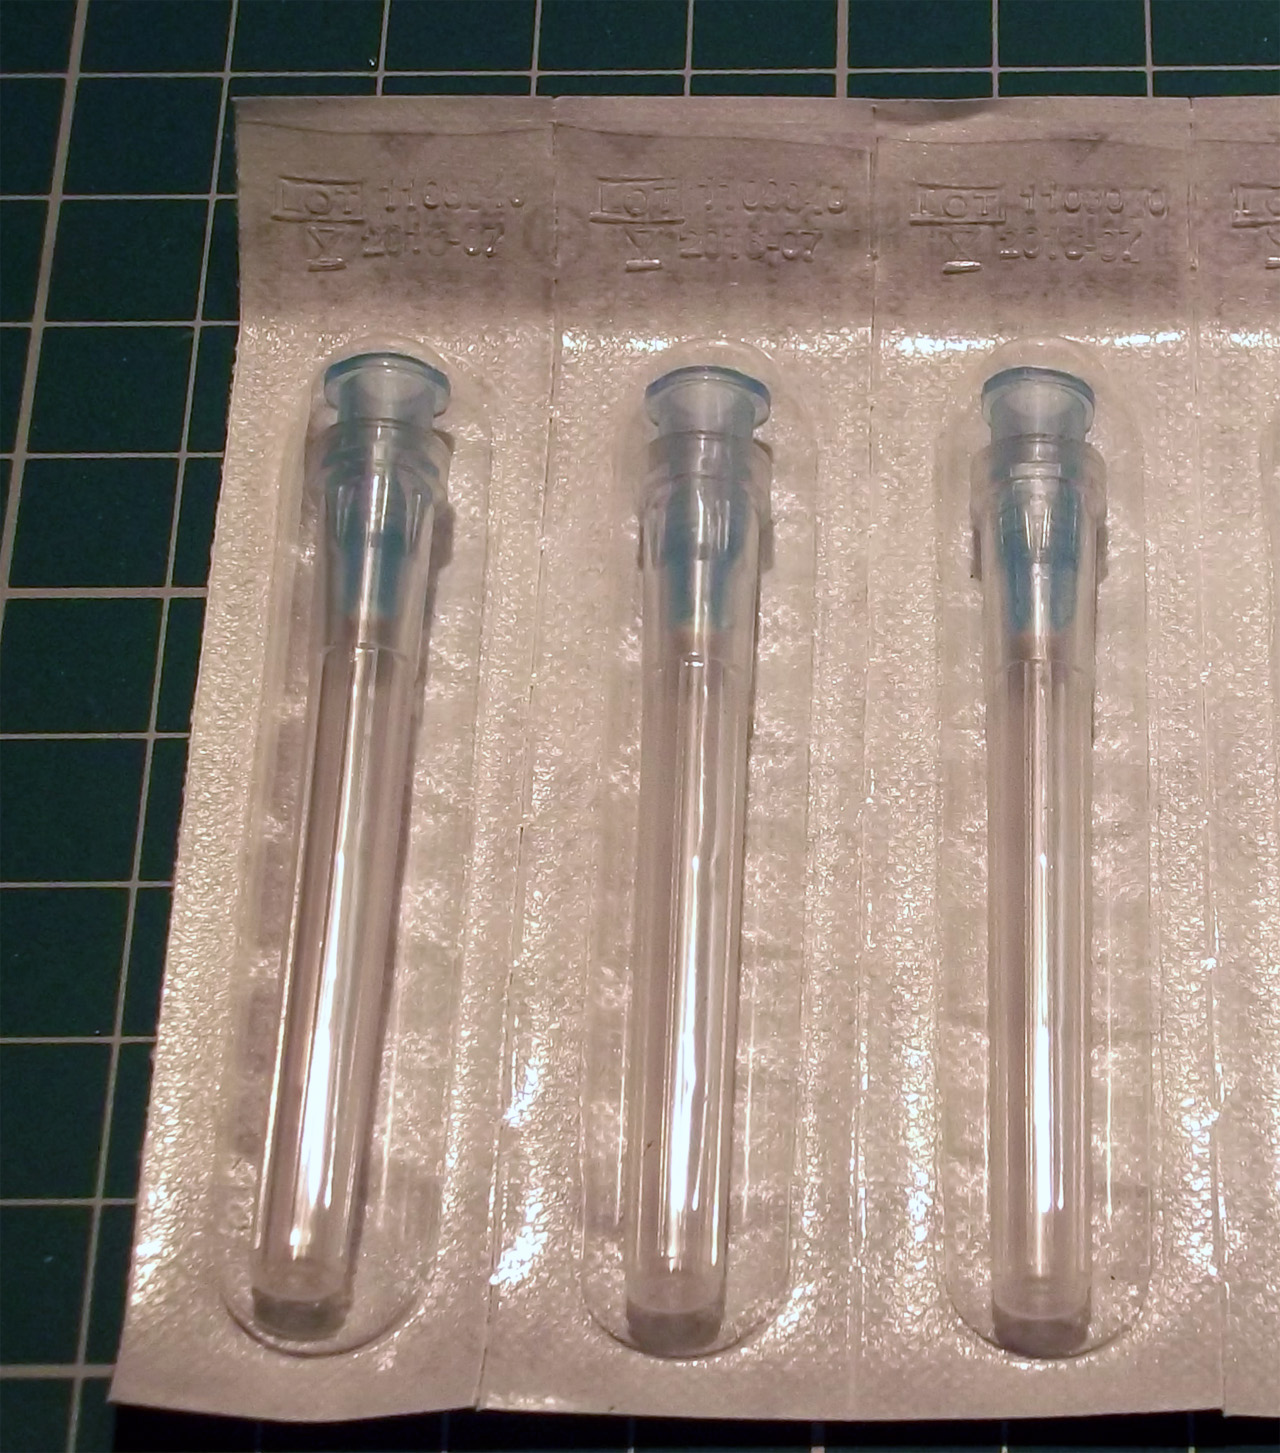
Normal length needles.
Printing with Chocolate and Muffin Mix video is shown here and also on my YouTube page in HD here
Chocolate is a tricky material, quality dark Chocolate is harder to print with than white Chocolate, I didn't try milk Chocolate yet.

65% Dark Chocolate

The easiest way to melt it is in a Microwave for 30 seconds, then stir it and let it melt, don't heat again unless it won't all melt after many minutes.

Mix it all really well and check the temperature, don't go over 35 degrees C.
Most dark chocolates stay very runny at around 33-35 degrees C
You want to be loading your syringes (Suck it up) at about 30-33 degrees C
White Chocolate is usually a thicker consistency at these temperatures, making it slightly easier to print with.
You can load white Chocolate at 31 - 36 degrees C

You should have plenty of printing time ~ 15+ minutes and you can always put the loaded syringe in a cup of warm water to keep it at a stable temperature.
I'm using Luer lock without needle as the hole is slightly smaller (2.1mm), a normal centre syringe is (2.4mm)

Dark chocolate outline, with a poured white chocolate inside.

White Chocolate - printed a little too cool in this picture.
Chocolate printing would benefit from a cold-bed to help freeze the layers quickly, so a future idea will be to use some Thermoelectric cooler (peltier) modules and Aluminium plate for the chocolate bed.
Printing with Masa Harina video is shown here and also on my YouTube page in HD here

Masa Harina flour is finely ground dried corn, used in lots of Mexican dishes.

Follow the instructions, mix with water, you are looking for a play-doh type consistency.


It's a perfect 3D printing material as the dough is not sticky and extrudes very well indeed.

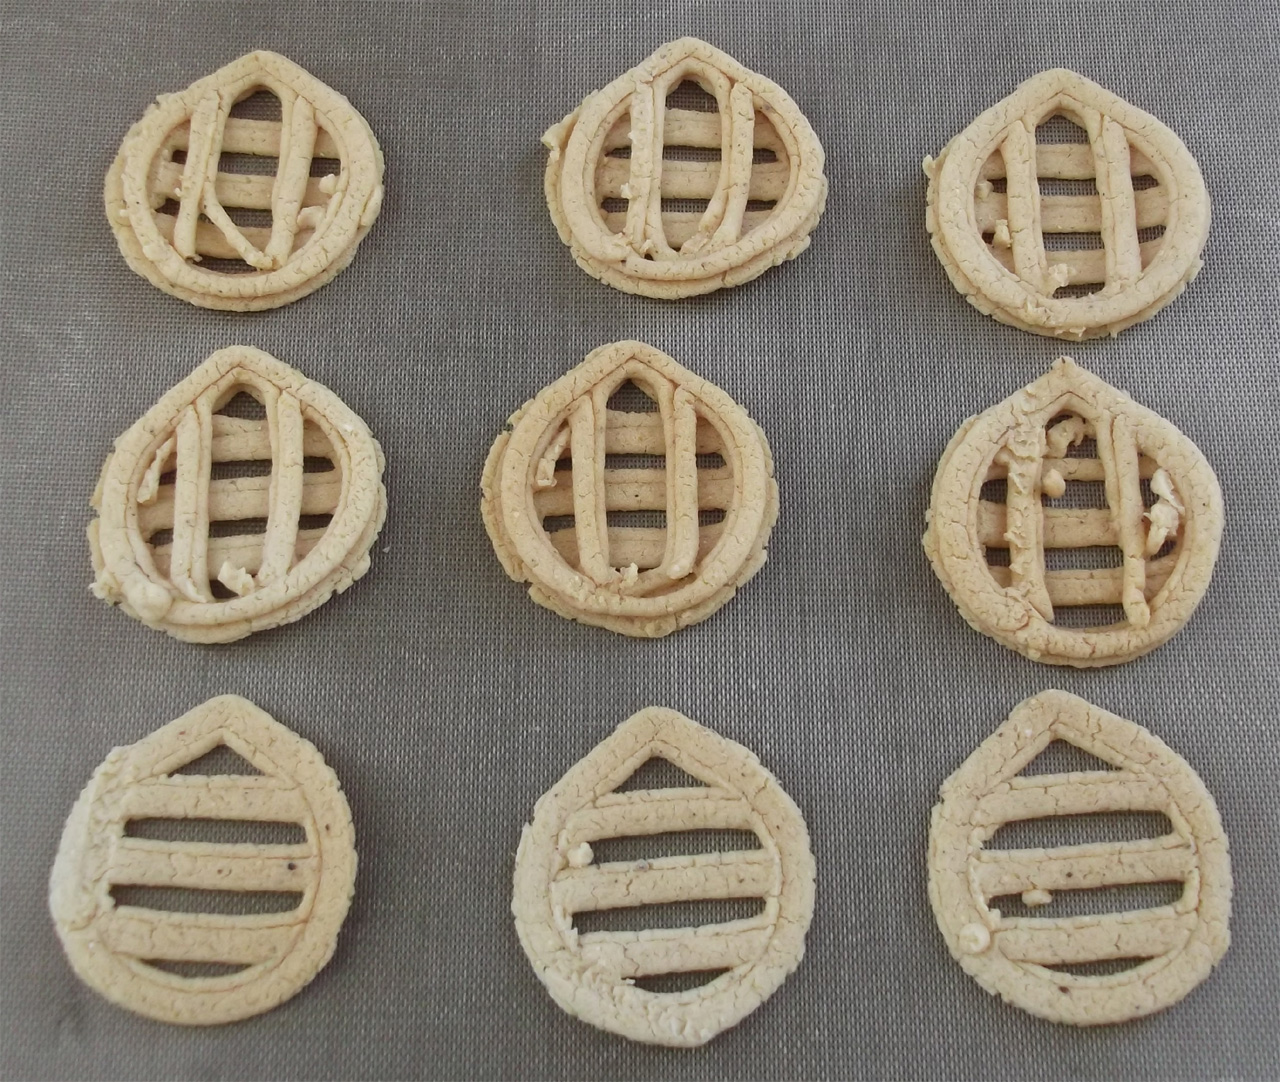
I decided to design the RepRap Crisp shown above to test this material.

I think a touch more water in the mix would have helped.
I'm printing on a Silicon baking sheet (so I can pop them straight in the oven).

They printed a little too fast, you need some time for the layers to stick before moving, but not bad.

A monster RepRap corn chip

Baked to perfection in about 18 mins
And yes, they tasted really good! You can hear me crunching them on the video.
Well I did say it was what I had around the house, this was a little bonkers, but good fun.

Muffin Mix, worked quite well.


Cooked top

Underside

Sponge cake mix (on the left) not recommended (too many bubbles and easy to burn)
I'm thinking Cookie dough would be the ultimate 3D printing Food material, I'll have to try that soon.
Printing with Ceramic porcelain clay, Arty and Crafty...
Printing with Porcelain clay video is shown here and also on my YouTube page in HD here
I'm using porcelain clay for this experiment, slightly watered down to form the consistency of toothpaste.
And I'm thinking that it needs to be slightly thicker next time around.
Clay sticks to most things, but unless you can remove it, your part will be stuck to your print table.
If you leave a printed ceramic object on the bed it will warp as it dries and usually break up.
Do NOT be tempted to use the heated bed to dry the clay, it will ruin the print.
The best way I found to print clay objects is on a piece of aluminium foil taped down, this can be removed and the part dries slowly.
If you use anything with an absorbing surface (like paper, card or baking paper) the part will warp.
I have tried both Blue and pink nozzles (0.6mm and 0.4mm) with a 0.2mm one to try next time.

The easiest way to load the clay is to push it down the syringe with a small spatula or spoon, if you keep on pushing it down any air gaps should be forced out.
Put the plunger in and the clay can sit in there for many hours just fine.

You get a 0.65mm bead out a pink nozzle.

This was the first print (on glass directly, just to get the flow correct)

I needed to tweak the Slic3r settings a little to get correct infill, I'm making them just slightly overstuffed as you get a little shrinking when the clay dries and this seems to help keep the objects together.

Single wall, it's quite amazing to see it build up, don't touch it, they are extremely fragile while wet.

This pot is quite tiny, only about 18mm across

Same pot, scaled up, builds well.


Close-up of the first layer - (frog)

Second layer - tiny frog print.

Check out the video, it gives a much better feel for the print than pictures alone.

Printing a small bunny.

Bonus points if you guess which version of the bunny this it?

Yes I stopped it just before the ears, the clay was too wet to attempt them.
I printed a few more bunnies, pots and frogs, they dry nicely on the aluminium foil, leave them in a cool place to dry out. I hope to get some first fired next week to see how they hold up at high temperature.
I had a few accidents where the pots flopped over as I was taking them off the bed, you need to be gentle in handling wet clay, after just a few hours they are quite firm.
I will be doing a lot more experimentation with clays, this was one of the most exciting tests for the universal paste extruder so far.
Just after I had my universal paste extruder running, a rather interesting Chocolate extruder also popped up on thingiverse, Created by ttsalo I have yet to try it as it needs warm air to keep the chocolate molten, but I'm going to try this out at some point. I can imagine a dedicated DIY Chocolate printer based around a design like this.
2) - The 'Heated' Universal Paste Extruder
My goals here were to be able to use other materials that required melting, a driving factor was as support structures for 3D printing that could be dissolved away (Like Sugar or Sealing Wax)
Chocolate was also on the list here.
The design is based around simple off-the-shelf plumbing parts and a PTFE nozzle, I used Nichrome wire for the element as I'm heating a round block of Brass and that seemed the easiest way.

This uses a standard 15mm to 10mm compression fitting and two sections of PTFE rod (16mm and 10mm)

The heating wire (30cm) is wrapped around the middle section.

Along with a Thermistor then wrapped in Kapton and covered in Fire Cement.

Nozzle is 0.8mm and the inside is stepped from 6mm down.
The intention for this design is to fit into the same universal paste extruder body as above, but I actually did this design before doing the paste extruder design above, so here below are a few ways (NOT) to design an extruder!
This was fun, but mechanically didn't work very well at all. (the hot/warm end worked fine).

It proved the point that a heated extruder can work with things other than plastic.
For my design I needed round cast Chocolate sticks, this makes it very easy to calibrate your extruder and volume for slicing models in much the same way you use 3mm or 1.75mm plastic feedstock.

I didn't find any easy sources of 8mm chocolate sticks so I cast some in PFTE tubes, the same size as I had used on the extruder.

Melt and pour into the tubes, tap down to remove air bubbles and set in freezer.

We have some Chocolate feedstock !
I decided to cast them in a two part tray next time, it was actually quite difficult to get them out of the PTFE tubes.

Chocolate stick loaded, the motor pulls the stick down into the 'warm-end'
I was attempting to keep the overall height down by using this arrangement, this eventually led me to try a direct drive design (see below) - that was a little bonkers looking back on it, but by this point I was getting much better at 3D modeling! so that was a plus point. And that led me onto the universal paste extruder design.
Failed design idea - direct drive


Chocolate melts at whatever temperature if feels like, but 'officially' it should be at around 34 degrees C.
For my first manual test I set the heater to 31 degrees and after warm-up fed in a stick by hand, then using the Nema14 motor.
It works! I experimented lowering the temperature, ideally I wanted a just melted, but not runny stream out the end of my nozzle.
The next problem was to check if the chocolate melts back up the stick, that would get messy and one of the reasons I had a fan on the extruder. I also had a backup plan to add a Thermoelectric cooler (peltier) if needed, I didn't need it.
Failed design idea - direct drive

Direct drive of cast chocolate sticks - don't do it this way!

Casting block in PLA

The casting worked, but it's too much hassle to do it this way - it was abandoned.
It would have been nice to have a direct drive heated chocolate extruder, you could have fed in stick after stick, but in reality it's just not going to work well.
These designs also allow you to pause the machine and load more 'food' reset the motor drive to the top and carry on extruding, or even mix ingredients (Sugar first, then Chocolate, then Sugar again?)
Future things still to experiment with -
Experiment #2 - Hot Sugar extrusion (sugar rods).
Sugar melts (actually it does not melt, it decomposes) at around 146-185 Degrees C
I'm not sure yet if dried soft sugar would work or if I would need to cast a more solid 8mm rod (more like sticks of rock)
One of my big questions is if PLA or ABS will stick to extruded sugar, for the use as a support material in 3D plastic printing.
Having Sugar as a Support structure for printing would be very great indeed, and it's super easy to dissolve away and non toxic. I'll let you know how I get on with that.
Experiment #3 - Wax (Sealing wax)

I also still want to see if you can print with sealing wax - for some time now you have been able to buy sealing wax as sticks for low-temperature glue-guns, I order a small pack and as they are also 8mm, they should fit perfectly into my heated adapter for the universal paste extruder.
Temperature is lower than sugar, but should work in the same way.
You could print some very interesting things for loss-wax casting or as moulds for things, but like the chocolate it's going to need cooling and a slower extrusion rate if you don't want to end up in a big waxy mess.
So what do you think? completely mad, or interesting?
I had a lot of fun doing this, if you want to experiment with paste, you can print yourself a set from the Thingiverse files I posted here -
The Slic3r configurations are also posted, use them as a starting point. And don't forget to change your Esteps in your firmware.
I have printed a few sets of these extruder parts in Faberdashery PLA and also built up some of these experimental extruder's, if you fancy buying one, I will have them up on the eMaker shop in the next few days, all proceeds of sales will go towards more RepRap experiments and some well deserved beer :)
If anyone is interested I can also put up just the set of printed plastic's Syringes and needles as a kit if you want to source the other parts yourself.
* - While I was uploading the video's to YouTube, one of the first comments was from films4you suggesting that it could also be used for solder paste, I have no idea why I didn't think of that! - Thanks, another one to try at some point soon I think.
Thanks for looking - Have a great Easter break or holiday and let me know what you think.
Rich.
Incredible job - ever since the University of Exeter video this has fascinated and simultaneously annoyed me that there isn't more public information out there on how to accomplish it.
ReplyDeleteIf you haven't seen it, today a commercial chocolate printer was announced to be released after easter: http://www.bbc.co.uk/news/technology-17623424
The question I leave with is: can you print cookie dough?
Thanks Tim, That's funny timing, I had not spotted that in the news today, thanks. It looks like they have also gone back to a Syringe based design. I wonder what took them so long to 'perfect it'
DeleteI'm sure it will print cookie dough :)
As always Rich amazing work.
ReplyDeleteVery interesting read and well documented.
Keep up the with the experiementing!
Thanks Bob, much appreciated. I wish I had more time to pop it up on the RepRap wiki, I'm still struggling with Wiki's.
DeleteTotally insane!!! Your precision is amazing and your designs are clean. Any success with firing the ceramics?
ReplyDeleteHow does the belt push the wax or chocolate sticks into the tube? I did not see any photos of the top of that device.
Great post!
YK
I'm going to get them first fired next week. I'll post if they explode or not!
DeleteFor the new hot-stick design the PTFE tube will have a 6.5mm slot down each side so the belt can just pull the stick straight down, maybe a little PLA cap for the belt to slide on, still working it out.
Excellent work Rich! Over the last few weeks I've been printing out various paste extruder designs, but have yet to get one working that I am happy with. I'll look forward to giving yours a try!
ReplyDeleteHi Gary, thanks, and let me know how you get on with it.
DeleteI was quite pleased with the level of control you can get from it. I expect you could speed up printing, but I have only gone slow for first testing.
Hi, this is really cool thank you for sharing :)
ReplyDeleteI wanted to sugest the use of Peltier Cells to COOL DOWN the heatbed when printing with this kind of materials.
When powered, these cells absorb heat from one side and dissipate it on the other side.
You can find them on Ebay for ~4€ each.
Again, great job :D
What about using the peatier to cool a heatsink, and then pulling air through it with a fan and directing the flow with tubes to right below the nozzle? Call it chilled air hardening.
Deleteanother option would be using dry ice creatively. The air off dry ice is supercooled, and instead of a hot plume like we get off the typical hot end, you'd have a downward flowing plume of cold air. You could use a box or tray of dry ice with some channels and ramps to direct the cold plume onto the printed wax or chocolate. You might not even need a fan. of course, such a rapid temp change might cause headaches with warping, but it might be a fun experiment.
lol, just read the post again and saw that you already had in mind using peltier cells, sorry for the comment xD
DeleteNice work! Not tempted to print a crumpet? ;)
ReplyDeleteIt's on my list!
Deletegreat post! So many pictures, which reallyu contribute to the information provided! Chocolate printers can really rock the world of sweet stuff lovers, as I am. Guess, the process of preparing chocolate will transform rapidly!
ReplyDeleteWhere do you get the syringes from?
ReplyDeleteJust eBay at the moment.
DeleteGreat work! I was messing around with the idea in my mind and came up with a rack and pinion design because it allows retraction, but yours is way easier to build and use. THX!
ReplyDeleteHi, I had the same thought process, along with screw drive, but the belt design seems to work well and give enough control with the high motor gearing.
DeleteWow Rich, awesome experimenting! Looks like we'll be fixing machines and appetites at future West of England RUG events :)
ReplyDeleteI look forward to seeing the pics of the ceramic pieces after firing.
As another area of artistic experimentation, particularly with the ceramic paste, it would be interesting to try some post extrusion carving/scraping/gouging of the material once it had slightly hardened - probably with a second head. Speaking of which, have you done any measurements of the positioning repeatability of extruders on your quick-change carriage setup?
Keep up the great work!
Hi Hamish, I really like the way the clay looks after being 3D printed, but it's very easy to smooth it out after a few hours of hardening, or even when it's dry. I do like the authenticity of the layered build process.
DeleteIt will be interesting to see how much shrink I get after firing if they stay intact.
I'm also thinking about that casing for you, send me a design and I'll try printing it.
The Quick-fit extruder seems ever as stable as bolting, I have not had a single issue with it. The only real issue is that all extruder's are hand-build, so the Z position is different on every one, we need an automatic Z height detection system now - I'm thinking about using the Brass nozzle to make an electrical connection to a small copper pad on the bed, you could lower (Slowly) until connection is made then step back up for the perfect nozzle height.
I'll give it some thought.
Thanks Rich, I'll send the next case design iteration after trialling it in PLA.
DeleteJust spotted: University of Exeter's commercial chocolate printer on Develop3D's blog: http://develop3d.com/blog/2012/04/chocolate-binge-to-continute-post-easter
All yours for £2500! No wonder they weren't giving away any operating tips.
BBC coverage here (dated same day as your blog entry):
http://www.bbc.co.uk/news/technology-17623424
Maybe it's about time the Beeb technology reporters tuned into the RepRap community.
Yes, the commercial chocolate printer looks like it's using RepRap based/style electronics and ReplicatorG for the software so what did they actually make? - a frame and a paste extruder as far as I can see.
DeleteI wonder it they are using any other open-source technology for this venture?
And for some reason the first one on ebay has already made £1850
http://www.ebay.co.uk/itm/World-First-Commercial-3D-Chocolate-Printer-Choc-Creator-Income-Sharing-/261001081167?pt=LH_DefaultDomain_3&hash=item3cc4e0714f#ht_766wt_1270
Cool, I got on Hackaday again - http://hackaday.com/2012/04/10/print-in-chocolate-sugar-and-clay-with-a-universal-paste-extruder/
ReplyDeleteThanks Jo :)
Very well documented...!!
ReplyDeleteI did some chocolate/paste printing as well with a own developed syringe extruder. The extruder is direct compatible with every 'bowden' driven extruder. See http://www.thingiverse.com/thing:14421 for pics and details.
Last December we printed chocolate letters [a dutch tradition] with Sinterklaas [another dutch tradition].
I really like the very complete documentation...!
cheers
joris
www.facebook.com/europerminutedesign
www.rooiejoris.nl
This is really an interesting blog as it focuses on the very important topic. i came to know about so many things or tips.printing services
ReplyDelete*cof*meat paste and transglutaminase*cof*
ReplyDeleteis there a complete list o parts somewhere? I wasn't able to find the list of fasteners and other metal parts just the list of printed parts.
ReplyDeletehi,
ReplyDeletehow to work with clay and wax that kind of printer? have to use the pontera heated?
Excuse the bad English.
att
Tiago
does anyone sell chocolate extruder??? Need it on my project... Thanks!
ReplyDeletePrinting is an art and 3 D printing requires some special kind of skill in a person who do such an interesting and artistic kind of job.
ReplyDeleteprinters sydney
This is really awesome!
ReplyDeleteBut I am not quite familiar with the mechanical part. So could you please tell me where I can buy these metal components such as bearing, bolt? And what is the proper dimensions or specific models of them?
Sorry for the fundamental question.
Thanks a lot~
Lister i plast
Have you always wondered how clay pots, vases and other ceramics are made? Are you curious as to what processes and tools are involved in the whole creation process? Let me start by introducing you to clay extruders.
ReplyDeleteExtrudering
Are the files for printed parts available for download, Rich?
ReplyDeleteI am very interested in paste extrusion but recovering from major bladder cancer surgery and two lots of aneasthesia my brain is not yet capable of much and just putting my printer to work on this to get the parts ready could work while, I hope!) I get myself mentally straightend out.
Pete
Please disregard my last, post, Rich.
ReplyDeleteI have found the files. Just not thinking straight.
Compliments on all the very fine work you have done on this project. Quite remarkable!
Hi Rich - really interested in a working model of UPE for an art project - do you ever make them for sale?
ReplyDeleteHi Rich.. I am interested with your working model. Do you you make them for sale? Because I need your model for my final project. Thank you
ReplyDeleteHi Rich,
ReplyDeleteI'm currently working on a project to build a 3D food printer and at the moment I'm testing paste extrusion with a screw thread plunger type design with syringes. However, I'm having problems with ooze out of the syringe nozzle after the motor stops driving the screw thread. I saw that on your design there doesn't seem to be any ooze during operation. How did you manage to prevent it?
Thanks,
Francis
Hey Rich,
ReplyDeletewhere can I find the design/templates to download your paste extruder?
Also, how can I mount/wire/software control it on a 3 ways extruder Mendel? And how can I use it to print something with a second extruder with PLA?
Anyway, any help woul dbe great, the basic/step by step th ebetter, I am not an expert user.
thanks!!!
Marco
I wonder if it is possible to combine pla (or abs) and wax. Does the wax stick to the pla (or abs)? I would use wax to connect supporting structures to the object to be build. That way it would be much easier to remove the supporting structures when the object is printed.
ReplyDeleteBTW: Are there repraps with 2 printing heads?